Page 1
- 1 -
Inhaltsangabe
1. EINLEITUNG ............ FEHLER! TEXTMARKE NICHT DEFINIERT.
1.1. SICHERHEITSHINWEISE ..... FEHLER ! TEXTMARKE NICHT
DEFINIERT . 1.2. HAFTUNGSAUSSCHUSS ..... FEHLER ! TEXTMARKE NICHT DEFINIERT . 1.3. BESCHREIBUNG DER PRODUKTMERKMALE .....................4 1.4. GEWÄHRLEISTUNGSBEDINGUNGEN .................... FEHLER ! TEXTMARKE NICHT DEFINIERT .
2. INBETRIEBNAHME FEHLER! TEXTMARKE NICHT DEFINIERT.
2.1. LIEFERUMFANG ................ FEHLER ! TEXTMARKE NICHT
DEFINIERT . 2.2. VORAUSSETZUNGEN ZUR VERWENDUNG DES PRODUKTS6 2.3.INBETRIEBNAHME DER FESTPLATTE ................... FEHLER ! TEXTMARKE NICHT DEFINIERT .
3. NUTZEN DES PRODUKTES FEHLER! TEXTMARKE NICHT DEFINIERT.
3.1. ANSCHLIEßEN UND VERWENDEN DES PRODUKTES
FEHLER ! TEXTMARKE NICHT DEFINIERT . 3.2. SICHERES ENTFERNEN DES PRODUKTES ............. FEHLER ! TEXTMARKE NICHT DEFINIERT .
4. WARTUNGSHINWEISE .............................................22
4.1. WARTUNG DES PRODUKTES ......... FEHLER ! TEXTMARKE
NICHT DEFINIERT .
5. SONSTIGES ............... FEHLER! TEXTMARKE NICHT
Page 2
- 2 -
DEFINIERT.
5.1. Häufig gestellte Fragen ................................................23
6. SONSTIGE HINWEISE ...............................................24
1. Einleitung 1.1. Sicherheitshinweise
Vielen Dank, dass Sie sich für dieses Gehäuse der Marke Poppstar
entschieden haben. Bitte lesen Sie diese Bedienungsanleitung
sorgfältig durch, um Fehler bei der Bedienung zu vermeiden. Diese
Bedienungsanleitung ist das beste Nachschlagewerk wenn Fragen
während der Nutzung aufkommen.
Die Entwicklung und die Produktion des Gerätes wurden mehrfach
durchdacht um den sicheren und praktischen Umgang mit dem Gerät
zu gewährleisten. Um Beschädigungen und Ausfälle zu vermeiden,
verwenden Sie das Gerät bitte nur so, wie in dieser Anleitung
beschrieben. Ihre Rechte und Interessen als Verbraucher können nur
dann garantiert werden, wenn Sie die in dieser Anleitung folgenden
Hinweise sorgfältig befolgen. Bitte beachten Sie zudem, dass sich in
diesem Gerät empfindliche Halbleiterelektronik verbaut ist, die
keinesfalls vom Anwender repariert werden sollte. Wenden Sie sich
im Falle einer Funktionsstörung bitte an Ihren Händler.
Page 3
- 3 -
Dieses Produkt wird mit Schwachstrom betrieben und erhielt das
amerikanische FCC-Zertifikat und das europäische CE-Zertifikat.
1 Beachten Sie bitte in jedem Falle die auf dem Aufkleber des
Netzteiles befindlichen Spezifikationen.
2 Bitte setzen Sie dieses Produkt keinen hohen Temperaturen
und/oder Feuchtigkeit aus, um Feuer und elektrische Schläge zu
vermeiden.
3 Der Datentransfer wird von elektromagnetischen Feldern
beeinflusst.
4 Bitte legen Sie nichts auf dem Gehäuse ab und vermeiden Sie
Bewegungen und Stöße während des Betriebes.
5 Bitte stecken Sie keine gerätfremden Objekte ins Innere des
Gehäuses, um einen fehlerfreien Betrieb oder gar Schäden bzw.
Brände zu vermeiden.
6 Sollte die Datenverbindung aufgrund elektrostatischer Aufladung
oder eines starken elektromagnetischen Feldes unerwartet
stoppen oder ganz zusammenbrechen, starten Sie die
Anwendung erneut und schließen Sie dass USB-Kabel des
Gerätes erneut an.
7 Bitte benutzen Sie dieses Produkt nicht während schlechter
Witterungsverhältnisse mit eingehender instabiler
Stromversorgung wie z.B. Gewitter oder Gewitterstürme.
8 Bitte trennen Sie das Gerät unverzüglich vom Netz und vom
Computer, wenn Flüssigkeit in das Gerät laufen sollte.
9 Bitte vermeiden Sie eine Unterbrechung eines aktiven
Kopiervorgangs. Dies kann zu Beschädigungen der Dateien und
Festplatte führen.
1.2. Haftungsausschluss
Beschädigungen durch Umweltkatastrophen wie Gewittern, Erdbeben
Page 4
- 4 -
oder ähnlichen Ereignissen höherer Gewalt, sowie Schäden aus
inkorrekter Handhabung, Diebstahl und Feuer, werden von unserem
Unternehmen nicht übernommen.
Datenverluste, die direkt oder indirekt durch Nutzung dieses Gerätes
auftreten, sowie Datenverluste durch unsachgemäße Nutzung dieses
Gerätes, werden nicht von unserem Unternehmen übernommen.
Jede Art von Schäden die aus der Kombination von gerätfremden
Bestandteilen oder Fremdsoftware resultieren, wird nicht von
unserem Unternehmen übernommen.
1.3. Beschreibung der Produktmerkmale:
Dieses externe Speicherprodukt ist eine neue Art von portablen
Multimediaspeichermedien mit einem einfachen und robusten Design
welches dazu genutzt werden kann, alle Arten von Dateien zu sichern.
Dieses Gerät hat mehrere, verschiedene Anschlüsse und kann wie
eine interne Festplatte genutzt werden. Dieses Gerät bietet Schutz vor
Feuchtigkeit und Erschütterungen. Es ist vollständig kompatibel mit
einer Vielzahl von Betriebssystemen und bietet viele Funktionen. Es
ist die ideale Speicherlösung für einzelne Nutzer, Unternehmer und
Netzwerkdienste.
1.3.1. Integrierter USB 3.0 Hochgeschwindigkeit Anschluss
Dieses Produkt ist ein Speichergerät welches über eine USB 3.0
Anschluss verfügt, welche auch mit USB 2.0 und USB 1.1
kompatibel ist. Die höchst Geschwindigkeit von diesem Gerät kann 5
GB/s betragen und es werden keine Treiber für Windows
Page 5
- 5 -
2000/Windows XP/Windows Vista und Windows 7 benötigt. Dadurch
ist dies die hervorragende Lösung, für den privaten oder
geschäftlichen Einsatz.
1.3.2. Netzschalter
Der Netzschalter wurde so konzipiert dass man nicht fest drücken
muss und die Elektronik ein plötzliches Ausschalten verhindert, um
einen Datenverlust durch verzögertes Ausschalten zu vermeiden.
Während sich das Produkt im Stand-By-Modus befindet, wird der
Stromsparmodus automatisch aktiviert um die Festplatte zu schützen.
1.4. Gewährleistungsbedingungen
Die Seriennummer auf dem Gerät, sowie auf der Produktverpackung
stellen eines der wichtigsten Garantiemerkmale dar. Im Falle eines
Servicefalles ist diese Nummer auf jedem Fall anzugeben. Ist die
Seriennummer ganz oder teilweise beschädigt, und/oder unlesbar,
erlischt jeglicher Gewährleistungsanspruch.
2. Inbetriebnahme
2.1. Lieferumfang
Bitte überprüfen Sie die Vollständigkeit des Lieferumfangs und
kontaktieren sie Ihren Händler im Falle einer Abweichung.
Nr. Menge
Page 6
- 6 -
1. Gerät 1
2. USB3.0-Kabel 1
3. Netzteil 1
4. Schrauben 4
5. Anleitung 1
2.2. Voraussetzungen zur Verwendung des Produktes
Hardware:
� PC oder Notebooks
Software
� Windows 2000 / Windows XP / Windows Vista/Windows 7
2.3. Partitionierung und Formatierung der Festplatte
Hinweis:
� Das Produkt kann vom PC nicht erkannt werden da Festplatte und
Treiber NEU sind. Bitte Partitionieren und Formatieren Sie Ihre
Festplatte bevor Sie diese benutzen.
� Eine erneute Formatierung muss bei manchen alten Festplatten
durchgeführt werden damit das Gerät ordnungsgemäß funktioniert.
� Jede Partitionierung und Formatierung führt zur Löschung der
Daten auf der Festplatte.
� Um die Stabilität während der Partitionierung und Formatierung zu
sichern empfehlen wir Windows 2000/Windows XP/ Windows
Page 7
- 7 -
Vista/Windows 7.
Partitionierung und Formatierung unter Windows 2000 / XP/
VISTA
Um sicherzustellen dass das Produkt ordnungsgemäß funktioniert
muss vor der ersten Benutzung das Produkt partitioniert und
formatiert werden. Führen Sie dies bitte wie in der nachfolgenden
Illustration beschrieben durch. Sollten Sie hier Schwierigkeiten haben,
melden Sie sich bitte bei Ihrem Händler.
Formatierung unter Windows XP
A Starten Sie Ihr Windows XP und stellen Sie sicher Sie dass Ihr
System stabil läuft.
B Verbinden Sie das Produkt mit Ihrem PC.
� Stecken Sie das Netzteil bitte in den AC-IN-Anschluss des
Produktes und schalten es ein.
� Bitte verbinden Sie das Produkt über USB mit Ihrem PC.
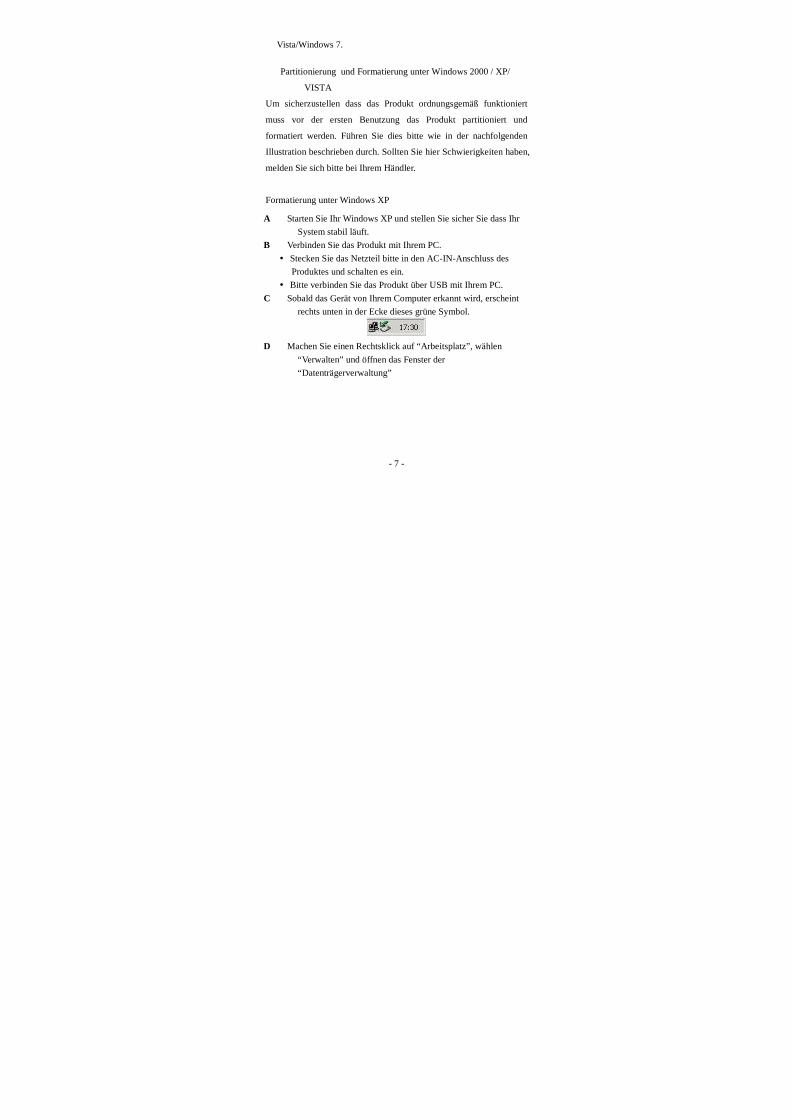
C Sobald das Gerät von Ihrem Computer erkannt wird, erscheint
rechts unten in der Ecke dieses grüne Symbol.
D Machen Sie einen Rechtsklick auf “Arbeitsplatz”, wählen
“Verwalten” und öffnen das Fenster der
“Datenträgerverwaltung”
Page 8
- 8 -
E Bitte gehen Sie in die “Datenträgerverwaltung” .Diese befindet
sich unter dem Pfad “Datenspeicher Handelt es sich bei
Ihnen um eine unformatierte Festplatte, werden Sie nicht
zugewiesenen Speicherplatz auf diesen Datenträger finden.
F Rechtsklicken Sie auf die Fläche “Nicht zugewiesen” der
Festplatte und erstellen eine Partition.
G Die Hilfe erscheint. Klicken Sie auf “Weiter” um fortzufahren
Page 9
- 9 -
H Wählen Sie die Option “Primäre Partition” und klicken Sie auf
weiter.
I Bitte geben Sie die von Ihnen gewünschte Größe der Partition
ein und klicken auf „Weiter“ um fortzufahren. Wenn Sie nur
eine Partition auf dieser Festplatte erstellen wollen klicken
Sie einfach auf „Weiter“.”
Page 10
- 10 -
J Formatierung in der Partition
� Bitte formatieren Sie die Festplatte im NTFS-Dateisystem.
Aktivieren Sie auch die „Schnellformatierung“.
� Mit „Weiter“ gelangen Sie zum nächsten Schritt.
K Wählen Sie „Abschließen“ um die Formatierung zu beginnen.
� Für nur eine Partition ist die Formatierung nun abgeschlossen,
das Produkt kann nun genutzt werden.
� Falls Sie mehr als eine Partition wollen, folgen Sie den
weiteren Anweisungen um weitere Partitionen zu erstellen.
Page 11
- 11 -
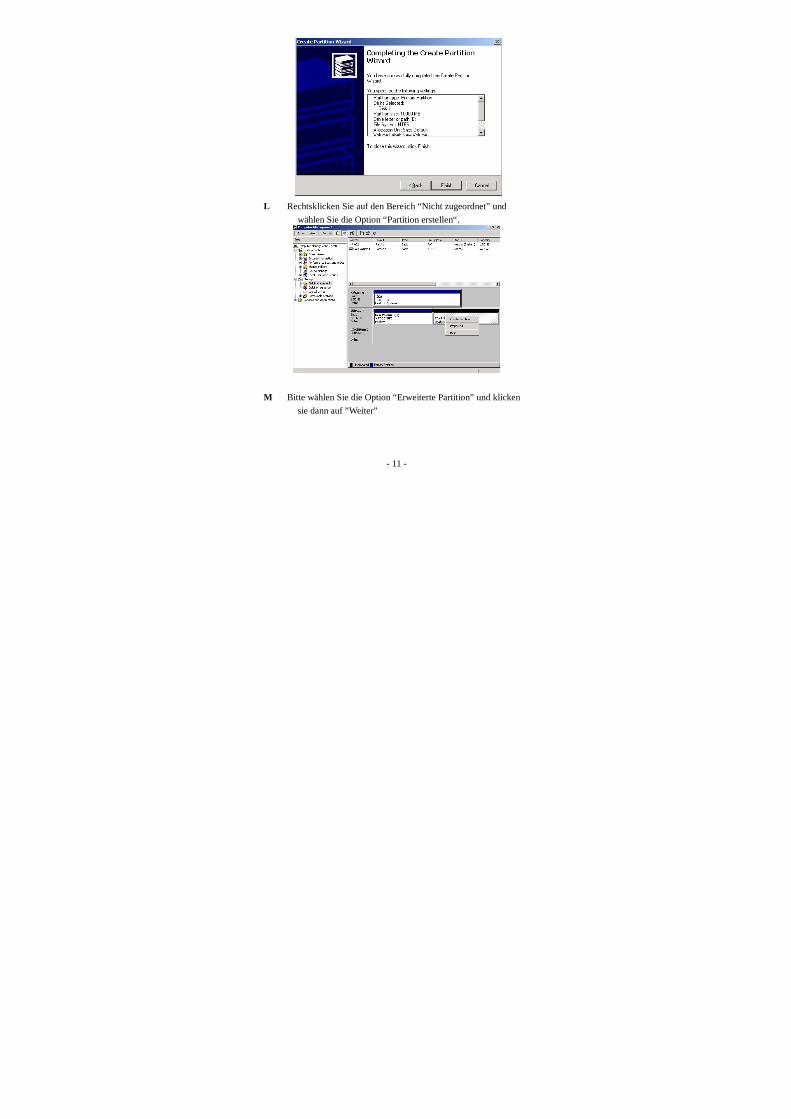
L Rechtsklicken Sie auf den Bereich “Nicht zugeordnet” und
wählen Sie die Option “Partition erstellen“.
M Bitte wählen Sie die Option “Erweiterte Partition” und klicken
sie dann auf ”Weiter”
Page 12
- 12 -
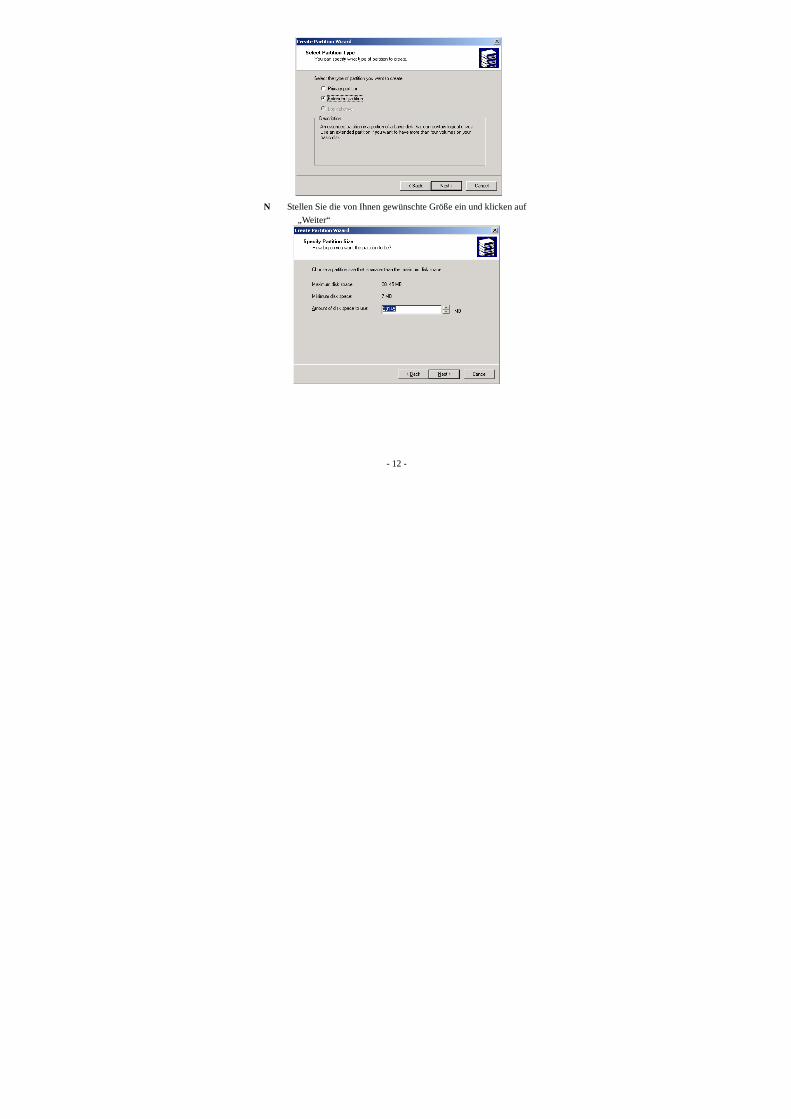
N Stellen Sie die von Ihnen gewünschte Größe ein und klicken auf
„Weiter“
Page 13
- 13 -
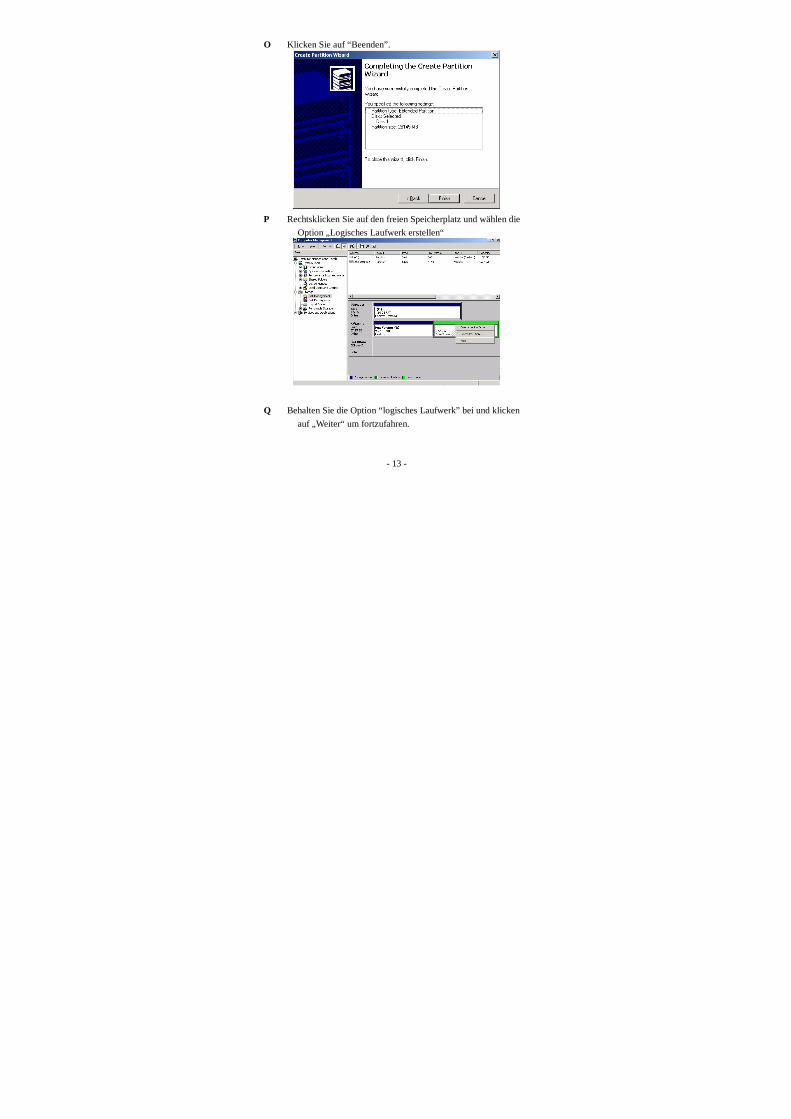
O Klicken Sie auf “Beenden”.
P Rechtsklicken Sie auf den freien Speicherplatz und wählen die
Option „Logisches Laufwerk erstellen“
Q Behalten Sie die Option “logisches Laufwerk” bei und klicken
auf „Weiter“ um fortzufahren.
Page 14
- 14 -
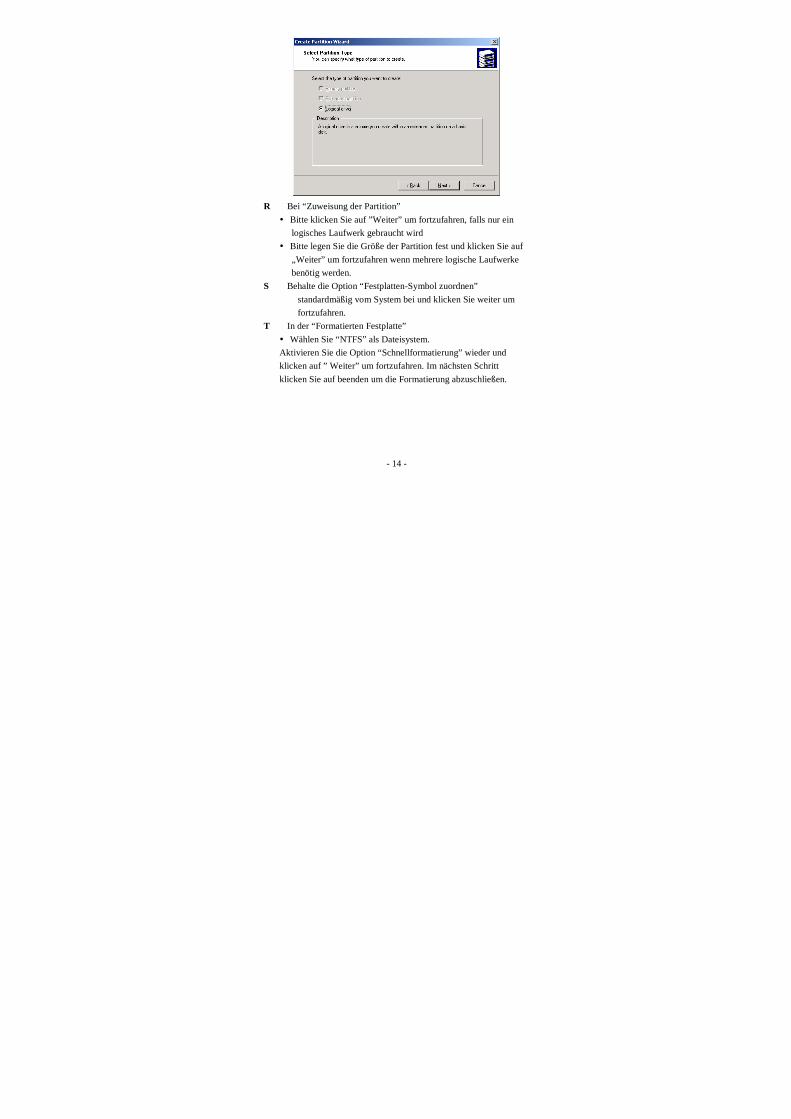
R Bei “Zuweisung der Partition”
� Bitte klicken Sie auf ”Weiter” um fortzufahren, falls nur ein
logisches Laufwerk gebraucht wird
� Bitte legen Sie die Größe der Partition fest und klicken Sie auf
„Weiter” um fortzufahren wenn mehrere logische Laufwerke
benötig werden.
S Behalte die Option “Festplatten-Symbol zuordnen”
standardmäßig vom System bei und klicken Sie weiter um
fortzufahren.
T In der “Formatierten Festplatte”
� Wählen Sie “NTFS” als Dateisystem.
Aktivieren Sie die Option “Schnellformatierung” wieder und
klicken auf ” Weiter” um fortzufahren. Im nächsten Schritt
klicken Sie auf beenden um die Formatierung abzuschließen.
Page 15
- 15 -
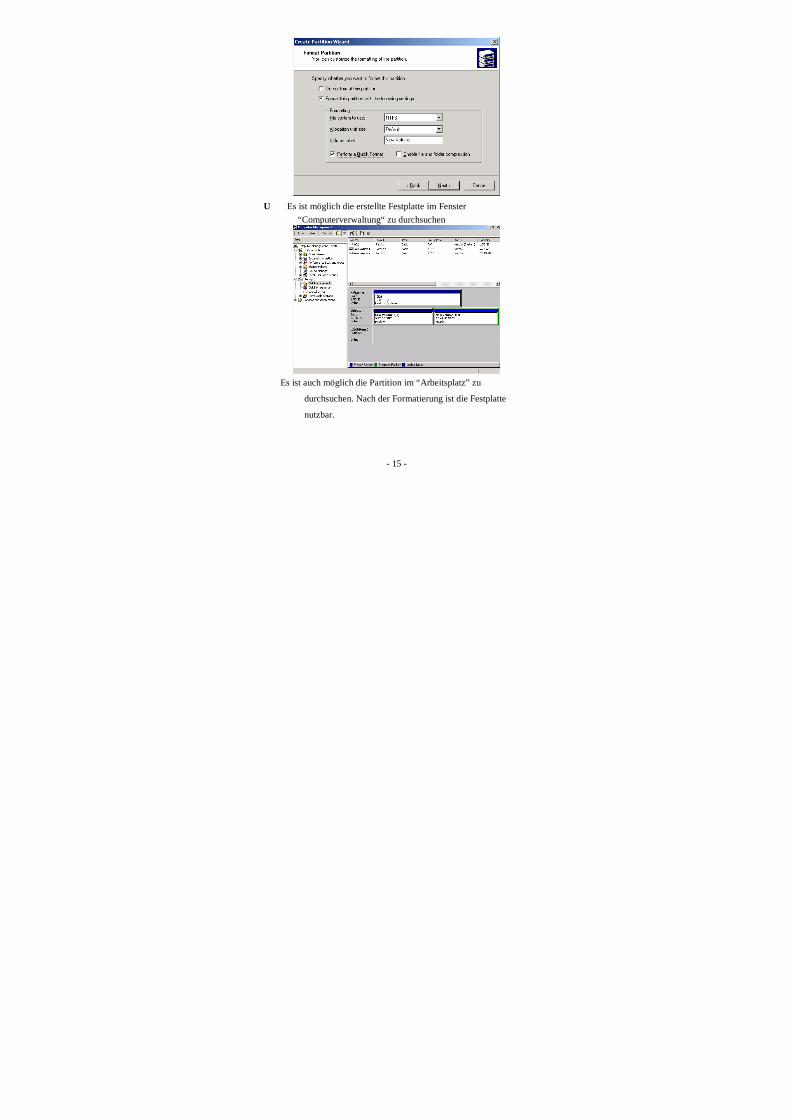
U Es ist möglich die erstellte Festplatte im Fenster
“Computerverwaltung“ zu durchsuchen
Es ist auch möglich die Partition im “Arbeitsplatz” zu
durchsuchen. Nach der Formatierung ist die Festplatte
nutzbar.
Page 16
- 16 -
2.4. Bei Windows 7:
1. Öffnen Sie das Startmenü
2. Rechtsklick auf „Computer“
3.Linksklicken Sie auf „Verwalten“. Bestätigen Sie die Nachfrage
zwecks Administratorrechten.
4. Klicken Sie auf Datenträgerverwaltung. Der unten gezeigte
Dialog erscheint. Bestätigen Sie die unten gezeigten
Einstellung mit „Ok“.
Rechtsklicken Sie auf den Nicht zugeordneten Speicher. Wählen
Sie „Neues einfaches Volume“.
Page 17
- 17 -
Linksklicken Sie auf „Ok“.
Legen Sie die gewünschte Größe der Partition fest. Bestätigen Sie
mit „Ok“.
Page 18
- 18 -
Weisen Sie der Partition einen Laufwerksbuchstaben zu.
Bestätigen Sie dies mit „Weiter“.
Formatieren Sie die Partition mit dem Dateisystem „NTFS“ und
aktivieren die Schnellformatierung. Bestätigen Sie mit
„Weiter“.
Page 19
- 19 -
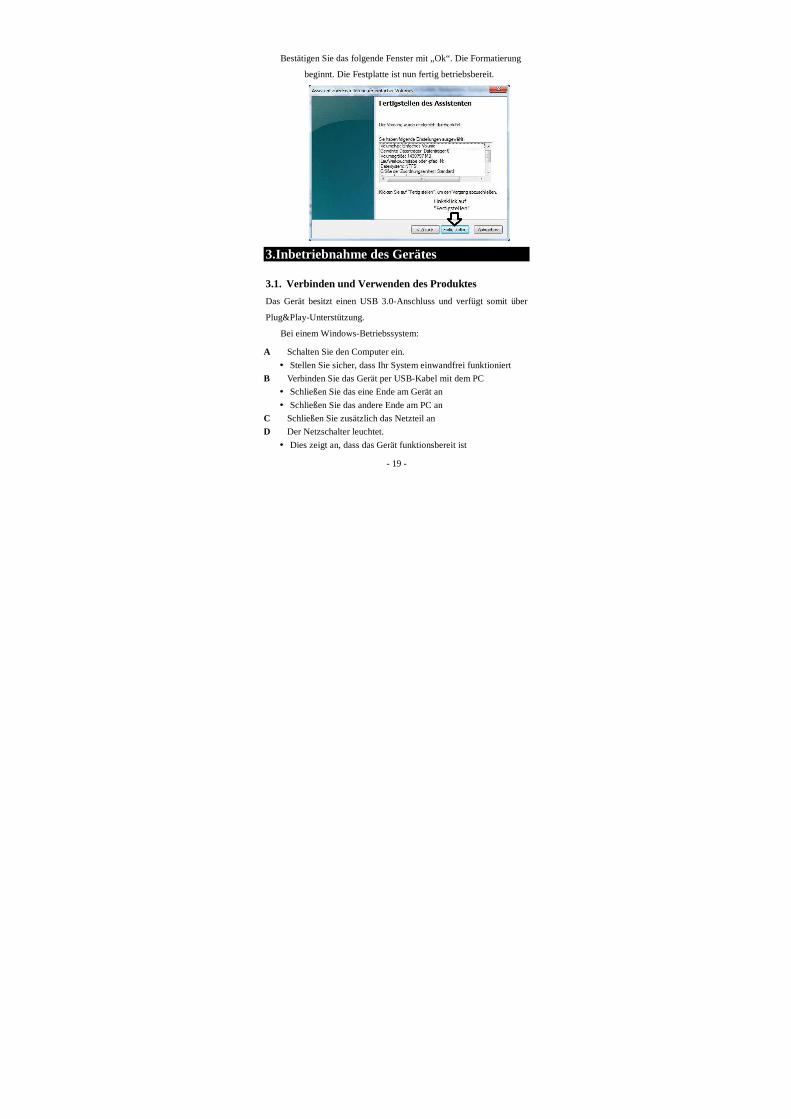
Bestätigen Sie das folgende Fenster mit „Ok“. Die Formatierung
beginnt. Die Festplatte ist nun fertig betriebsbereit.
3.Inbetriebnahme des Gerätes
3.1. Verbinden und Verwenden des Produktes
Das Gerät besitzt einen USB 3.0-Anschluss und verfügt somit über
Plug&Play-Unterstützung.
Bei einem Windows-Betriebssystem:
A Schalten Sie den Computer ein.
� Stellen Sie sicher, dass Ihr System einwandfrei funktioniert
B Verbinden Sie das Gerät per USB-Kabel mit dem PC
� Schließen Sie das eine Ende am Gerät an
� Schließen Sie das andere Ende am PC an
C Schließen Sie zusätzlich das Netzteil an
D Der Netzschalter leuchtet.
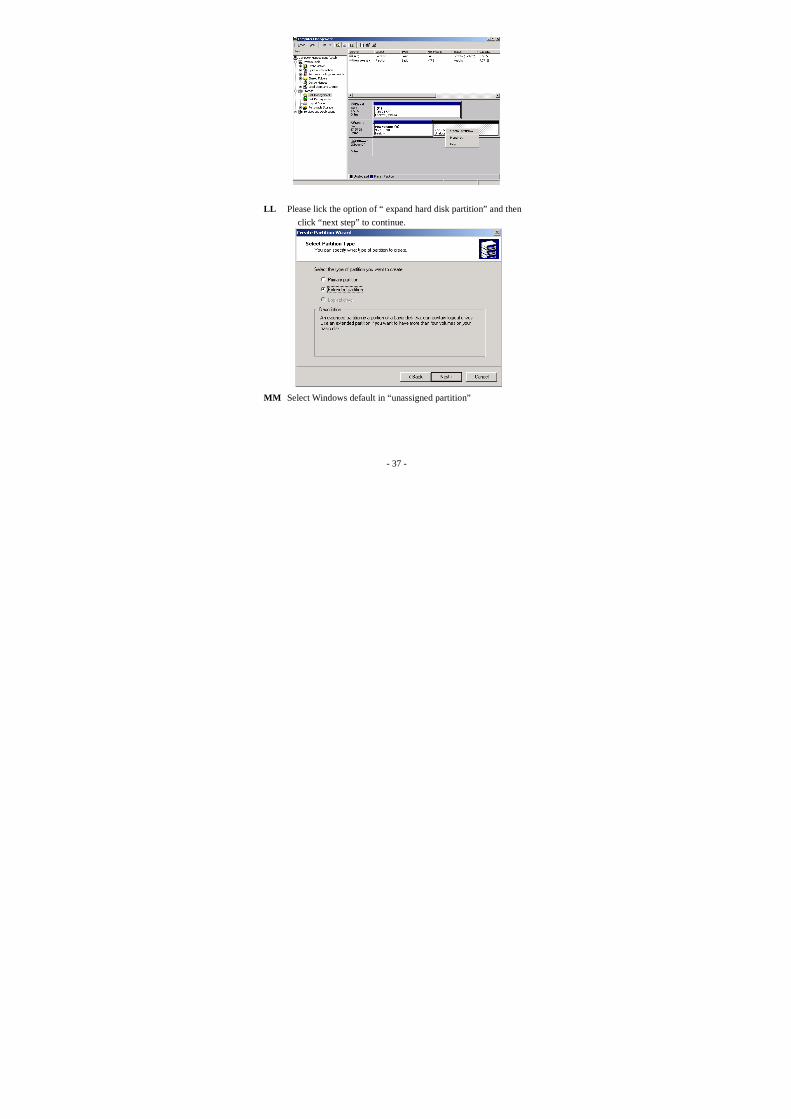
� Dies zeigt an, dass das Gerät funktionsbereit ist
Page 20
- 20 -
E Ein grünes Symbol erscheint in der Taskleiste, sobald das
Gehäuse in den Betriebsmodus gewechselt ist.
� Die neue Hardware wurde vom System gefunden
F Wenn Sie den “Arbeitsplatz” öffnen, erscheint das neue
Laufwerk
� Wenn beispielsweise die Partition C: und D: bereits bestehen,
wird ihr neues Laufwerk unter dem Laufwerksbuchstaben E:
angeführt werden.
� Die Geschwindigkeit, in der das Symbol erscheint, ist abhängig
von der Systemgeschwindigkeit sowie der Hard- und Software.
G Alltägliche Verwendung
� Die Verwendung der externen Festplatte entspricht die der
bereits bestehenden lokalen Festplatten.
� Während des Lese- und Schreibprozesses flackert das
LED-Display des Gehäuses auf und signalisiert so den Betrieb
� Besteht keine Lese- und Schreibaktivität oder befindet sich die
Festplatte im Standby-Modus, nimmt die Frequenz des
Flackerns ab bzw. hört komplett auf.
� Bitte unterbrechen Sie die Verbindung zwischen PC und
Gehäuse nicht während eines Lese-- oder Schreibvorgangs.
Andernfalls kann es zu Beschädigungen und/oder
Datenverlusten an/auf der Festplatte kommen
3.2. eSATA:
Bitte stellen Sie sicher dass Ihr PC über eine SATA-Schnittstelle
besitzt. Falls nicht, können Sie diese über SATAerweiterungskarten
per PCI oder PCMCIA hinzufügen.
Page 21
- 21 -
Hinweis: Falls der SATA-Bus-Controller kein Hot Swap unterstützt,
müssen Sie die Festplatte vor dem Anschalten anschließen.
Andernfalls erkennt Ihr PC die angeschlossene Festplatte nicht.
1 Schalten Sie ihren Computer an. Schließen Sie das SATA-Kabel
an der SATA-Schnittstelle des Computers und an der Festplatte an.
Bitte haben Sie etwas Geduld, die Festplatte wird automatisch
gesucht. Dies kann beim ersten Anschluss ein bisschen dauern.
2 Bitte loggen Sie sich als Administrator bei Windows 2000 /XP /
Vista/Windows 7 ein. Andernfalls kann die Festplatte nicht
hinzugefügt werden.
Bitte fragen Sie ihren Netzwerkadministrator, wenn sie nicht wissen
was zu tun ist.
3 Systeme wie Windows 2000,XP, Vista und Windows 7installieren
die Treiber automatisch.
4 Starten Sie Ihren PC neu falls dies verlangt wird.
3.3. Entfernen des Gerätes
Der Vorteil der USB-Schnittstelle ist natürlich der Anschluss bzw.
Das Entfernen während des Betriebs. Dies sollte aber nicht während
eines Lese- oder Schreibvorgangs geschehen. Das Entfernen des
Gerätes während eines Lese- oder Schreibvorgangs kann zu
Page 22
- 22 -
Festplattenbeschädigungen und/oder Datenverlust führen.
In Windows:
A Stellen Sie sicher, dass sich das Gehäuse nicht in einem aktiven
Lese- oder Schreibvorgang befindet.
� Kein Lese oder Schreibbefehl wird ausgeführt
� Kein Flackern des Produkt-LEDs
B Klicken Sie auf das Symbol mit dem grünen Pfeil mit einem
Rechtsklick und wählen Sie Ihr Gerät aus.
� Das grüne Symbol sieht wie folgt aus.
� Bei Linksklick auf das grüne Symbol erscheint die Möglichkeit,
Ihr USB-Gerät auszuwählen.
C Klicken Sie auf „OK“ um das Gerät zu entfernen.
D Die Systemmeldung erscheint: „Das USB-Gerät kann nun
entfernt werden“.
E Klicken Sie auf „OK“ und das System schließt die Meldung.
F Nun können Sie die Verbindung zum PC trennen.
G Fertig
4. Wartungshinweis
4.1. Instandhaltung
Die 3.5Zoll-Produkte sind mit einem Netzteil ausgestattet. Um die
Funktion zu gewährleisten, beachten Sie folgende Punkte
� Leistungsaufnahme Spannung 100V~240V, Output 12 V.
Page 23
- 23 -
� Das Netzteil könnte sich während der Nutzung erwärmen. Eine
Temperatur von 60 Grad Celsius ist normal.
� Vermeiden Sie bitte während dem Betrieb den Adapter auf dem
Bett, Sofa oder anderen Dinge liegen zulassen.
� Halten Sie defekte Adapter von Unwissenden fern, nicht dass es
wieder in Betrieb genommen wird.
� Bitte keine Demontage des Adapters. Bitte senden Sie den Adapter
an Ihren Händler. Denn es könnte bei einem falschen
Zusammenbau gefährliche Stromschläge bei der nächsten Nutzung
entstehen.
� Bitte entfernen Sie sofort das Netzteil bei Eindringen von
Flüssigkeit. Bitte wenden Sie sich an Ihren Händler zwecks
Austausch/Reparatur.
5. Sonstiges
5.1. ((((FAQ))))
Q Das grüne Symbol erscheint aber es wird keine Festplatten am
PC angezeigt.
A Die neue Festplatte ist möglicherweise nicht formatiert,
Überprüfen Sie bitte das Kapitel der Partition und
Formatierung.
Page 24
- 24 -
Q Die Festplatte wird angezeigt, aber die Geschwindigkeit ist
sehr langsam und das Kopieren von Daten dauert sehr
lange.
A Bitte überprüfen Sie den USB-Anschluss des PCs
Q Die Festplatte kann von Windows 2000 / Windows XP nicht
erkannt werden und das System ist nicht in der Lage das
Gerät zu installieren.
A Die Ursache liegt am Verlust des USB-Treibers vom
Betriebssystem. Bitte installieren Sie ihr Betriebssystem
neu.
Q Unterstützt dieses Produkt Plug-in und Draw-out ?
A Ja, dies wird unterstützt. Stellen Sie sicher, dass der
SATA-PCI-BUS-Controller Plug-in und Draw-out
unterstützt. Bitte auf die Spezifikationen der PCI-Karte
schauen. Zweitens, Plug-in und Draw-out ist nur unter
Windows 2000,XP,Vista, 7 möglich.
Q Wenn ich meine Festplatte mit dem Computer verbinde,
erscheint nur die grüne Markierung aber keine Festplatte?
A Bitte stellen sie sicher dass die Festplatte richtig angeschlossen
ist. Falls die Festplatte neu ist und noch keine Partition hat,
formatieren Sie diese bitte.
Page 25
- 25 -
Q Ist es unter Windows 95 und Windows NT nutzbar?
A Dieses Produkt unterstützt nur Windows 98SE, ME, 2000,
XP, Vista und Windows 7. Alle älteren Betriebssysteme
unterstützen kein SATA. Bitte aktualisieren Sie Ihre
Windows-Version.
6.Sonstige Hinweise::::
� Der Lieferumfang variiert für verschiedene Modelle der Serie. Bitte
beziehen Sie sich auf das Handbuch oder fragen Ihren Händler.
� Über jede Aktualisierung zu den Zahlen, Funktionen und
Spezifikationen wird im Voraus nicht informiert.
� Die Bilder und Illustrationen in der Anleitung sind nur für die
Bezugnahme.
Content
1. BEFORE USAGE ............................................... 26
1.1. SAFETY NOTICE ............................................. 26
Page 26
- 26 -
1.2. TERMS FOR EXEMPTING OBLIGATION .............. 27 1.3. INTRODUCTION OF THE PRODUCT FEATURES: .. 28 1.4. TERMS OF WARRANTY.................................... 29
2. READY FOR USING THE PRODUCT ............ 29
2.1. PRODUCT ACCESSORIES .................................. 29 2.2. REQUIREMENT FOR SYSTEM OF SOFTWARE&
HARDWARE ............................................................... 30 2.3. PARTITION AND FORMAT OF DISK DRIVER ........ 30
3. USING .................................................................. 41
3.1. CONNECTION AND USAGE OF THE PRODUCT ..... 41 3.2. EXIT AND DRAW OUT THE PRODUCT ................ 43
4. MAINTENANCE NOTICE ............................... 44
4.1. ADAPTER MAINTENANCE ................................ 44
5. FAQ ...................................................................... 45
6. OTHER INSTRUCTION ............................... 47
7.Before Usage
7.1. Safety Notice
Many thanks for choosing this product. For your better usage of this
product, please read this User Manual carefully first regarding points
Page 27
- 27 -
for attention and product operation and functions. The user manual
attached to the product is the most important guide for using, the user
has to hold it when is necessary.
The design and production of this device has well considered for both
safety of human being and convenient usage. Workless and damaged
will be happened when this device is not used as properly. Your rights
and interests of consumption will be guaranteed with following below
notices completely when this device’s used. This is a device
integrated with semiconductor fitting, no any component need to be
repaired by users.
This product complies with national low-voltage electronic appliances
safety standards, and acquires American FCC certificate and
European Union CE certificate.
10 The power supply used for this product should be conformed to
the details requirement showed on the nameplate.
11 Don’t expose this product in high temperature and moisture in
order to avoid fire and electric shock.
12 Data transfer will be likely to be influenced on by the
electromagnetic field with special frequency.
13 Please do not move or strike when it is using. Do not put any
object on top of this device.
14 Insert other object into this device is inhibitived, and please do
not tear down the device casually. It may make this device
damages.
15 If data transformation failed or discontinued because of the
static electricity and strong electromagnetic field, the application
system should be restarted and the USB cable reconnected.
16 Please do not use this product in environments of thunder storm
Page 28
- 28 -
or unstable electricity.
17 Please make the device disconnected with the power and PC
immediately when liquid flows into the device unexpectedly.
18 Do not intermit during copying files out of the way, otherwise
may cause damage to the file and HDD.
7.2. Terms for exempting obligation
A natural disaster like Earthquake, thunder and other accidents caused
by incorrectly usage, stolen and fire will not be assumed by our
company.
Any loss of data caused by using this product or other relative
responsibilities will not be assumed by our company.
Any loss caused by not follow user manual completely will not be
assumed by our company.
Any loss caused by trying to use other device or software combined
in this product will not be assumed by our company.
7.3. Introduction of the Product Features:
The external storage system are new types of portable storage
multimedia exchanging products with filmy and light design which
can be used for storing any kinds of data file and System technology
of exchanging. This device has several different ports and can be used
as the same as on the local disks. This device has Shaking and oisture
proof function and simple design. It is fully compatible for many
kinds of operation system and with multi-function design added. It is
really an ideal storage solution for individual users, enterprise
Page 29
- 29 -
business and network service.
1.3.1. Integrated USB 3.0 High Speed port
This device is a storage device with a USB 3.0 interface which is also
compatible with USB 2.0 and USB 1.1. The highest transfer speed of
this device can reach 5 GB/s. This makes it tot he excellent solution
for business and personal storage.
1.3.2. High Performance of Electronic Power Switch
Power switch is designed with soft push and electronic protection
against data loss caused by misoperation of POWER key by delayed
power-down. When standby this product will be automatically on
electricity saving mode in order to protect hard disk.
7.4. Terms of Warranty
The serial number attached to the product and the package is the most
important subjects for warranty. The user has to hold it when
repairing is necessary. If the serial number is damaged, torn and
blurred, there will be no any warranty. After-sales services of
exchange in 3 months and repair in 1 year is available.
8.Ready for using the product
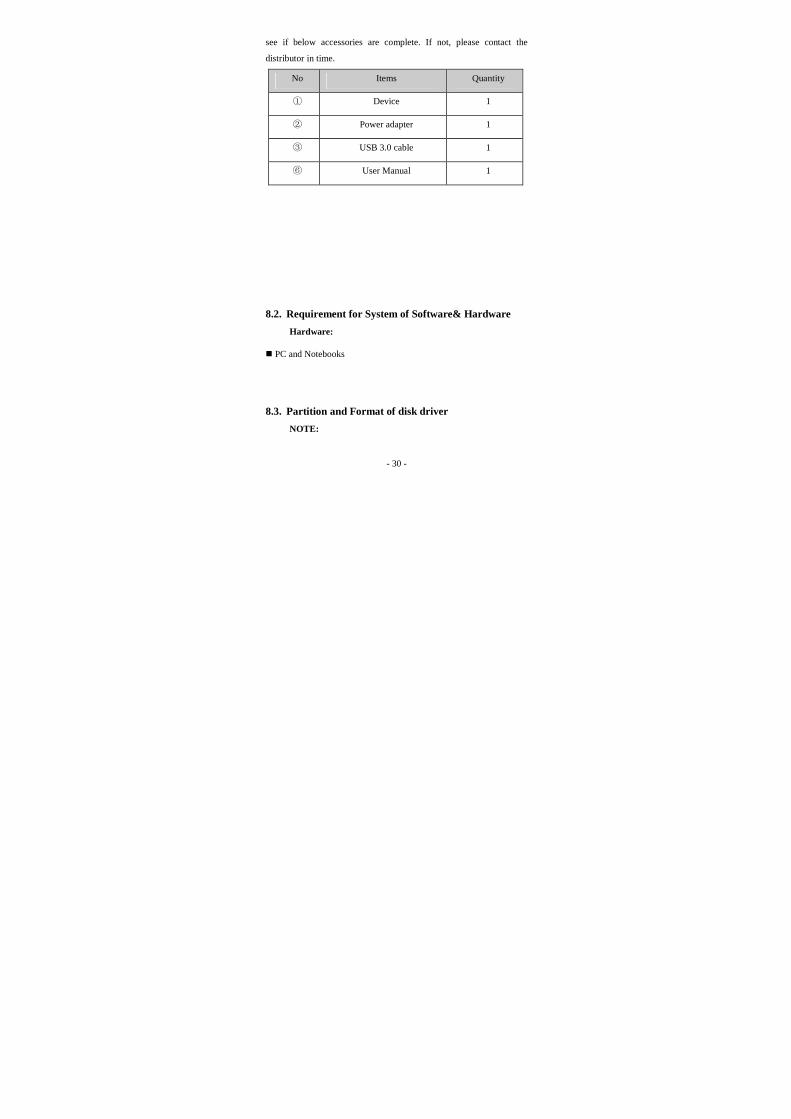
8.1. product accessories
Accessories
After you buy this product, please check your package carefully to
Page 30
- 30 -
see if below accessories are complete. If not, please contact the
distributor in time.
No Items Quantity
Device 1
Power adapter 1
USB 3.0 cable 1
User Manual 1
8.2. Requirement for System of Software& Hardware
Hardware:
� PC and Notebooks
8.3. Partition and Format of disk driver
NOTE:
Page 31
- 31 -
� The product can’t be recognized by the PC after if the optical
driver and an unformated hard disk are totally new. Please
partition and format the hard driver first before use it.
� A re-formatting job needs to be done for the file format for some
old hard disk to make sure the product’s workable.
� Please note that every time partition and formatting will delete all
the data of the hard driver.
� To ensure the stability, to partition and format under Windows
2000/Windows XP/ Windows Vista is advised.
Partition and formatting under Windows 2000 / XP/ VISTA
The operation process is available for operation system Windows
2000/Windows XP/ Windows Vista To make sure that the product can
working normally, partition and formatting before first using is
necessary. Please operate strictly according to the illustration and
explaining. For any doubt about the practical operation, please contact
to the after sales service department for further help.
V Startup the operation system of Windowsand make sure that
the system working in the normal status.
W Connect the product to the PC
� For models with adapter, please plug the adapter into the AC
IN port.
� Please connect the product to the PC through USB cable.
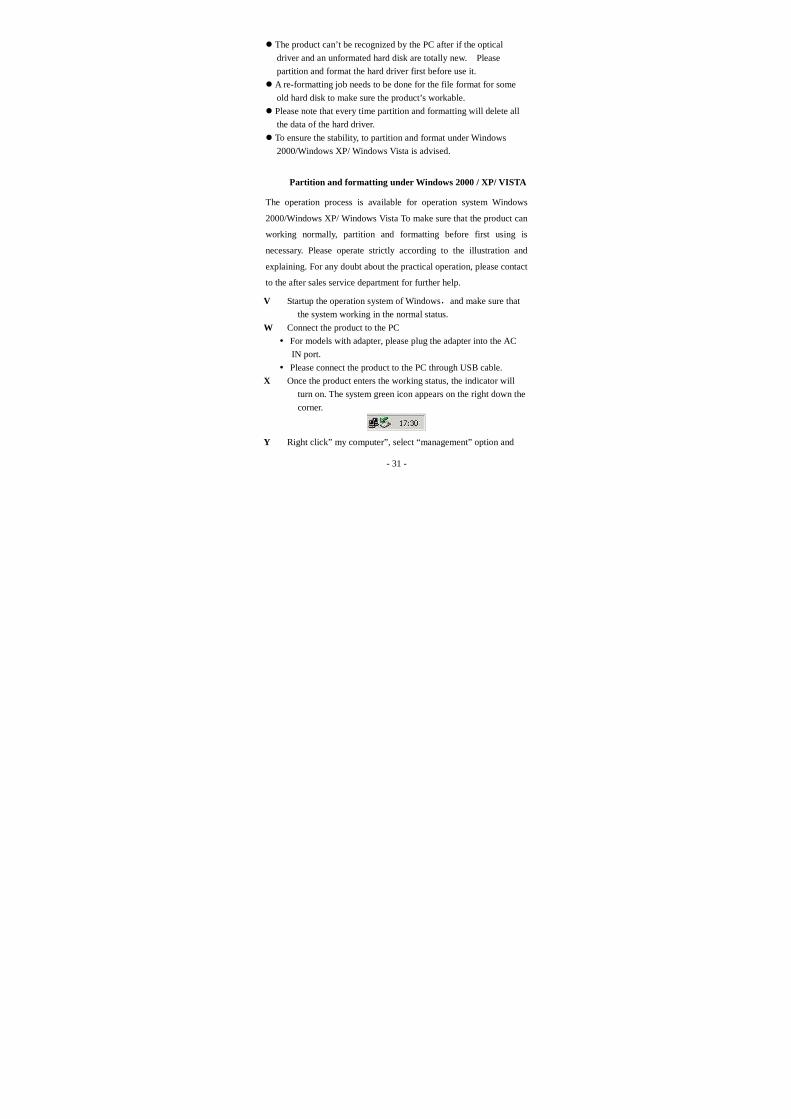
X Once the product enters the working status, the indicator will
turn on. The system green icon appears on the right down the
corner.
Y Right click” my computer”, select “management” option and
Page 32
- 32 -
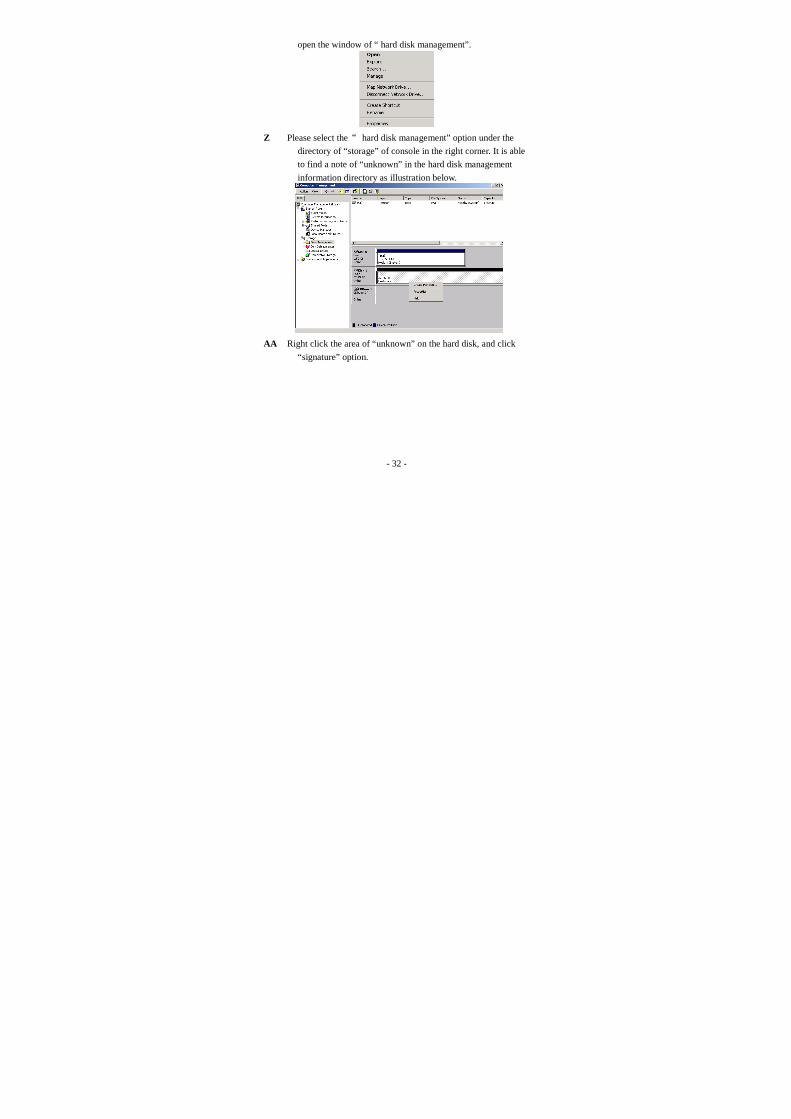
open the window of “ hard disk management”.
Z Please select the hard disk management” option under the
directory of “storage” of console in the right corner. It is able
to find a note of “unknown” in the hard disk management
information directory as illustration below.
AA Right click the area of “unknown” on the hard disk, and click
“signature” option.
Page 33
- 33 -
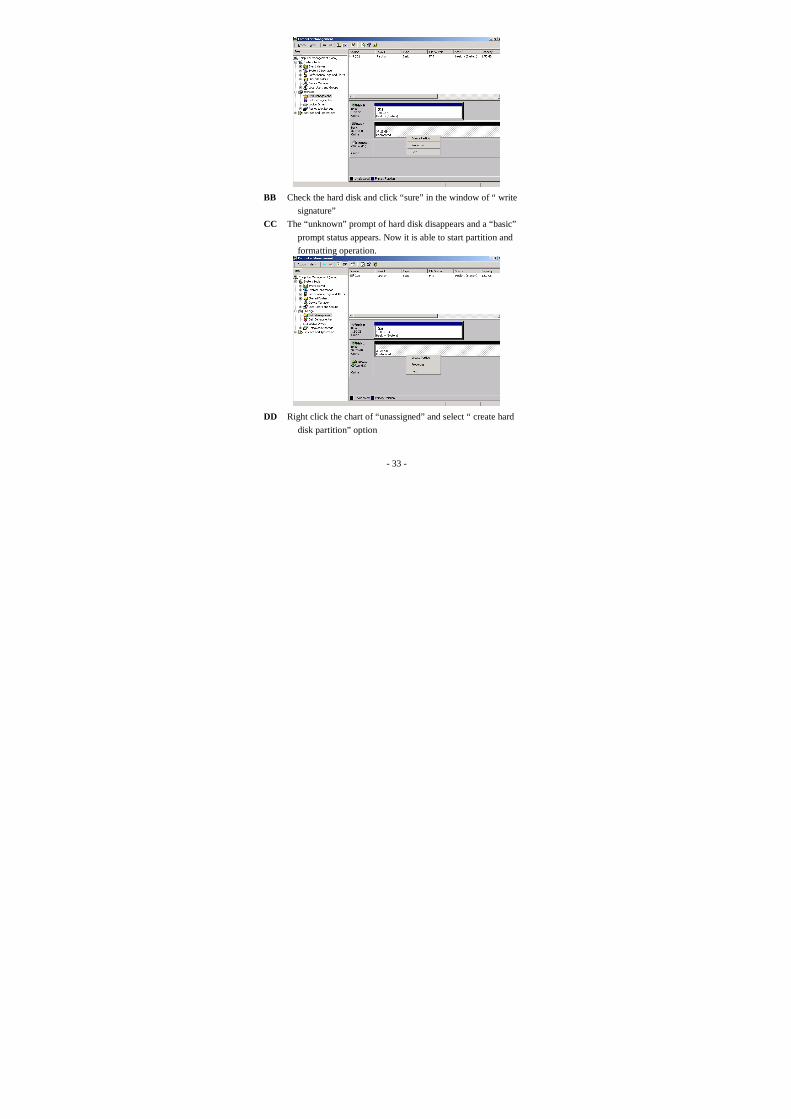
BB Check the hard disk and click “sure” in the window of “ write
signature”
CC The “unknown” prompt of hard disk disappears and a “basic”
prompt status appears. Now it is able to start partition and
formatting operation.
DD Right click the chart of “unassigned” and select “ create hard
disk partition” option
Page 34
- 34 -
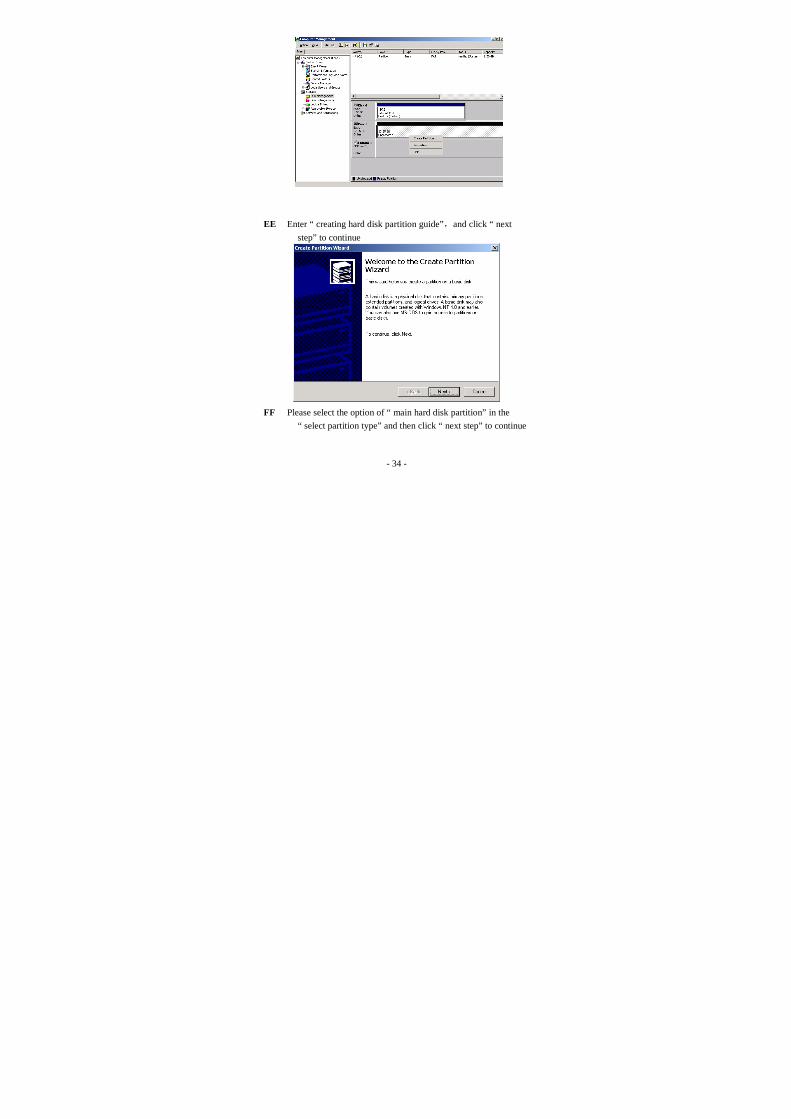
EE Enter “ creating hard disk partition guide”and click “ next
step” to continue
FF Please select the option of “ main hard disk partition” in the
“ select partition type” and then click “ next step” to continue
Page 35
- 35 -
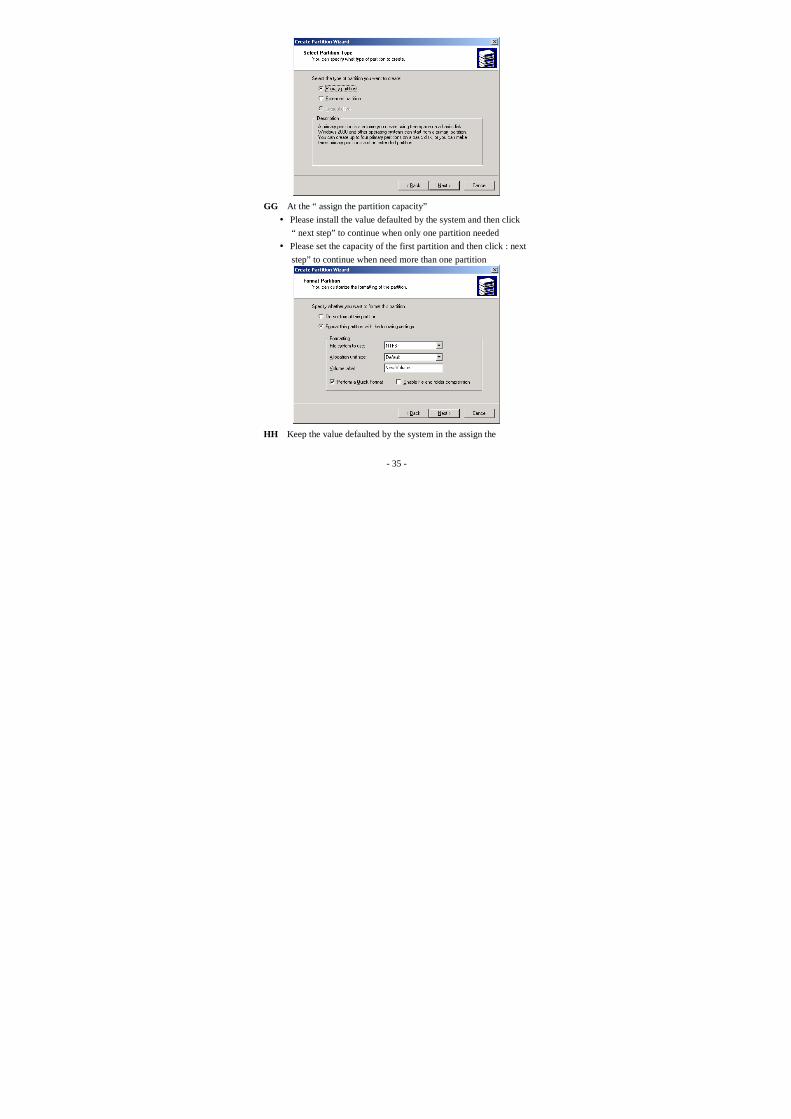
GG At the “ assign the partition capacity”
� Please install the value defaulted by the system and then click
“ next step” to continue when only one partition needed
� Please set the capacity of the first partition and then click : next
step” to continue when need more than one partition
HH Keep the value defaulted by the system in the assign the
Page 36
- 36 -
Number for the hard disk and then click “next step” to
continue.
II In the formatting partition
� Please set the option of” FAT32” in the option of using file
system;
� Check the option of “run fast formatting” and then click “next
step “ to continue.
JJ Click “finish” and guide complete
� For one partition only, the process is complete and the product
is available to use
� For more than one partition, the process complete the partition
/ formatting of the “main hard disk”, please follow the
operation follow for the further partition
KK Right Click the residual area of “ unassigned” and select the
option of “ create hard disk partition”
Page 37
- 37 -
LL Please lick the option of “ expand hard disk partition” and then
click “next step” to continue.
MM Select Windows default in “unassigned partition”
Page 38
- 38 -
NN Click finish”.
OO Right click the interface of the created expending hard driver,
and
PP Select the option of “ to create logic disk”
Page 39
- 39 -
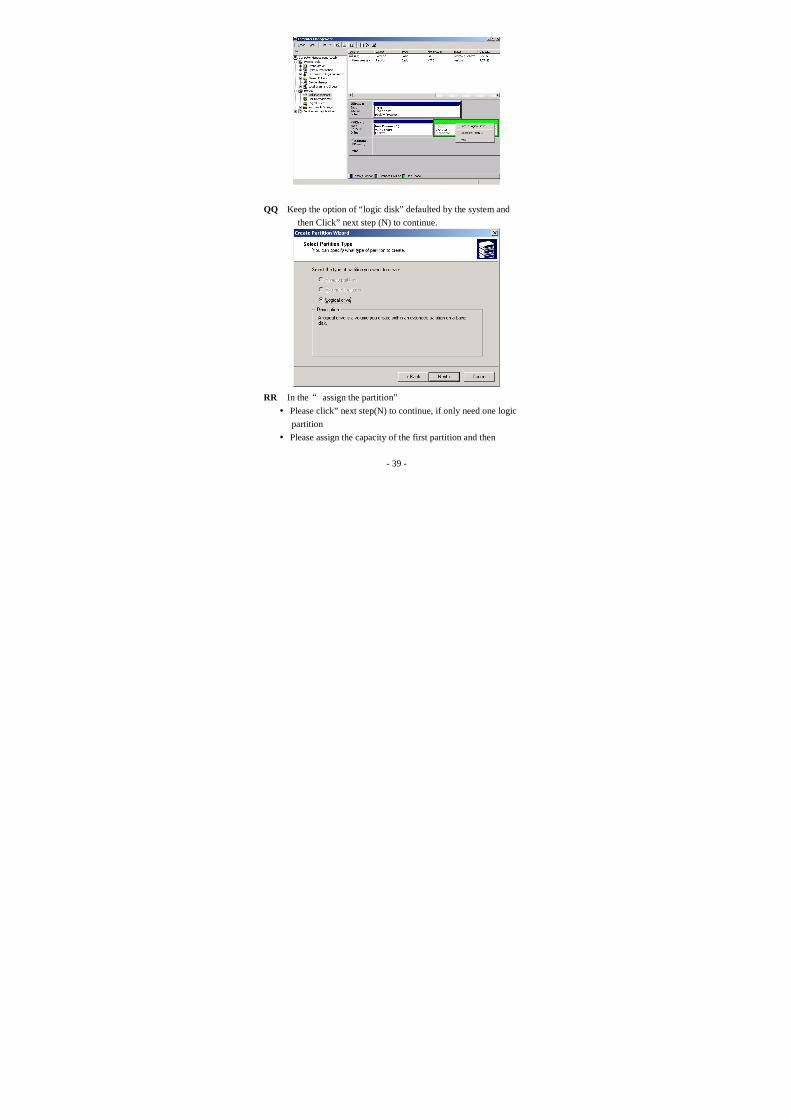
QQ Keep the option of “logic disk” defaulted by the system and
then Click” next step (N) to continue.
RR In the assign the partition”
� Please click” next step(N) to continue, if only need one logic
partition
� Please assign the capacity of the first partition and then
Page 40
- 40 -
click ”next step” to continue, if need more than one logic
partition
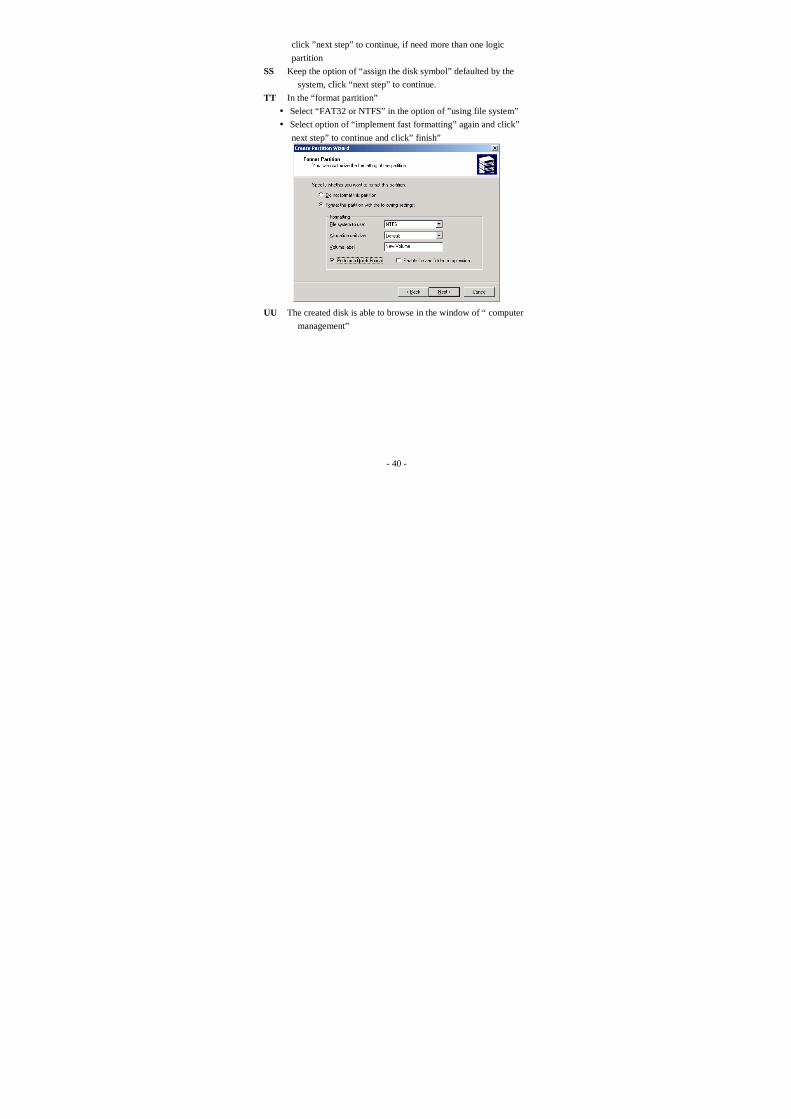
SS Keep the option of “assign the disk symbol” defaulted by the
system, click “next step” to continue.
TT In the “format partition”
� Select “FAT32 or NTFS” in the option of ”using file system”
� Select option of “implement fast formatting” again and click”
next step” to continue and click” finish”
UU The created disk is able to browse in the window of “ computer
management”
Page 41
- 41 -
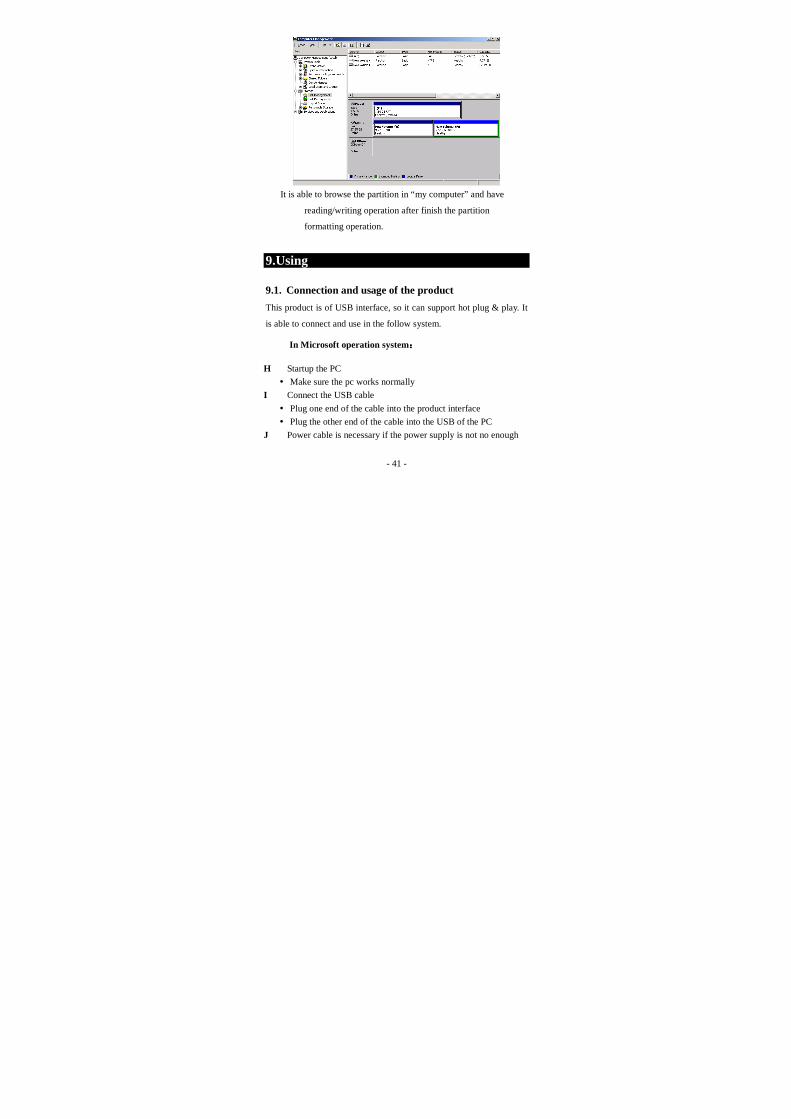
It is able to browse the partition in “my computer” and have
reading/writing operation after finish the partition
formatting operation.
9.Using
9.1. Connection and usage of the product
This product is of USB interface, so it can support hot plug & play. It
is able to connect and use in the follow system.
In Microsoft operation system
H Startup the PC
� Make sure the pc works normally
I Connect the USB cable
� Plug one end of the cable into the product interface
� Plug the other end of the cable into the USB of the PC
J Power cable is necessary if the power supply is not no enough
Page 42
- 42 -
K Indicator of the product turns on
� This indicates that the products is on working status
L Active system, the green icon of disk appears
� The new hardware is found by the system
� The green arrowhead icon appears right down the corner of the
screen, and the products is recognized by the operation system
M Open” my computer”, the new” disk partition” appears
� The disk symbol should be the latter one followed the previous
system partition
� If there were partition C. D, the system will assign a disk
symbol of E for the disk after connect the product.
� The speed of disk symbol appearing is various because of the
difference between its hardware and software. This is a normal
phenomena.
N Common usage
� The operation is the same as the common hard disk accessing,
reading and writing
� The product indicator flickers during the reading and writing
process.
� The product indicator stops flickering or slow down flickering
during no reading or writing operation and stand by status
� Please don’t draw out the product from the PC when the
product is under reading or writing status. Otherwise, it may
cause damage to the hard disk or loss of data
Serial ATA:
Please make sure there is SATA interface on your computer before
using HDD enclosure. If no, SATA pci card (for desktop) or SATA
pcmcia (for laptop) are recommended.
Note: if the SATA bus controller of your computer cannot support
Page 43
- 43 -
HOT SWAP, you need to connect the hard disk to your computer
before boot-up. Otherwise, the computer cannot detect the hard disk.
1 Boot up your computer. Connect the SATA cable to the SATA
interface of your computer, and the other end to the hard disk. Please
wait patiently when Windows is searching automatically. It takes a
few minutes if first time use.
2 Please log in as administrator if you use Windows 2000 /XP / Vista .
Otherwise, the hard disk cannot be added. Please ask network
administrator if you do not know how to do.
3 Systems of Windows 2000,XP and Vista can automatically install
drivers.
4 Please restart the computer if Windows requires.
9.2. Exit and draw out the product
As a USB interface, it supports hot swap. Please follow the procedure
below to make sure a normal exit from the system and protect the
integrality of the system and the safety of the product.
In Microsoft operation system
H Make sure the product is not under reading or writing status
� No reading or writing operation command implements
� No flickering on the product indicator
I Click the green icon right down the system screen
� The green icon illustrates as follow
� Right click the green icon, the option of USB device directory
Page 44
- 44 -
appears
J Click the device need to exit
K The system prompt: the device has been removed from the
system safely
L Click” sure”, and the system shut the dialogue box
M Remove product from the PC
N finish
10.Maintenance notice
10.1.Adapter maintenance
The 3.5 inch product is with power adapter. In order to make sure the
normal usage, please read carefully about the follow characters
� Rating power input voltage 100V~240Voutput 12V/2A Please
notice the voltage of the connection terminal
� The power adapter could warm up under the normal working status.
The temperature of 60 degrees centigrade is of normal status.
� Please avoid to keep the adapter on the bed, sofa, and other things
which are not ventilated when it’s under working status
� Please keep the adapter away from people once it breaks to avoid
Page 45
- 45 -
some people unknown and use it again.
� Please don’t disassembly the adapter and send the adapter to the
authorized service department or agent for maintenance. Because it
could be dangerous to disassembly the adapter and the incorrect
reassembly could have some dangerous to get an electric shock in
the later usage.
� Please pull out the plug if the circuit has abrasion or any liquid
enter the adapter and send to the authorized service department or
agent for maintenance.
11.FAQ
Q The green icon appears but no disk symbol when the new
product connects to the system.
A The new hard disk may not formatted, please check the chapter
of partition and formatting
Q Portable hard disk is available but the speed is very slow and
takes a long time to copy data
A Please check the USB terminal version of the PC
Q Portable hard disk can’t be recognized by the Windows 2000 /
Page 46
- 46 -
Windows XP and the system prompt that a device,
incapable of identify connected
A This is caused by the loss of the USB driver of operation
system. Please install the operation system again.
Q What is serial ATA ?
A Serial ATA is the second era ATA interface standard, it uses
the last test ATA parallel protocol standard. Compare to
previous ATA standard the new one: faster speed, better
compatibility and point to point connection. Presently, the
SATA standard can support 150mb/sec.The next era
standard will be able to support 300mb/secThe SATA
uses 7pins connecting cable instead of that of 80pins,it
enable a faster data transfer. The SATA adopts a
connection of point to point : one cable to one device. This
abrogates the master/ subordinate mode.
Q Does it support heat plug-in and draw-out ?
A Yes, it does. Firstly, the SATA pci bus controller must support
heat plug-in and draw-out. Please reference the
specification of pci card. Secondly, the heat plug-in and
draw-out is only available in windows 2000,XP,Vista.
Q Why connect to the hard disk, only the green mark appears but
the hard disk letter ?
Page 47
- 47 -
A Please make sure the hard disk connects well. If the hard disk
is a new one, and has not partitioned yet, please go to
control panel�management tool�computer
management . After open hard disk management, a
non-partitioned hard disk hard disk 1 will appear. After
format this hard disk, it is able to find it.
Q It is available in windows 95 and windows NT ?
A The product can only support windows 98se, me, 2000, and
XP All older version can’t support SATA. Microsoft has
not add the driver of SATA into the older version. Please
update your Windows version.
12. Other instruction::::
� The accessories are various for different models in this series,
please refer to the manual or inquiry from the agent.
� Any update to the figures, function and specification will not be
informed in advance
� The photo or illustration in the manual is just for reference.