11
Centro Business einrichten Installer le Centro Business Installare il Centro Business Centro Business setup
Centro Business einrichten Installer le Centro Business Installare il Centro Business Centro Business setup
WillkommenHerzlichen Glückwunsch zu Ihrem Centro Business Router! Ihr Centro Business Router (CB) unterstützt alle bei Swisscom eingesetzten Technologien einschliesslich EconomyLINE, ISDN MultiLINE sowie alle Angebote im Bereich IP-Telefonie (VoIP). Dabei erkennt Centro Business selbst, mit welchem jeweiligen Anschlusstyp er verbunden ist. Centro Business ist ein universell einsetzbarer KMU-Router, mit dessen Hilfe der Wechsel von der heutigen Telefoniewelt in die zukünftige IP-Telefonie-Welt stark vereinfacht wird. Das heisst konkret, dass Sie im Falle eines Wechsels den Centro Business Router nicht ersetzen müssen und Sie ebenfalls Ihre bestehenden Telefone (analoge und ISDN) weiterhin nutzen können.
Der Funktionsumfang des Centro Business Routers wird ständig erweitert. Sie erhalten deshalb von Zeit zu Zeit ein automatisches Update und Ihr Router ist immer auf dem aktuellsten Stand der Entwicklung. Weitere Information dazu finden Sie auf der Webseite http://www.swisscom.ch/centrobusiness. Dort finden Sie auch Anleitungen und Hinweise für die einfache Einrichtung von WLAN und die verschiedenen Nutzungsmöglichkeiten Ihres Centro Business Routers.
Über die URL http://192.168.1.1 können erfahrene User weitere Einstellungen der Centro Business vornehmen. Falls Sie Ihre Logindaten nicht selbst definiert haben (z.B. bei Business Internet Light), ist der Username Admin und das Standardpasswort 1234. Bei Swisscom xDSL können Sie das Routerpasswort im Kundencenter einsehen, verwalten und auch nur dort anpassen.
BenvenutiCongratulazioni per aver scelto il router Centro Business! Il router Centro Business (CB) supporta tutte le tecnologie utilizzate da Swisscom, incluse EconomyLINE, ISDN MultiLINE nonché tutte le offerte nell’ambito della telefonia IP (VoIP). In tale ottica Centro Business riconosce automaticamente il tipo di collegamento al quale è allacciato. Centro Business è un router PMI ad uso universale che semplifica notevolmente il passaggio dall’attuale mondo della telefonia analogica al futuro mondo della telefonia IP. Concretamente significa che quando avverrà l’effettivo passaggio alla nuova tecnologia, il router Centro Business non dovrà essere sostituito e che potrete continuare ad utilizzare i vostri attuali telefoni (analogici oppure ISDN).
Le funzionalità del router Centro Business vengono costantemente ampliate. Pertanto riceverete periodicamente un aggiornamento automatico, in modo tale che il vostro router sia sempre aggiornato all’ultima tecnologia disponibile. Trovate ulteriori informazioni sul sito internet http://www.swisscom.ch/centrobusiness. Su tale sito troverete anche istruzioni e avvertenze per installare reti WLAN in modo semplice nonché informazioni sulle diverse possibilità di impiego del router Centro Business.
Tramite il link http://192.168.1.1 gli utenti esperti possono effettuare ulteriori impostazioni. Se non avete già cambiato i vostri dati di login (ad es. nel caso di Business Internet Light), inserite il nome utente Admin e la password standard 1234. Chi ha Swisscom xDSL può vedere, gestire e modificare la password del router nell’area clienti.
WelcomeCongratulations on purchasing your Centro Business router! Your Centro Business router (CB) supports all technologies used by Swisscom, including EconomyLINE, ISDN MultiLINE and all services in the IP telephony (VoIP) sector. Centro Business automatically recognises which type of connection it is linked to. Centro Business is a SME router that can be used anywhere to help you switch much more easily from current-day telephony to the IP telephony of the future. In practical terms, this means that, if you switch, you will not need to replace your Centro Business router and you will still be able to use your existing telephones (analogue and ISDN).
The range of functions of the Centro Business router is constantly increasing. From time to time, you will therefore receive automatic updates and your router will always be in tune with the latest technological developments. You can find more information about this on the website http://www.swisscom.ch/centrobusiness, where you will also find instructions and guidelines on setting up a WLAN and using the various features of your Centro Business router.
Via the link http://192.168.1.1, experienced users can adjust additional settings for the Centro Business router. If you did not create your login data yourself (e.g. with Business Internet Light), the username is Admin and the standard password is 1234. With Swisscom xDSL, you can view and manage the router password in the Customer Centre, which is the only place the password can be changed.
FélicitationsNous vous remercions d’avoir opté pour un routeur Centro Business! Votre routeur Centro Business (CB) est compatible avec toutes les technologies exploitées par Swisscom, y compris EconomyLINE, ISDN MultiLINE ainsi que toutes les offres de téléphonie IP (VoIP). Centro Business reconnaît automatiquement le type de raccordement auquel il est connecté. Routeur universel pour PME, Centro Business simplifie grandement le passage des solutions de téléphonie actuelles à l’univers VoIP de demain. Autrement dit, en cas de migration, vous ne devrez pas changer votre routeur Centro Business et vous pourrez continuer d’utiliser vos appareils actuels (téléphones analogiques et ISDN).
Les fonctions du routeur Centro Business font l’objet d’un développement constant. Une mise à jour automatique est effectuée de temps à autre pour que votre routeur soit toujours à la pointe du développement technologique. Pour de plus amples informations, consultez le site Internet http://www.swisscom.ch/centrobusiness. Vous y trouverez aussi des modes d’emploi et conseils pour établir facilement un réseau sans fil (WLAN), ainsi que la description des diverses manières d’utiliser le routeur Centro Business.
Le lien http://192.168.1.1 permet aux utilisateurs expérimentés de procéder à un paramétrage plus approfondi du routeur Centro Business. Si vous n’avez pas défini vous-même vos données de connexion (par exemple pour Business Internet Light), le nom d’utilisateur est Admin et le mot de passe standard 1234. Pour Swisscom xDSL, vous pouvez visualiser, gérer et modifier le mot de passe du routeur dans l’espace clients exclusivement.
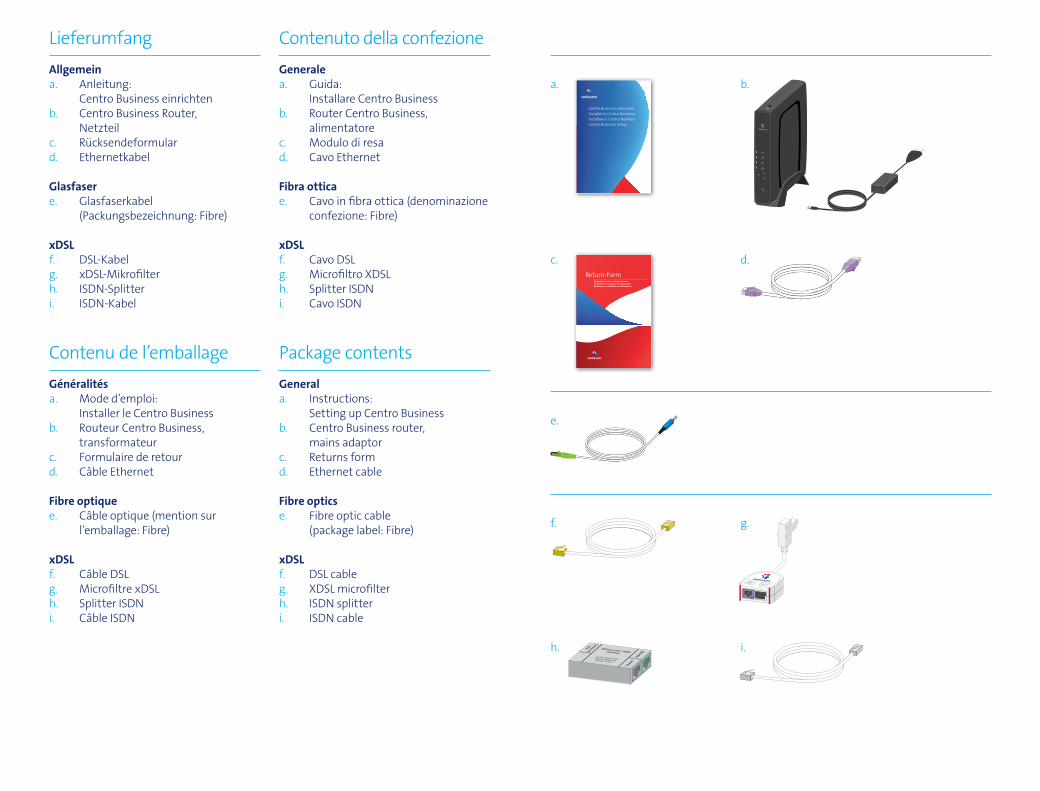
Lieferumfang
Allgemeina. Anleitung:
Centro Business einrichtenb. Centro Business Router,
Netzteilc. Rücksendeformulard. Ethernetkabel
Glasfasere. Glasfaserkabel
(Packungsbezeichnung: Fibre)
xDSLf. DSL-Kabelg. xDSL-Mikrofi lter h. ISDN-Splitter i. ISDN-Kabel
Contenu de l’emballageGénéralitésa. Mode d’emploi:
Installer le Centro Businessb. Routeur Centro Business, transformateurc. Formulaire de retourd. Câble Ethernet
Fibre optiquee. Câble optique (mention sur l’emballage: Fibre)
xDSLf. Câble DSLg. Microfi ltre xDSL h. Splitter ISDN i. Câble ISDN
Contenuto della confezioneGenerale a. Guida:
Installare Centro Businessb. Router Centro Business,
alimentatorec. Modulo di resad. Cavo Ethernet
Fibra otticae. Cavo in fi bra ottica (denominazione
confezione: Fibre)
xDSLf. Cavo DSLg. Microfi ltro XDSL h. Splitter ISDN i. Cavo ISDN
Package contentsGenerala. Instructions:
Setting up Centro Businessb. Centro Business router, mains adaptorc. Returns formd. Ethernet cable
Fibre opticse. Fibre optic cable
(package label: Fibre)
xDSLf. DSL cableg. XDSL microfi lterh. ISDN splitteri. ISDN cable
d.
g.
e.
h.
c.
f.
i.
Return-Form Rückgabeformular und Informationen Formulaire de restitution et informations Modulo per la restituzione e informazioni
Centro Business einrichten Installer le Centro Business Installare il Centro Business Centro Business setup
a. b.

Übersicht über den Aufbau
1 WLAN-Knopf2 Resetknopf 3 DSL-Anschluss4, 5 Analoger Telefonanschluss6 ISDN-Schalter7, 8 ISDN S-Bus9–11 LAN-Ports12 WAN- oder LAN-Port13 Glasfaser-Anschluss14 Ein- und Ausschalter15 Stromanschluss für Netzteil
Aperçu de la structure
1 Bouton WLAN 2 Bouton de réinitialisation3 Raccordement DSL4, 5 Raccordement téléphonique
analogique6 Commutateur ISDN7, 8 ISDN Bus S9–11 Ports LAN12 Port WAN ou LAN13 Raccordement fibre optique14 Interrupteur marche/arrêt15 Prise de courant pour
transformateur
Panoramica della struttura 1 Tasto WLAN2 Tasto di reset 3 Presa DSL4, 5 Presa telefonica analogica 6 Interruttore ISDN7, 8 S-Bus ISDN9–11 Porte LAN12 Porta WAN o LAN13 Presa in fibra ottica 14 Interruttore on/off 15 Presa per l’alimentatore di corrente
Overview over the structure
1 WLAN button 2 Reset button3 DSL plug4, 5 Analogue telephone plug6 ISDN switch7, 8 ISDN S-Bus9–11 LAN ports12 WAN or LAN port13 Fibre optic plug14 On/off switch15 Main adaptor plug
1 SG/
ISDN
ISDN
Tel.WAN
/2
12
34
ON
12
3
4
5
6
7
8
9
10
11
12
13
1415
2
1
Power LED
Internet LED
WLAN LED
Tel. LED
Router VorderseitePanneau avantPannello anterioreFront Panel
Router RückseitePanneau arrièrePannello posterioreBack Panel
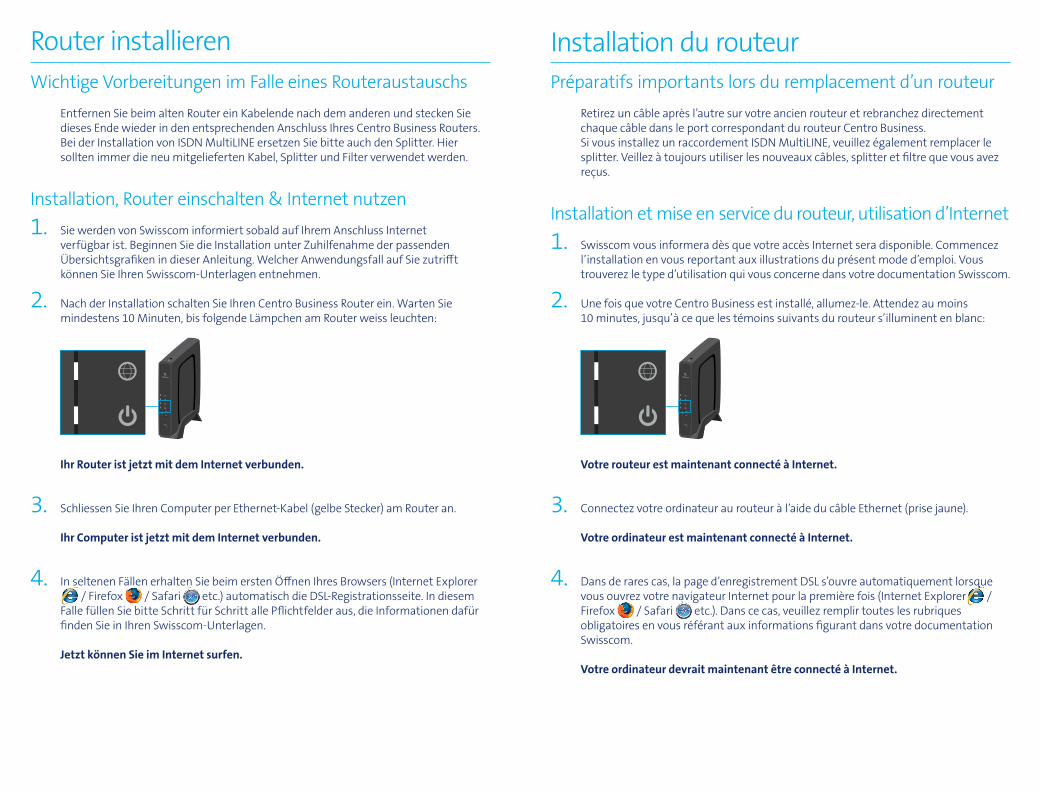
Router installierenWichtige Vorbereitungen im Falle eines Routeraustauschs Entfernen Sie beim alten Router ein Kabelende nach dem anderen und stecken Sie
dieses Ende wieder in den entsprechenden Anschluss Ihres Centro Business Routers. Bei der Installation von ISDN MultiLINE ersetzen Sie bitte auch den Splitter. Hier
sollten immer die neu mitgelieferten Kabel, Splitter und Filter verwendet werden.
Installation, Router einschalten & Internet nutzen1. Sie werden von Swisscom informiert sobald auf Ihrem Anschluss Internet
verfügbar ist. Beginnen Sie die Installation unter Zuhilfenahme der passenden Übersichtsgrafi ken in dieser Anleitung. Welcher Anwendungsfall auf Sie zutriff t können Sie Ihren Swisscom-Unterlagen entnehmen.
2. Nach der Installation schalten Sie Ihren Centro Business Router ein. Warten Sie mindestens 10 Minuten, bis folgende Lämpchen am Router weiss leuchten:
Ihr Router ist jetzt mit dem Internet verbunden.
3. Schliessen Sie Ihren Computer per Ethernet-Kabel (gelbe Stecker) am Router an.
Ihr Computer ist jetzt mit dem Internet verbunden.
4. In seltenen Fällen erhalten Sie beim ersten Öff nen Ihres Browsers (Internet ExplorerIn seltenen Fällen erhalten Sie beim ersten Öff nen Ihres Browsers (Internet Explorer / Firefox
In seltenen Fällen erhalten Sie beim ersten Öff nen Ihres Browsers (Internet Explorer / Safari
In seltenen Fällen erhalten Sie beim ersten Öff nen Ihres Browsers (Internet Explorer etc.) automatisch die DSL-Registrationsseite. In diesem
Falle füllen Sie bitte Schritt für Schritt alle Pfl ichtfelder aus, die Informationen dafür fi nden Sie in Ihren Swisscom-Unterlagen.
Jetzt können Sie im Internet surfen.
Installation du routeurPréparatifs importants lors du remplacement d’un routeur Retirez un câble après l’autre sur votre ancien routeur et rebranchez directement
chaque câble dans le port correspondant du routeur Centro Business. Si vous installez un raccordement ISDN MultiLINE, veuillez également remplacer le
splitter. Veillez à toujours utiliser les nouveaux câbles, splitter et fi ltre que vous avez reçus.
Installation et mise en service du routeur, utilisation d’Internet1. Swisscom vous informera dès que votre accès Internet sera disponible. Commencez
l’installation en vous reportant aux illustrations du présent mode d’emploi. Vous trouverez le type d’utilisation qui vous concerne dans votre documentation Swisscom.
2. Une fois que votre Centro Business est installé, allumez-le. Attendez au moins 10 minutes, jusqu’à ce que les témoins suivants du routeur s’illuminent en blanc:
Votre routeur est maintenant connecté à Internet.
3. Connectez votre ordinateur au routeur à l’aide du câble Ethernet (prise jaune).
Votre ordinateur est maintenant connecté à Internet.
4. Dans de rares cas, la page d’enregistrement DSL s’ouvre automatiquement lorsque vous ouvrez votre navigateur Internet pour la première fois (Internet Explorer
Dans de rares cas, la page d’enregistrement DSL s’ouvre automatiquement lorsque /
Firefox vous ouvrez votre navigateur Internet pour la première fois (Internet Explorer
/ Safari vous ouvrez votre navigateur Internet pour la première fois (Internet Explorer
etc.). Dans ce cas, veuillez remplir toutes les rubriques obligatoires en vous référant aux informations fi gurant dans votre documentation Swisscom.
Votre ordinateur devrait maintenant être connecté à Internet.
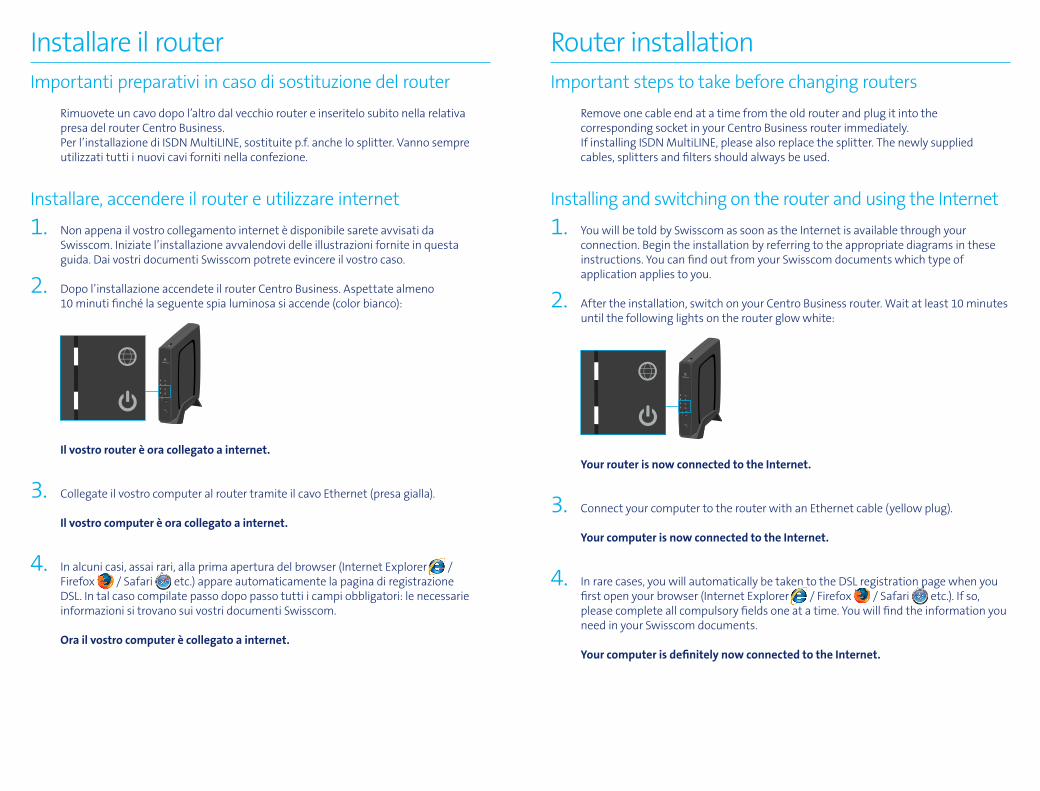
Installare il router Importanti preparativi in caso di sostituzione del router Rimuovete un cavo dopo l’altro dal vecchio router e inseritelo subito nella relativa
presa del router Centro Business. Per l’installazione di ISDN MultiLINE, sostituite p.f. anche lo splitter. Vanno sempre
utilizzati tutti i nuovi cavi forniti nella confezione.
Installare, accendere il router e utilizzare internet 1. Non appena il vostro collegamento internet è disponibile sarete avvisati da
Swisscom. Iniziate l’installazione avvalendovi delle illustrazioni fornite in questa guida. Dai vostri documenti Swisscom potrete evincere il vostro caso.
2. Dopo l’installazione accendete il router Centro Business. Aspettate almeno 10 minuti fi nché la seguente spia luminosa si accende (color bianco):
Il vostro router è ora collegato a internet.
3. Collegate il vostro computer al router tramite il cavo Ethernet (presa gialla).
Il vostro computer è ora collegato a internet.
4. In alcuni casi, assai rari, alla prima apertura del browser (Internet Explorer / Firefox
In alcuni casi, assai rari, alla prima apertura del browser (Internet Explorer / Safari
In alcuni casi, assai rari, alla prima apertura del browser (Internet Explorer etc.) appare automaticamente la pagina di registrazione
DSL. In tal caso compilate passo dopo passo tutti i campi obbligatori: le necessarie informazioni si trovano sui vostri documenti Swisscom.
Ora il vostro computer è collegato a internet.
Router installationImportant steps to take before changing routers Remove one cable end at a time from the old router and plug it into the
corresponding socket in your Centro Business router immediately. If installing ISDN MultiLINE, please also replace the splitter. The newly supplied
cables, splitters and fi lters should always be used.
Installing and switching on the router and using the Internet1. You will be told by Swisscom as soon as the Internet is available through your
connection. Begin the installation by referring to the appropriate diagrams in these instructions. You can fi nd out from your Swisscom documents which type of application applies to you.
2. After the installation, switch on your Centro Business router. Wait at least 10 minutes until the following lights on the router glow white:
Your router is now connected to the Internet.
3. Connect your computer to the router with an Ethernet cable (yellow plug).
Your computer is now connected to the Internet.
4. In rare cases, you will automatically be taken to the DSL registration page when you fi rst open your browser (Internet Explorer
In rare cases, you will automatically be taken to the DSL registration page when you / Firefox
In rare cases, you will automatically be taken to the DSL registration page when you / Safari
In rare cases, you will automatically be taken to the DSL registration page when you etc.). If so,
please complete all compulsory fi elds one at a time. You will fi nd the information you need in your Swisscom documents.
Your computer is defi nitely now connected to the Internet.
Mikrofi lterMicrofi ltre Microfi ltroMicrofi lter
a)
FestnetzRéseau fi xeRete fi ssaFixed line
1 2 34 5 67 8 9* 0 #
b)c)
klick
klick 1 SG/
ISDN
ISDN
Tel.WAN
/2
12
34
ON
12
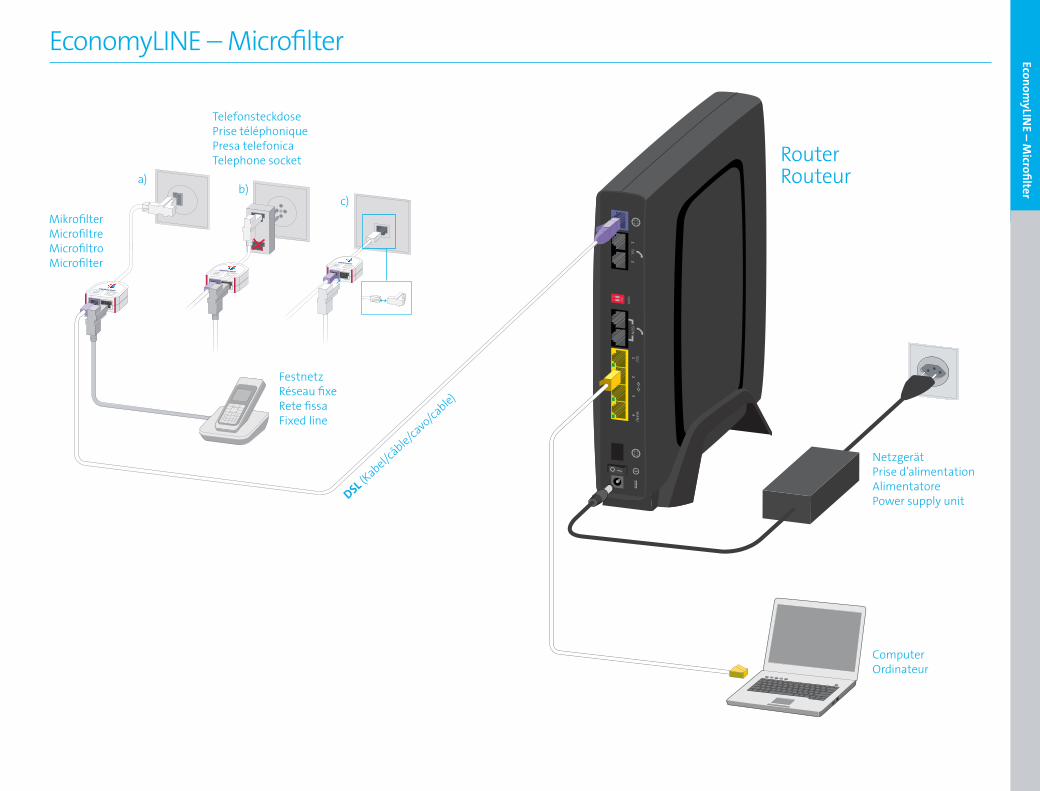
EconomyLINE – Microfi lter
TelefonsteckdosePrise téléphonique Presa telefonicaTelephone socket
DSL (Kabel/c
âble/cavo/cable)
EconomyLIN
E – Microfi lter
RouterRouteur
NetzgerätPrise d’alimentation AlimentatorePower supply unit
Computer Ordinateur
Line
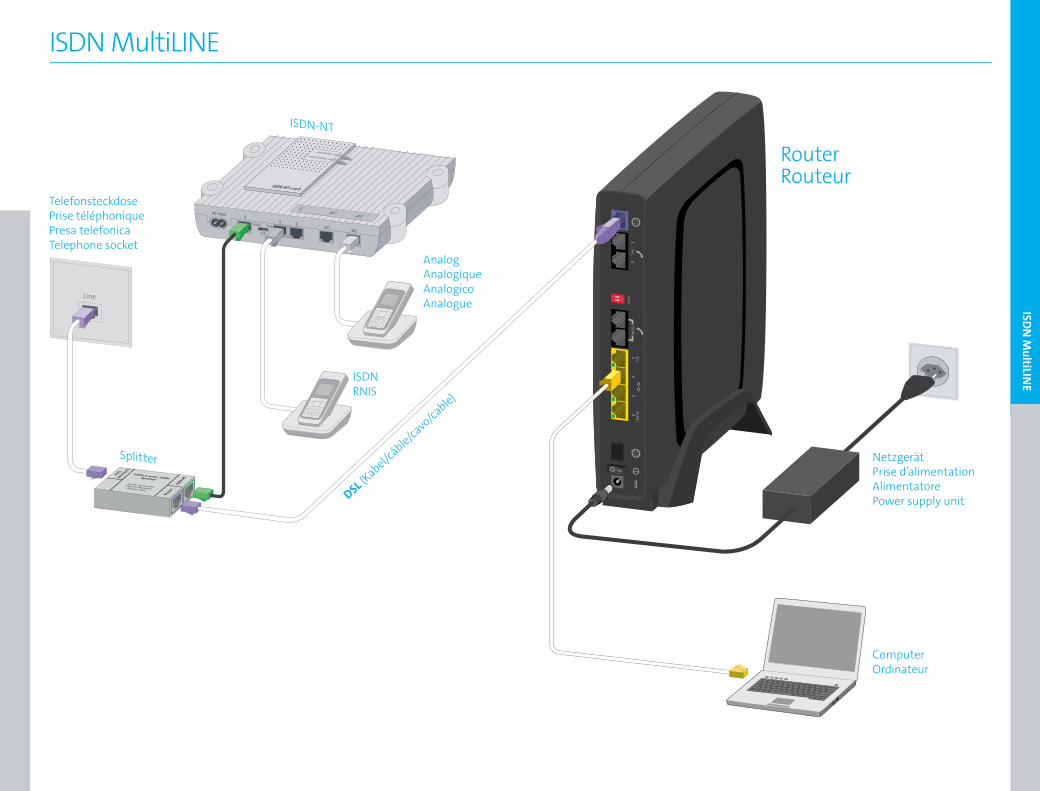
TelefonsteckdosePrise téléphoniquePresa telefonicaTelephone socket
1 SG/
ISDN
ISDN
Tel.WAN
/2
12
34
ON
12
RouterRouteur
AnalogAnalogiqueAnalogicoAnalogue
Splitter
ISDN-NT
ISDNRNIS
1 2 34 5 67 8 9* 0 #
1 2 34 5 67 8 9* 0 #
ISDN MultiLINE
NetzgerätPrise d’alimentation AlimentatorePower supply unit
Computer Ordinateur
ISDN
MultiLIN
E
DSL (Kabel/c
âble/cavo/cable)
1 SG/
ISDN
ISDN
Tel.WAN
/2
12
34
ON
12
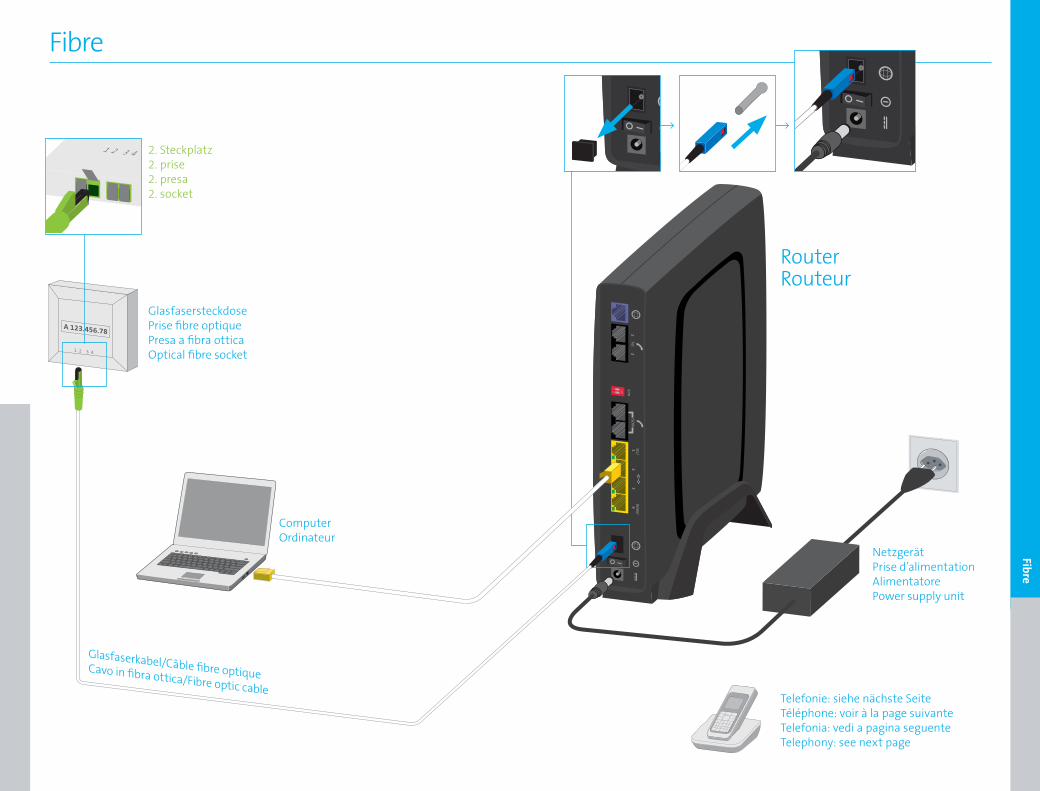
Fibre
1 SG/
ISDN
ISDN
Tel.WAN
/2
12
34
ON
12
1 SG/
ISDN
ISDN
Tel.WAN
/2
12
34
ON
12
2. Steckplatz 2. prise 2. presa2. socket
Telefonie: siehe nächste SeiteTéléphone: voir à la page suivanteTelefonia: vedi a pagina seguenteTelephony: see next page
A 123.456.78
1 2 3 41 2 3 4
123.456.78
Glasfaserkabel/Câble fibre optiqueCavo in fibra ottica/Fibre optic cable
GlasfasersteckdosePrise fibre optiquePresa a fibra otticaOptical fibre socket
Computer Ordinateur
A 123.456.781 2 3 4
Fibre
RouterRouteur
NetzgerätPrise d’alimentation AlimentatorePower supply unit
1 2 34 5 67 8 9* 0 #
1 SG/
ISDN
ISDN
Tel.WAN
/2
12
34
ON
12
RouterRouteur
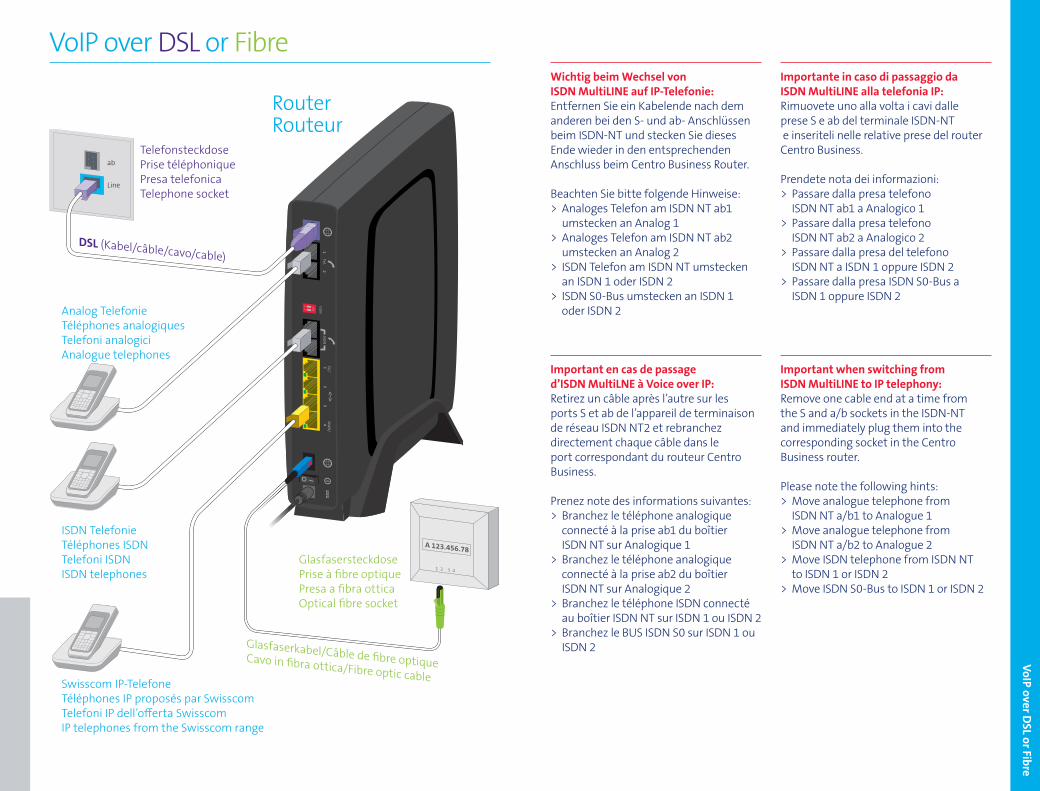
VoIP over DSL or Fibre
Line
abTelefonsteckdosePrise téléphonique Presa telefonicaTelephone socket
DSL (Kabel/câble/cavo/cable)
Analog Telefonie Téléphones analogiquesTelefoni analogiciAnalogue telephones
ISDN TelefonieTéléphones ISDNTelefoni ISDNISDN telephones
Swisscom IP-TelefoneTéléphones IP proposés par Swisscom Telefoni IP dell’off erta Swisscom IP telephones from the Swisscom range
1 2 34 5 67 8 9* 0 #
1 2 34 5 67 8 9* 0 #
1 2 34 5 67 8 9* 0 #
VoIP over DSL or Fibre
Wichtig beim Wechsel von ISDN MultiLINE auf IP-Telefonie: Entfernen Sie ein Kabelende nach dem anderen bei den S- und ab- Anschlüssen beim ISDN-NT und stecken Sie dieses Ende wieder in den entsprechenden Anschluss beim Centro Business Router.
Beachten Sie bitte folgende Hinweise:> Analoges Telefon am ISDN NT ab1 umstecken an Analog 1> Analoges Telefon am ISDN NT ab2 umstecken an Analog 2> ISDN Telefon am ISDN NT umstecken an ISDN 1 oder ISDN 2> ISDN S0-Bus umstecken an ISDN 1 oder ISDN 2
Important en cas de passage d’ISDN MultiLNE à Voice over IP: Retirez un câble après l’autre sur les ports S et ab de l’appareil de terminaison de réseau ISDN NT2 et rebranchez directement chaque câble dans le port correspondant du routeur Centro Business.
Prenez note des informations suivantes:> Branchez le téléphone analogique connecté à la prise ab1 du boîtier ISDN NT sur Analogique 1> Branchez le téléphone analogique connecté à la prise ab2 du boîtier ISDN NT sur Analogique 2> Branchez le téléphone ISDN connecté au boîtier ISDN NT sur ISDN 1 ou ISDN 2> Branchez le BUS ISDN S0 sur ISDN 1 ou ISDN 2
Importante in caso di passaggio da ISDN MultiLINE alla telefonia IP: Rimuovete uno alla volta i cavi dalle prese S e ab del terminale ISDN-NT e inseriteli nelle relative prese del router Centro Business.
Prendete nota dei informazioni:> Passare dalla presa telefono ISDN NT ab1 a Analogico 1> Passare dalla presa telefono ISDN NT ab2 a Analogico 2> Passare dalla presa del telefono ISDN NT a ISDN 1 oppure ISDN 2> Passare dalla presa ISDN S0-Bus a ISDN 1 oppure ISDN 2
Important when switching from ISDN MultiLINE to IP telephony:Remove one cable end at a time from the S and a/b sockets in the ISDN-NT and immediately plug them into the corresponding socket in the Centro Business router.
Please note the following hints:> Move analogue telephone from ISDN NT a/b1 to Analogue 1> Move analogue telephone from ISDN NT a/b2 to Analogue 2> Move ISDN telephone from ISDN NT to ISDN 1 or ISDN 2> Move ISDN S0-Bus to ISDN 1 or ISDN 2
GlasfasersteckdosePrise à fi bre optiquePresa a fi bra otticaOptical fi bre socket
Glasfaserkabel/Câble de fi bre optiqueCavo in fi bra ottica/Fibre optic cable
A 123.456.78
1 2 3 41 2 3 4
123.456.78
Témoins lumineuxet dépannage
Internet ne fonctionne pas
(globe terrestre allumé en rouge) > Tous les câbles sont-ils correcte- ment connectés ? > Dans le cas contraire, faites redé- marrer votre routeur. La LED POWER clignote en blanc ou rouge. > Il ne s’agit pas d’une erreur. Attendez 10 minutes jusqu’à ce que le globe terrestre s’allume en blanc. > Pendant ce temps, n’éteignez surtout pas le routeur.
Le témoin WLAN n’est pas allumé > Appuyez sur le bouton WLAN pour mettre le WLAN en service. > Le symbole LED devrait d’abord clignoter en bleu, puis rester allumé en bleu. > Si ce n’est pas le cas, faites redémarrer votre routeur
Le témoin «Téléphone» est allumé en rouge: la téléphonie
IP n’est pas active. est allumé en blanc: la téléphonie
IP est active. n’est pas allumé: Le routeur Centro
Business est éteint ou la téléphonie IP ne capte aucun signal. > Si le redémarrage n’apporte aucune amélioration, veuillez vous référer à l’aide additionnelle ci-dessous.
Interrupteur ISDN > Si des téléphones ISDN sont connectés, cet interrupteur doit être sur «on». Pour toute aide supplémentaire > www.swisscom.ch/pme-aide > www.swisscom.ch/centrobusiness > Numéro gratuit: 0800 055 055
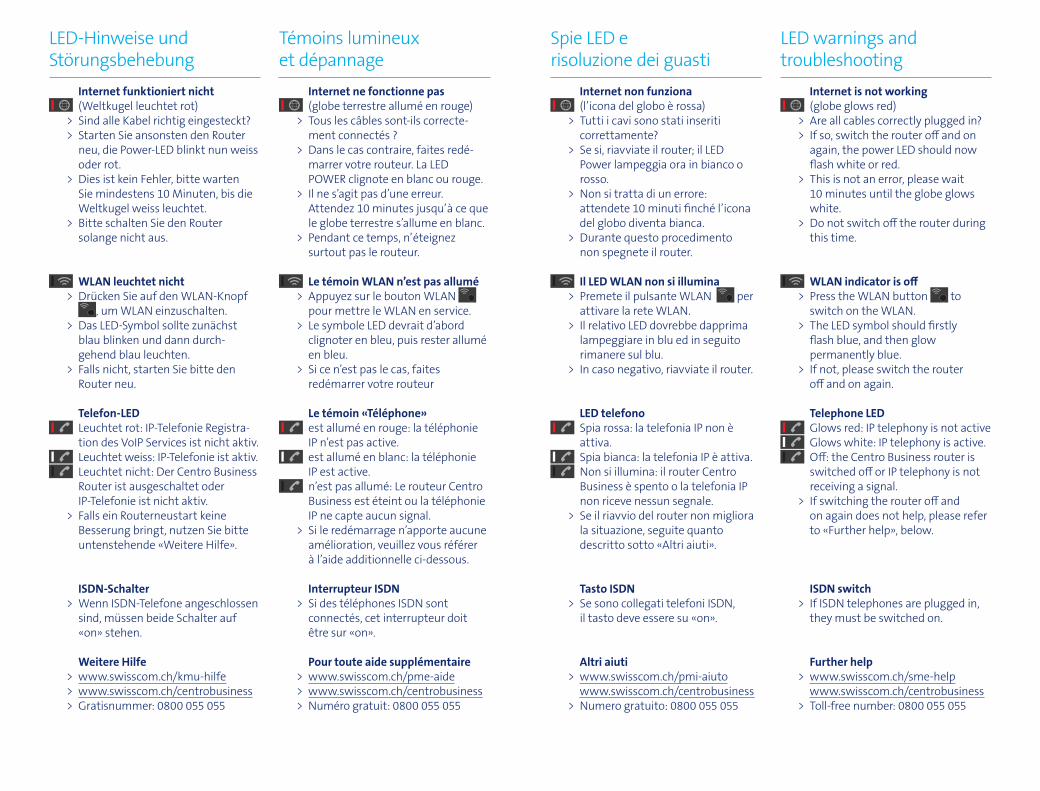
LED-Hinweise und Störungsbehebung
Internet funktioniert nicht
(Weltkugel leuchtet rot) > Sind alle Kabel richtig eingesteckt? > Starten Sie ansonsten den Router neu, die Power-LED blinkt nun weiss oder rot. > Dies ist kein Fehler, bitte warten Sie mindestens 10 Minuten, bis die Weltkugel weiss leuchtet. > Bitte schalten Sie den Router solange nicht aus.
WLAN leuchtet nicht > Drücken Sie auf den WLAN-Knopf , um WLAN einzuschalten. > Das LED-Symbol sollte zunächst blau blinken und dann durch- gehend blau leuchten. > Falls nicht, starten Sie bitte den Router neu.
Telefon-LED Leuchtet rot: IP-Telefonie Registra-
tion des VoIP Services ist nicht aktiv. Leuchtet weiss: IP-Telefonie ist aktiv. Leuchtet nicht: Der Centro Business
Router ist ausgeschaltet oder IP-Telefonie ist nicht aktiv. > Falls ein Routerneustart keine Besserung bringt, nutzen Sie bitte untenstehende «Weitere Hilfe».
ISDN-Schalter > Wenn ISDN-Telefone angeschlossen sind, müssen beide Schalter auf «on» stehen.
Weitere Hilfe > www.swisscom.ch/kmu-hilfe > www.swisscom.ch/centrobusiness > Gratisnummer: 0800 055 055
Spie LED e risoluzione dei guasti
Internet non funziona
(l’icona del globo è rossa) > Tutti i cavi sono stati inseriti correttamente? > Se si, riavviate il router; il LED Power lampeggia ora in bianco o rosso. > Non si tratta di un errore: attendete 10 minuti finché l’icona del globo diventa bianca. > Durante questo procedimento non spegnete il router.
Il LED WLAN non si illumina > Premete il pulsante WLAN per attivare la rete WLAN. > Il relativo LED dovrebbe dapprima lampeggiare in blu ed in seguito rimanere sul blu. > In caso negativo, riavviate il router.
LED telefono Spia rossa: la telefonia IP non è
attiva. Spia bianca: la telefonia IP è attiva. Non si illumina: il router Centro
Business è spento o la telefonia IP non riceve nessun segnale. > Se il riavvio del router non migliora la situazione, seguite quanto descritto sotto «Altri aiuti».
Tasto ISDN > Se sono collegati telefoni ISDN, il tasto deve essere su «on».
Altri aiuti > www.swisscom.ch/pmi-aiuto www.swisscom.ch/centrobusiness > Numero gratuito: 0800 055 055
LED warnings and troubleshooting
Internet is not working
(globe glows red) > Are all cables correctly plugged in? > If so, switch the router off and on again, the power LED should now flash white or red. > This is not an error, please wait 10 minutes until the globe glows white. > Do not switch off the router during this time.
WLAN indicator is off > Press the WLAN button to switch on the WLAN. > The LED symbol should firstly flash blue, and then glow permanently blue. > If not, please switch the router off and on again.
Telephone LED Glows red: IP telephony is not active Glows white: IP telephony is active. Off: the Centro Business router is
switched off or IP telephony is not receiving a signal. > If switching the router off and on again does not help, please refer to «Further help», below.
ISDN switch > If ISDN telephones are plugged in, they must be switched on.
Further help > www.swisscom.ch/sme-help www.swisscom.ch/centrobusiness > Toll-free number: 0800 055 055


