

Mila/Mila MiniMANDELMILCHBEREITER/ALMOND MILK MAKER
DE Bedienungsanleitung EN Instruction manual NL GebruiksaanwijzingIT Instruzione per l’usoFR Mode d’emploiES Manual de instrucciones


3
DE
EN
NL
IT
FR
ES
Technische Daten 4
Sicherheitshinweise 4
Mila und Mila Mini nutzen 8
Reinigung und Pflege 12
Fehler beheben 15
Kundenservice 17
Entsorgung/Umweltschutz 17
Technical Data 18
Safety information 18
Using Mila and Mila Mini 21
Cleaning and care 25
Trouble shooting 28
Customer service 30
Disposal/ Environmental protection 30
Technische gegevens 31
Veiligheidsaanwijzingen 31
Mila en Mila Mini gebruiken 35
Reiniging en onderhoud 40
Fouten oplossen 42
Klantenservice 44
Afvalverwijdering/ Milieubescherming 45
Dati tecnici 46
Indicazioni per la sicurezza 46
Uso Mila e Mila Mini 50
Pulizia e manutenzione 55
Risoluzione dei problemi 58
Servizio clienti 60
Smaltimento/ Protezione dell’ambiente 60
Caracteristiques techniques 61
Consignes de securite 61
Comment utiliser Mila et Mila Mini 65
Nettoyage et entretien 70
Résolution des problèmes & astuces 73
Service clientèle 75
Élimination/ Protection de l'environnement 75
Datos técnicos 76
Advertencias de seguridad 76
Como Usar Mila y Mila Mini 80
Limpieza y cuidado 85
Resolución de problemas 88
Atención al cliente 90
Eliminación/ Protección del medio ambiente 90

4
TECHNISCHE DATEN
Motorleistung: 210 WHeizleistung: 1.000 W Volt/Frequenz: 220-240 V; 50-60 Hz Umdrehungen: Mila 20.000 upm; Mila Mini 15.300 upm Maße (B/T/H): Mila 16 x 36 x 37 cm; Mila Mini 15 x 32 x 34 cmGewicht: Mila ca. 5,8 kg, Mila Mini ca. 4,7 kgKapazität: Mila 300-1000 ml;
Mila Mini 300-600 mlAusstattung: Filterfreie Zubereitung von pflanzlichen Drinks; 6 voreingestellte Pro-gramme; Zeitvoreinstellung; automatische SelbstreinigungsfunktionZubehör: Glaskanne, Rezeptheft
Änderungen und Irrtümer in Aus- stattungsmerkmalen, Technik, Farben und Design vorbehalten.
SICHERHEITSHINWEISE
Bitte lies dir die Gebrauchsanwei-sung vor Inbetriebnahme sorgfäl-tig durch und bewahre diese auf.
VERWENDUNGSZWECKDas Gerät ist ausschließlich für die Herstellung von pflanzlichen Drinks aus Getreide, Nüssen, Ker-nen, Samen, Hülsenfrüchten oder Obst geeignet. Fülle keine anderen Lebensmittel, insbesondere keinen Kaffee, ein.
SYMBOLERKLÄRUNGDieses Symbol warnt vor Gefahren, die zu Schäden
am Gerät führen oder Verletzun-gen nach sich ziehen können.
Dieses Symbol warnt vor einem elektrischen Schlag,
der durch ein defektes Gerät oder unsachgemäße Handhabung aus-gelöst werden kann. Dieses Produkt darf bei erforderlichen Service- arbeiten ausschließlich von einem autorisierten Techniker geöffnet werden.
DE

5
ALLGEMEINE HINWEISE• Überprüfe das Gerät nach dem
Entpacken auf seinen einwand-freien Zustand und eventuelle Beschädigungen, die die Funkti-onssicherheit des Gerätes beein-trächtigen könnten. Sind Mängel vorhanden oder ist das Gerät zu Boden gefallen, nimm es nicht in Betrieb und wende dich an unse-ren Kundenservice.
• Unsachgemäße Reparaturen können zu Gefahren für den Benutzer führen und den Aus-schluss der Garantie zur Fol-ge haben. Falls Einzelteile be-schädigt sind, müssen sie vom Hersteller, einem autorisierten Fachbetrieb oder einer ähn-lich qualifizierten Person ersetzt werden.
• Das Gerät ist ausschließlich für die Herstellung von pflanzlichen Drinks aus Getreide, Nüssen, Kernen, Samen, Hülsenfrüchten oder Obst geeignet. Fülle keine anderen Lebensmittel ein.
• Das Gerät an einem für Kin-der unzugänglichen Ort aufbewahren.
• Kinder unter 8 Jahren sollten dem Gerät fernbleiben oder
durchgehend unter Beaufsichti-gung stehen.
• Kinder ab 8 Jahren und Perso-nen mit verringerten physischen, sensorischen oder mentalen Fä-higkeiten oder Mangel an Erfah-rung und/oder Wissen sollten das Gerät nur dann ein- und aus-schalten/bedienen, wenn es sich in seiner vorgesehenen normalen Bedienungsposition befindet, sie beaufsichtigt werden oder be-züglich des sicheren Gebrauchs unterwiesen wurden und die da-mit einhergehenden Gefahren verstanden haben. Kinder ab 8 Jahren sollten das Gerät weder anschließen noch reinigen oder warten. Das Gerät ist kein Spiel-zeug. Kinder sollten beaufsichtigt werden, um sicherzustellen, dass sie nicht mit dem Gerät spielen.
• Stell das Gerät auf einer freien, ebenen Fläche auf.
• Das Gerät ist ausschließlich für den Haushaltsgebrauch be-stimmt, darüber hinaus für ähnli-che Verwendungszwecke, z.B.• in Teeküchen in Geschäften,
Büroräumen oder sonstigen Arbeitsstätten
• in landwirtschaftlichen Betrieben

6
• zur Verwendung durch Gäste in Beherbergungsbetrieben (Ho-tels, Motels), Privatpensionen oder Ferienhäusern.
• Benutze das Gerät nur nach ord-nungsgemäßem Zusammenbau.
• Das Gerät darf ausschließlich mit Original-Zubehör und Ersatztei-len verwendet werden.
• Mila darf während des Gebrauchs nicht in einem Schrank stehen.
• Fülle niemals kalte oder heiße Flüssigkeiten in die Mixkammer ein und verwende nur zimmer-warme Zutaten.
• Fülle ausschließlich gefiltertes, kalkarmes Trinkwasser in den Wassertank, um dein Gerät zu schonen und den optimalen Ge-schmack zu erhalten.
• Entferne das Gerät nicht wäh-rend der Zubereitung oder des Selbstreinigungsprogramms vom Strom.
• Entferne Kerne, wenn du Obst verarbeitest (z.B. Nektarinen, Kirschen, Pflaumen o. Ä.).
• Fülle keine Kaffeebohnen oder Instantkaffee ein!
• Lass das Gerät vollständig abküh-len, bevor du es reinigst.
ACHTUNG! Halte wäh-rend der Ausgabe deines
Getränks niemals die Hände unter den Auslass. Verbrühungsgefahr!
ACHTUNG! Entferne niemals den Stopfen aus
dem Deckel während der Zuberei-tung. Verbrühungsgefahr!
ELEKTRISCHE SICHERHEIT• Gerät nur an Wechselstrom ge-
mäß Typenschild anschließen. Den Netzstecker nur mit einer geerdeten Steckdose verbinden.
• Das Netzkabel vor Gebrauch vollständig abwickeln.
• Platziere keine Mehrfachsteck-dosen oder Stromgeneratoren in der unmittelbaren Umgebung des Gerätes.
• Ziehe den Netzstecker, sobald du das Gerät nicht mehr verwen-dest. Ziehe nicht am Netzkabel selbst, da es sonst beschädigt werden könnte.
• Schalte die Maschine aus, bevor du den Netzstecker des Gerätes ziehst.
• Dieses Gerät darf nicht mit ei-ner externen Zeitschaltuhr oder einem Fernbedienungssystem betrieben werden.

7
• Nach Gebrauch, vor der Reini-gung oder bei evtl. Störungen während des Betriebs immer den Netzstecker ziehen.
• Gerät nie in Wasser oder eine an-dere Flüssigkeit eintauchen, das Netzkabel und den Netzstecker vor Feuchtigkeit schützen.
• Das Gerät ist nicht spülmaschi-nengeeignet. Deckel, Stopfen, Auffangschale und Glaskanne können in der Spülmaschine ge-reinigt werden.
• Gerät und Netzkabel nie auf oder in der Nähe von heißen Oberflä-chen abstellen oder betreiben.
• Das Kabel darf nicht über die Kante der Arbeitsfläche herunterhängen.
• Verwende das Gerät nicht im Freien.
• Während des Betriebs keine Ge-genstände in das laufende Gerät halten und nicht mit der Hand in das Gerät greifen.
VOR DER ERSTEN INBETRIEBNAHME• Entferne alle Transportsiche-
rungs- und Verpackungsteile und halte diese von Kindern fern – Erstickungsgefahr!
• Vor der ersten Inbetriebnahme und nach längerem Nichtge-brauch sollte Mila gereinigt wer-den. Beachte dabei unsere Reini-gungs- und Pflegehinweise.
• Stelle das Gerät auf eine ebene und trockene Arbeitsfläche.
• Kalibriere Mila indem du die Cleaning Taste gedrückt hältst. Das Programm dauert 5 Minuten.

8
MILA UND MILA MINI NUTZEN
PRODUKTBESCHREIBUNGGerät – Mila und Mila Mini
1. Abnehmbarer Deckel2. Stopfen3. Mixkammer4. Messer5. Display
6. Wassertank7. Auffangbehälter8. Gehäuse9. Auslass10. Glaskanne mit Deckel
1
5
7
9
10
3
2
4
6
8

9
Display Mila
1
4
3
65
2
1. Menge2. Anzeige für Zeit, Menge, Fehler
und Reinigungsmodus3. Zeitvorwahl
4. Reinigungsmodus und Intensiv-Reinigungsmodus
5. Start/Stop 6. Programmauswahl
Display Mila Mini 1
2
653 4
1. Anzeige für Zeit, Menge, Fehler und Reinigungsmodus
2. Zeitvorwahl3. Reinigungsmodus und
Intensiv-Reinigungsmodus
4. Menge5. Programmauswahl6. Start/Stop

10
EIN GETRÄNK ZUBEREITEN1. Schließe das Gerät an den Strom an.2. Schalte Mila an, indem du das Display
unten in der Mitte berührst. Das Display wird jetzt sichtbar
2a
2b
3. Über die Taste „Program“ kannst du die verschiedenen Programme auswählen. Drücke dazu die Taste mehrmals.
4. Drücke die Taste „Capacity“ mehr-mals, um die Menge auszuwählen. In der großen Mila kannst du 300 ml, 500 ml, 800 ml oder 1000 ml
zubereiten. In der Mila Mini kannst du 300 ml oder 600 ml zubereiten. Bei größeren Mengen arbeitet Mila in zwei Durchgängen. Gib deine Zutaten dennoch komplett am Anfang in die Mixkammer.
5. Fülle den Wassertank mit gefiltertem Wasser.
6. Gib deine Zutaten in die Mixkammer.7. Drücke die Taste „Start/Stop“, um das
Programm zu starten.8. Drücke die Taste „Start/Stop“ inner-
halb der ersten Minute erneut, um das Programm abzubrechen.
9. Mila gibt dein Getränk in die Glaskan-ne aus. Achtung: Das Getränk und die Glaskanne sind sehr heiß. Fasse die Glaskanne nur am Griff an. Wenn die Zubereitung abgeschlossen ist, ertönt ein Signal und der Selbstreinigungs-modus startet. Im Display erscheint der Hinweis „Self-clean“. Mila gibt das Reinigungswasser in den Auf-fangbehälter aus. Mila piepst, wenn der Selbstreinigungsmodus ebenfalls abgeschlossen ist.
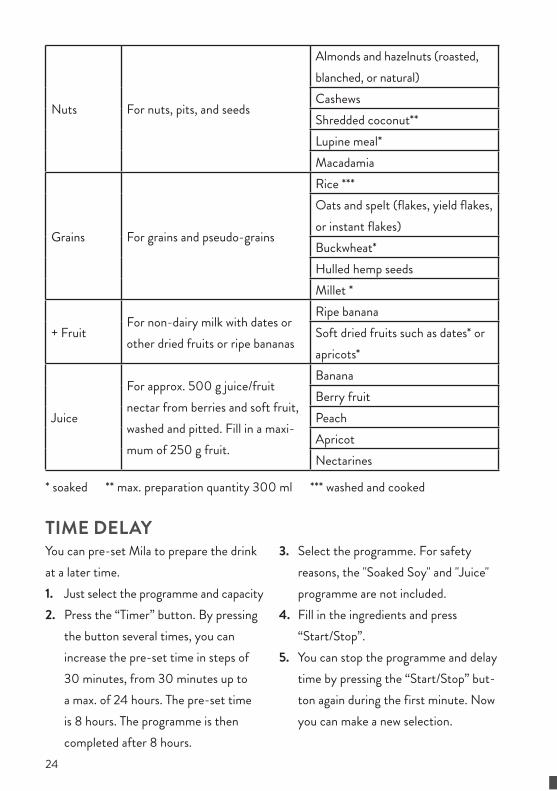
DIE PROGRAMME
Programm Beschreibung Zutaten
Dry Soy / Soaked Soy
Für getrocknete bzw. einge-weichte Sojabohnen und andere Hülsenfrüchte
Getrocknete Sojabohnen
Sojabohnen 12 Std. eingeweicht

11
Nuts Für Nüsse, Kerne und Samen
Mandeln und Haselnüsse (geröstet, blanchiert oder in natur)CashewsKokosraspeln**Lupinenschrot*Macadamia
Grains Für Getreide und Pseudogetreide
Reis ***Hafer und Dinkel (Flocken, Schmelz- oder Instantflocken)Buchweizen*geschälte HanfsamenHirse *
+ FruitFür pflanzliche Milch mit Datteln oder anderem Trockenobst oder reifen Bananen
Reife BananeWeiches Trockenobst wie Datteln* oder Aprikosen*
Juice
Für ca. 500 g Saft/Fruchtnektar aus Beeren und weichem Obst, gewaschen und entsteint. Fülle maximal 250 g Obst ein.
BananeBeerenobstPfirsichAprikoseNektarinen
* eingeweicht ** maximale Zubereitungsmenge 300 ml *** gewaschen und gekocht
DIE ZEITVORWAHLDu kannst Mila vorprogrammieren, sodass sie dein Getränk zu einem späteren Zeit-punkt zubereitet. 1. Wähle dazu dein Programm und die
Kapazität aus2. Wähle die Taste „Timer“ aus.
Durch wiederholtes Drücken kannst du die Zeiteinstellung in 30-Minuten- Schritten von 30 Minuten auf
maximal 24 Stunden verändern. Die voreingestellte Zeit liegt bei 8 Stun-den. Das Programm würde dann in 8 Stunden beendet sein.
3. Wähle das Programm aus. Die Programme "Soaked Soy" und "Juice" sind aus Sicherheitsgründen von dieser Funktion ausgeschlossen.
4. Fülle die Zutaten ein und drücke auf „Start/Stop“.

12
5. Du kannst das Programm und die Zeit-vorwahl abbrechen, indem du inner-halb der ersten Minute „Start/Stop“ drückst. Jetzt kannst du eine neue Auswahl vornehmen.
ACHTUNG! Wenn die Raumtemperatur über
30 °C steigt, solltest du die Zeit-vorwahl nicht auf mehr als 12 h einstellen, um eine Verkeimung zu verhindern.
REINIGUNG UND PFLEGE
REINIGUNGMila kommt mit einem automatischen und zwei manuellen Selbstreinigungsmodi zu dir. So wird die Reinigung ein Kinderspiel.1. Nach jedem Programmdurchlauf
schaltet Mila automatisch die Selbst-reinigung ein. Sie dauert 7 Minuten. Dazu reinigt sie sich einfach mit Wasser. Öffne nach dem Ende der Selbstreinigung den Deckel, um die Mixkammer trocknen zu lassen.
2. Du kannst den Reinigungsmodus auch einfach über das Display auswählen, z. B. wenn du das Gerät länger nicht benutzt hast, einen süßen Drink (mit Zucker, Sirup, Trockenobst oder Früchten) zubereitet hast oder eine Grundreinigung fällig wird:• Wähle den Reinigungsmodus aus
und drücke auf Start, um den Reinigungsmodus zu starten. Er dauert 3 Minuten. Öffne nach dem Ende der Selbstreinigung
den Deckel, um die Mixkammer trocknen zu lassen.
• Drücke die Reinigungstaste er neut, um den Intensiv-Reini-gungs modus auszuwählen. Er dauert 8 Minuten. Du solltest ihn regelmäßig starten, auch wenn du deine Maschine häufig verwendest. Gib vor dem Pro-grammstart einen Tropfen mildes Spülmittel in die Verarbeitungs-kammer. Achte bei der ersten Nutzung darauf, dass das Spül-mittel nicht zu stark konzentriert ist und die Mischkammer nicht überschäumt. Sind nach Ende des Programms noch Schaum-rückstände zu sehen, spüle mit dem 3-Minuten-Spülprogramm nach. Öffne nach dem Ende der Selbstreinigung den Deckel, um die Mixkammer trocknen zu lassen.

13
3. Öffne den Deckel und ziehe ihn einfach senkrecht nach oben ab, so kannst du ihn besser per Hand reini-gen. Den Stopfen kannst du einfach herausnehmen. Reinige Deckel und Stopfen nicht in der Spülmaschine, um die Dichtungen zu schonen.
4. Reinige auch die Metallstifte, die in die Mixkammer ragen, das Silikonventil, durch das Wasser in die Mixkammer fließt sowie den Silikonausguss regel-mäßig mit einem feuchten Tuch.
5. Den Wassertank solltest du regelmä-ßig reinigen, sodass er immer hygie-nisch sauber ist.
6. Wische das Gehäuse einfach mit einem feuchten, weichen Tuch ab und trockne es anschließend sorgfältig.
ACHTUNG! Solltest du die Klingen per Hand
reinigen wollen, musst du das Gerät ausschalten und den Netz-stecker vom Strom nehmen. Sei besonders aufmerksam und vor-sichtig, die Klingen sind sehr scharf.
Nimm das Gerät während des Reinigungsprogramms
nicht vom Strom und breche das Programm nicht ab.
RESTE AUS DER MIXKAMMER ENTFERNENSollten durch einen Stromausfall oder aus einem anderen Grund Reste oder unfertige Milch in der Mixkammer sein, die du entfernen möchtest, befolge diese Schritte:1. Schließe Mila an die Strom -
versorgung an.2. Wenn alle Symbole im Display er-
scheinen, kannst du Reste ausgeben lassen, indem du die Taste "Capacity" gedrückt hältst.
3. Starte anschließend ein manuelles Reinigungsprogramm über die Taste „Cleaning“.
ENTKALKUNGVerwende für Mila ausschließlich gefil-tertes Wasser, um das Gerät zu schonen. Zusätzlich solltest du Mila regelmäßig entkalken. Wir empfehlen die Entkalkung nach jedem 50. Zubereitungsvorgang oder wenn du deutliche Kalkablagerungen an oder in der Maschine feststellst. Gehe dazu wie folgt vor:1. Gib 3 TL Haushaltsnatron in den Was-
sertank und fülle ihn mit Wasser auf.2. Lasse ein Zubereitungsprogramm ohne
Zutaten mit einer Menge von 300 ml durchlaufen.
14
3. Breche die Zubereitung ab, indem du den Wassertank entfernst. Gieße das übrige Natronwasser ab. Warte 1 Stun-de und setze den Wassertank wieder mit frischem Wasser ein. Lasse das Programm zu Ende durchlaufen.
4. Lasse anschließend zwei Zubereitungs-programme ohne Zutaten mit einer Menge von jeweils 1000 ml durchlau-fen. Wiederhole den Vorgang, falls er-forderlich. Jetzt ist Mila wieder startklar.
Von der Gewährleistung ausgeschlossen sind Ausfälle oder Funktionsstörungen des Geräts infolge nicht durchgeführter Entkalkungen.
KLINGEN AUSTAUSCHENSollten die Klingen deiner Mila nach einer Weile abstumpfen, kannst du sie selbst tauschen. Verwende dazu ausschließlich Original-Ersatzteile!
ACHTUNG! Sei besonders vorsichtig, wenn du mit
Klingen hantierst, auch dann, wenn sie bereits abgestumpft sein sollten. Es besteht Verletzungsgefahr!
1. Vergewissere dich, dass Mila nicht am Stromnetz angeschlossen ist.
2. Verwende zwei stabile Werkzeuge wie zum Beispiel lange Schraubenzieher.
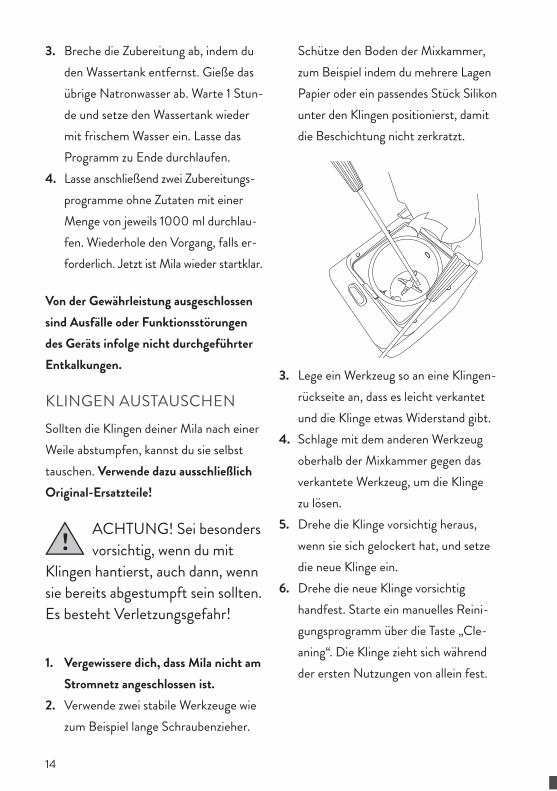
Schütze den Boden der Mixkammer, zum Beispiel indem du mehrere Lagen Papier oder ein passendes Stück Silikon unter den Klingen positionierst, damit die Beschichtung nicht zerkratzt.
3. Lege ein Werkzeug so an eine Klingen-rückseite an, dass es leicht verkantet und die Klinge etwas Widerstand gibt.
4. Schlage mit dem anderen Werkzeug oberhalb der Mixkammer gegen das verkantete Werkzeug, um die Klinge zu lösen.
5. Drehe die Klinge vorsichtig heraus, wenn sie sich gelockert hat, und setze die neue Klinge ein.
6. Drehe die neue Klinge vorsichtig handfest. Starte ein manuelles Reini-gungsprogramm über die Taste „Cle-aning“. Die Klinge zieht sich während der ersten Nutzungen von allein fest.

15
FEHLER BEHEBEN
Mila zeigt dir über den Signalton und das Display an, wenn ein Problem vorliegt.
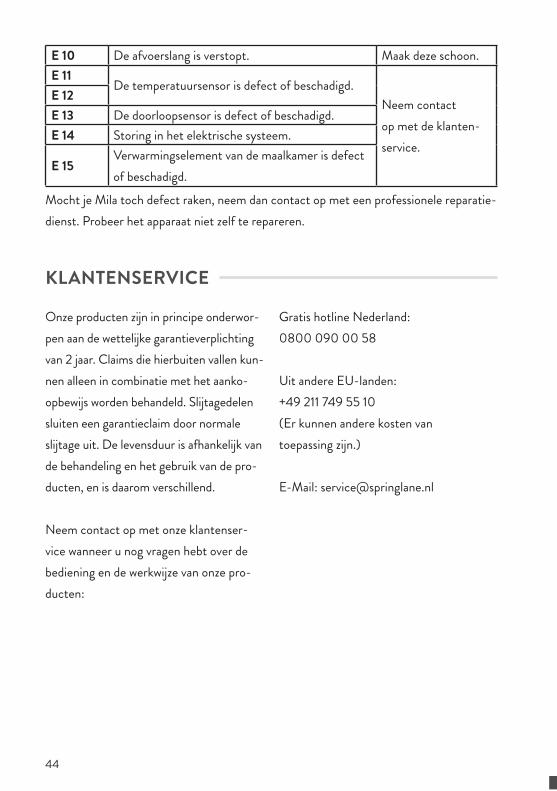
E04E01 E02 E03
1. Die Glaskaraffe fehlt.2. Der Wassertank ist leer.3. Der Deckel ist geöffnet oder
nicht richtig geschlossen.
4. Der Auffangbehälter muss ausgeleert werden.
Bitte gehe folgende Schritte durch, falls das Gerät nicht ordnungsgemäß funktioniert:1. Überprüfe, ob die Bedienungsanleitung genau und korrekt befolgt wurde. 2. Überprüfe, ob die unten aufgeführte Tabelle mögliche Lösungen anbietet.3. Überprüfe, ob alle Sicherungen intakt sind.
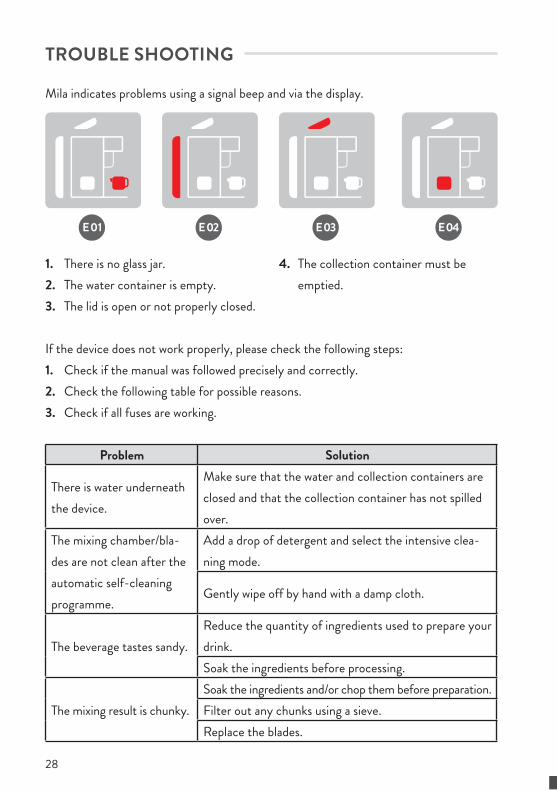
Problem Lösung
Unter dem Gerät befindet sich Wasser.
Vergewissere dich, dass Wassertank und Auffang-behälter dicht sind und der Auffangbehälter nicht übergelaufen ist.
Die Mixkammer/ die Klingen werden nach dem automatischen Selbstreinigungsprogramm nicht sauber.
Verwende einen Tropfen Spülmittel und wähle den Intensiv-Reinigungsmodus.
Wische vorsichtig per Hand mit einem feuchten Tuch nach.
Der Drink schmeckt sandig.
Verringere die Zutatenmenge für deinen Drink.Weiche die Zutat vor der Verarbeitung ein.
16
Das Mixergebnis ist stückig.
Weiche die Zutaten ein und/oder zerkleinere sie vor der Zubereitung.Filtere Stückchen mit dem Sieb aus.Tausche die Klingen.
FEHLERCODESFehler-
codeProblem Lösung
E 05 Der Motor ist durch zu viele Zutaten überlastet.Bitte Zutaten entfernen.
E 06Die Mixkammer enthält zu viele Zutaten oder die Temperatursensoren sind verklebt.
Entferne die Zutaten und reinige die Sensoren in der Mixkammer.
E 07 Die Spannung liegt unter 160 V oder über 260 V.Bitte kontaktiere den Kundenservice.
E 08Signalstörung.
E 09E 10 Der Auslassschlauch ist verstopft. Bitte reinigen.E 11
Ein Temperatursensor ist defekt oder beschädigt.
Bitte kontaktiere den Kundenservice.
E 12E 13 Der Durchlasssensor ist defekt oder beschädigt.E 14 Störung der Elektrik.
E 15Heizeinheit der Mixkammer defekt oder beschädigt.
Sollte deine Mila darüber hinaus Defekte aufweisen, wende dich bitte an den Hersteller oder einen professionellen Reparaturdienst. Versuche nicht, das Gerät selbst zu reparieren.
17
KUNDENSERVICE
Grundsätzlich unterliegen unsere Produk-te der gesetzlichen Gewährleistungspflicht von 2 Jahren. Ansprüche darüber hinaus können nur in Verbindung mit dem Kauf-beleg bearbeitet werden. Verschleißtei-le schließen bei der üblichen Abnutzung einen Gewährleistungsanspruch aus. Die Lebensdauer hängt von der jeweiligen Be-handlung und Nutzung der Produkte ab und ist daher variabel.
Wende dich für Fragen zur Bedienung oder Funktion unserer Artikel an unseren Kundenservice:
Kostenlose Hotline für Deutschland/Österreich: 0800 270 70 27
E-Mail: [email protected]
ENTSORGUNG/UMWELTSCHUTZ
Unsere Produkte werden mit hohem Qualitätsanspruch hergestellt und sind für eine
lange Lebensdauer ausgelegt. Regelmäßi-ge Wartung und Pflege tragen dazu bei, die Nutzungsdauer zu verlängern. Ist das Gerät defekt und nicht mehr zu reparie-ren, darf es nicht zusammen mit dem normalen Hausmüll entsorgt werden.
Du musst das Gerät bei einer ausgewie-senen Entsorgungsstelle zum Recycling elektrischer oder elektronischer Geräte abgeben. Durch die fachgerechte Entsor-gung und das Recycling leistest du einen wichtigen Beitrag zum Schutz unserer Umwelt.
Dieses Gerät entspricht der WEEE Richt-linie 2002/96/EG über die Entsorgung elektrischer und elektronischer Altgeräte.
18
TECHNICAL DATA
Engine power: 210 WHeating power: 1.000 W Volt/frequency: 220-240 V; 50-60 Hz Rotations: Mila 20.000 rpm; Mila Mini 15.300 rpm Dimensions (W/D/H): Mila 16 x 36 x 37 cm; Mila Mini 15 x 32 x 34 cmWeight: Mila approx. 5,8 kg; Mila Mini approx. 4,7 kg
Capacity: Mila 300-1000 ml; Mila Mini 300-600 ml Equipment: Filter-free preparation of plant based drinks; 6 programmes; delay timer; automatic self-cleaning functionAccessories: glass jar, recipe booklet
Specifications, technology, colours, and de-sign are subject to change without notice.
SAFETY INFORMATION
Please read this manual carefully before using the device for the first time and keep the manual.
INTENDED USEThe appliance is exclusively inten-ded for the preparation of vegetab-le drinks made of grains, nuts, pits, seeds, legumes, or fruit. Do not fill it with any other types of food, especially coffee.
EXPLANATION OF SYMBOLSThis symbol warns of ha-zards that can damage the
appliance or cause injury.
This symbol warns of an electric shock that may be
caused by a defective appliance or by improper handling. This product may only be opened for necessary service work by an authorised technician.
GENERAL INFORMATION• After unpacking the appliance,
check that it is in perfect con-dition and has not sustained any damage that could impair its functional safety. Should you notice any defects or if the ap-pliance has fallen on the floor, do not attempt to use it, but call our customer service.
EN
19
• Improper repairs can lead to hazards for the user and the war-ranty may be deemed void. If in-dividual parts are damaged, they must be replaced by the manufac-turer, an authorised specialist com-pany, or a similarly qualified person.
• The appliance is exclusively inten-ded for the preparation of vegetab-le drinks made of grains, nuts, pits, seeds, legumes, or fruit. Do not fill it with any other types of food.
• Store the appliance out of the re-ach of children.
• Children under the age of 8 should be kept away from the appliance or be under constant supervision.
• Children aged 8 and above or persons with reduced physi-cal, sensory, or mental capabi-lities or lack of experience and/or knowledge should only switch on/off or use the appliance if it is in its intended, normal operatio-nal position, and if they are su-pervised or have been instructed on the safe use of the appliance and have understood the hazards involved. Children aged 8 and above should neither connect nor clean or service the appliance. The appliance is not a toy. Child-ren should be supervised to ensu-
re that they do not play with the appliance.
• Position the appliance on a free and level surface.
• The appliance is only intended for use in the household or other si-milar uses such as• in kitchenettes in shops, of-
fices, or other workplaces,• on farms,• for use by guests in accommo-
dation establishments (hotels, motels), private guest houses, or holiday homes.
• Only use the appliance after pro-per assembly.
• The appliance may only be used with its original accessories and spare parts.
• Mila may not be operated while standing in a cabinet.
• Never fill cold or hot liquids into the mixing chamber and only use ingredients at room temperature.
• Only fill the water container with filtered water with a low lime content, to protect your applian-ce and get the best possible taste.
• Do not disconnect the applian-ce from the mains during pre-paration or the self-cleaning programme.
• Remove stones of fruit before

20
processing (e.g. nectarines, cher-ries, plums, and similar fruit).
• Do not fill it with coffee beans or instant coffee!
• Allow the appliance to cool com-pletely before cleaning.
WARNING: Never hold your hands under the spout
as the beverage is being dispensed. Danger of scalding!
WARNING: Never remove the plug from the lid during
preparation. Danger of scalding!
ELECTRICAL SAFETY• Connect the appliance only to al-
ternating current as indicated on the type plate. Connect the mains plug only to an earthed socket.
• Uncoil the power cable comple-tely before use.
• Do not place any power strips or power generators in the immedi-ate vicinity of the appliance.
• Disconnect the mains plug as soon as you have finished using the appliance. Do not pull on the power cable itself, as this might damage the cable.
• Switch off the machine before unplugging it.
• The appliance may not be ope-rated with an external timer or remote-control system.
• Always disconnect the mains plug after use, before cleaning, or in the event of malfunctions during operation.
• Do not immerse the appliance in water or any other liquid. Protect the power cable and mains plug from moisture.
• The appliance is not suitable for dishwashers. The lid, plunger, col-lection tray, and glass jar can be cleaned in the dishwasher.
• Never place or use the appliance and power cable on or near a hot surface.
• The cable must not hang over the edge of the work surface.
• Do not use the appliance outdoors. • Do not insert objects or your
hand into the appliance while it is in operation.
BEFORE USING THE APPLIANCE FOR THE FIRST TIME• Remove all transport safety and
packaging parts and keep them away from children – danger of suffocation!
• Mila should be cleaned before the first use and after prolonged
21
periods of non-use. When doing so, follow our instructions on cle-aning and maintenance.
• Place the appliance on a level and dry surface.
• Calibrate Mila by holding the Cleaning button. The programme will take 5 minutes.
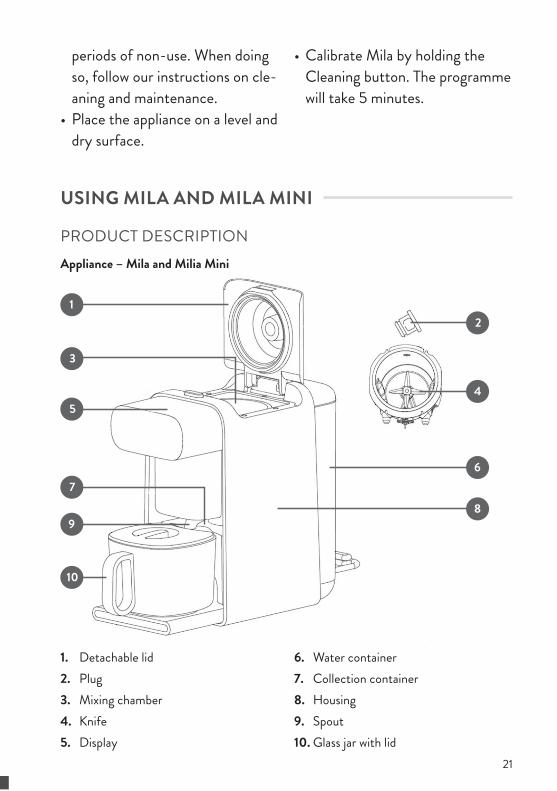
USING MILA AND MILA MINI
PRODUCT DESCRIPTION Appliance – Mila and Milia Mini
1
5
7
9
10
3
2
4
6
8
1. Detachable lid2. Plug3. Mixing chamber4. Knife5. Display
6. Water container7. Collection container8. Housing9. Spout10. Glass jar with lid

22
Display Mila
1
4
3
65
2
1. Quantity2. Indicators for time, quantity, faults,
and cleaning mode3. Time delay
4. Cleaning mode and intensive cleaning mode
5. Start/Stop6. Programme selection
Display Mila Mini 1
2
653 4
1. Indicators for time, quantity, faults, and cleaning mode
2. Time delay
3. Cleaning mode and intensive cleaning mode
4. Quantity5. Programme selection6. Start/Stop

23
PREPARING A DRINK1. Connect the appliance to the power
supply.2. Switch on Mila by tapping at the
bottom centre of the display. The display now lights up. 2a
2b
3. You can select the various programmes using the “Program” button. Just push the button several times.
4. Press the “Capacity” button multiple times to select the quantity. You can prepare 300 ml, 500 ml, 800 ml, or 1,000 ml in the large Mila.
Mila Mini is suitable for the prepa-ration of 300 ml or 600 ml. Mila processes large quantities in two runs. Nevertheless, all ingredients are to be poured into the mixing chamber at the beginning.
5. Fill the water container with filtered water.
6. Pour all ingredients into the mixing chamber.
7. Press the “Start/Stop” button to start the programme.
8. Press the “Start/Stop” button again during the first minute to stop the programme.
9. Mila pours your drink into the glass jar. Warning: The drink and glass jar are very hot. Only hold the glass jar by the handle. At the end of pre-paration, you will hear a beep sound as the self-cleaning mode starts. The display will show the following message “Self-clean”. Mila pours out the cleaning water into the collection container. Mila beeps again when the self-cleaning mode is completed.
PROGRAMMES
Programme Description IngredientsDry soy/Soaked soy
For dried or soaked soybeans and other legumes
Dried soybeansSoybeans soaked for 12 hours
24
Nuts For nuts, pits, and seeds
Almonds and hazelnuts (roasted, blanched, or natural)CashewsShredded coconut**Lupine meal*Macadamia
Grains For grains and pseudo-grains
Rice ***Oats and spelt (flakes, yield flakes, or instant flakes)Buckwheat*Hulled hemp seedsMillet *
+ FruitFor non-dairy milk with dates or other dried fruits or ripe bananas
Ripe bananaSoft dried fruits such as dates* or apricots*
Juice
For approx. 500 g juice/fruit nectar from berries and soft fruit, washed and pitted. Fill in a maxi-mum of 250 g fruit.
BananaBerry fruitPeachApricotNectarines
* soaked ** max. preparation quantity 300 ml *** washed and cooked
TIME DELAYYou can pre-set Mila to prepare the drink at a later time. 1. Just select the programme and capacity2. Press the “Timer” button. By pressing
the button several times, you can increase the pre-set time in steps of 30 minutes, from 30 minutes up to a max. of 24 hours. The pre-set time is 8 hours. The programme is then completed after 8 hours.
3. Select the programme. For safety reasons, the "Soaked Soy" and "Juice" programme are not included.
4. Fill in the ingredients and press “Start/Stop”.
5. You can stop the programme and delay time by pressing the “Start/Stop” but-ton again during the first minute. Now you can make a new selection.
25
WARNING: If the room temperature exceeds
30°C, do not set the timer at over 12 hours to prevent germs.
CLEANING AND CARE
CLEANINGMila comes with one automatic and two manual self-cleaning modes. This makes cleaning a breeze. 1. After every programme, Mila auto-
matically switches on the self-cleaning mode. The cleaning takes 7 minutes. Mila only needs water to clean herself. After the end of the self-cleaning pro-cess, open the lid to allow the mixing chamber to dry.
2. You can also directly select the clea-ning mode via the display, for example after not using the device for a longer period of time, after preparing a sweet drink (with sugar, syrup, or fruit), or whenever the appliance is due for a basic cleaning:• Select the cleaning mode and
press “Start” to start the clea-ning mode. It takes 3 minutes. After the end of the self-cleaning process, open the lid to allow the mixing chamber to dry.
• Press the Cleaning button again to select the intensive cleaning mode. This programme takes 8 minutes. It is recommended to run the intensive cleaning programme regularly, even if the appliance is in constant use. Add a drop of mild detergent into the mixing chamber before the programme starts. On first use, make sure that the detergent is not too highly concentrated to prevent excessive foam from forming in the mixing chamber. If foam residues remain after the end of the programme, flush out the appliance using the 3-minute flushing programme. After the end of the self-cleaning process, open the lid to allow the mixing chamber to dry.
3. Open the lid and simply remove it in the vertical direction for easier cleaning by hand. You can also simply remove the plug. Do not clean the

26
lid and plug in a dishwasher, to avoid damaging the seals.
4. Also regularly clean the metal pins pro-truding into the mixing chamber, the silicone valve through which the water flows into the mixing chamber, as well as the silicone spout with a damp cloth.
5. Regularly clean the water container to make sure it always stays hygienically clean.
6. Clean the housing with a damp and soft cloth and thoroughly dry afterwards.
WARNING: If you wish to clean the blades by hand,
switch off the device and remove the mains plug. Please pay attenti-on and be careful, the blades are very sharp.
Do not disconnect the power supply of the appli-
ance during the cleaning program-me and do not interrupt the programme.
REMOVE RESIDUES FROM THE MIXING CHAMBERPlease follow these steps if you wish to remove any residues or unfinished milk left in the mixing chamber due to a power outage or for a different reason:
1. Connect Mila to the power supply.2. As soon as the display shows all sym-
bols, you can have the rests fed out by holding the "Capacity" button.
3. Afterwards, start a manual cleaning programme using the “Cleaning” button.
DESCALINGTreat Mila with care and only use filtered water. You should additionally descale Mila regularly. We recommend descaling after every 50th preparation process, or whenever you clearly notice limescale on or in the machine. To descale, proceed as follows:1. Add 3 tsp baking soda into the water
container and fill it with water.2. Run through a preparation programme
without any ingredients using a quantity of 300 ml.
3. Abort the preparation by removing the water container. Drain the remaining water with baking soda. Wait for 1 hour and reinsert the water container with fresh water. Now, allow the programme to finish.
4. Afterwards, run through two preparation programmes without any ingredients using a quantity of 1,000 ml each time. Repeat the process, if required. Now, Mila is good to go.

27
The warranty does not cover faults and malfunctions of the appliance that are the result of a lack of descaling.
REPLACEMENTIf Mila's blades get blunt after a period of use, you can replace them yourself. Only use original spare parts!
ATTENTION! Exercise particular care when
handling the blades, also if they are dull. There is a risk of injury!!
1. Ensure that Mila is not connected to the power supply.
2. Use two rugged tools such as long screwdrivers. Protect the base of the mixing chamber, e.g. by placing several layers of paper or a fitting piece of silicone underneath the blades, to prevent scratching the coating.
3. Position one tool on the back side of the blade and slightly tilt it with the blade exerting a bit of resistance.
4. Use the other tool to strike against the tilted tool above the mixing chamber to loosen the blade.
5. After loosening the blade, carefully remove it by turning it and insert the new blade.
6. Carefully tighten the new blade by hand. Start a manual cleaning program-me using the “Cleaning” button. The blade fastens itself during the first uses.
28
TROUBLE SHOOTING
Mila indicates problems using a signal beep and via the display.
E04E01 E02 E03
1. There is no glass jar. 2. The water container is empty.3. The lid is open or not properly closed.
4. The collection container must be emptied.
If the device does not work properly, please check the following steps:1. Check if the manual was followed precisely and correctly.2. Check the following table for possible reasons.3. Check if all fuses are working.
Problem Solution
There is water underneath the device.
Make sure that the water and collection containers are closed and that the collection container has not spilled over.
The mixing chamber/bla-des are not clean after the automatic self-cleaning programme.
Add a drop of detergent and select the intensive clea-ning mode.
Gently wipe off by hand with a damp cloth.
The beverage tastes sandy.Reduce the quantity of ingredients used to prepare your drink.Soak the ingredients before processing.
The mixing result is chunky.Soak the ingredients and/or chop them before preparation. Filter out any chunks using a sieve.Replace the blades.

29
ERROR CODESError code
Problem Solution
E 05The motor is overloaded due to too many ingredients.
Reduce the amount of ingredients and clean the machine.
E 06The temperature sensores are sticky or there are too many ingredients.
Reduce the amount of ingredients and clean the sensors inside of the mixing chamber.
E 07 The voltage is lower than 160 V or exceeds 260 V.Please contact customer services.
E 08Signal defect.
E 09E 10 The discharge hose is jammed. Please clean.E 11
The temperature sensor is defective or damaged.
Please contact customer services.
E 12E 13 The pass-through sensor is defective or damaged.E 14 Electrical fault.
E 15The heating unit of the mixing chamber is defective or damaged.
Should your Mila show any other defects, please contact a professional repair service provider. Do not attempt to repair the appliance yourself.

30
CUSTOMER SERVICE
In principle, our products have a legal war-ranty duty of 2 years. Further claims canonly be processed in conjunction with a proof of purchase. Wearing parts excludeany warranty claims, when usual abrasion has occurred. The durability is determinedby the respective handling and use of the products and is thus variable.
For questions concerning handling and functionality of our products, please cont-act our customer-service:
Free hotline for Germany/Austria only: 0800 270 70 27 From other EU countries: +49 211 749 55 10(Different costs may apply.)
E-Mail: [email protected]
DISPOSAL/ENVIRONMENTAL PROTECTION
Our products are manufactured to high quality standards and are designed for a long service life.
Regular maintenance and care will help to extend service life. If the appliance is defective and can no longer be repaired, it must not be disposed of in the normal household waste.
Take the appliance to a designated disposal point for recycling electrical or electronic equipment. Through professional disposal and recycling you make an important con-tribution to protecting our environment.
This device complies with WEEE Directive 2002/96/EG on the disposal of waste electrical and electronic equipment.
31
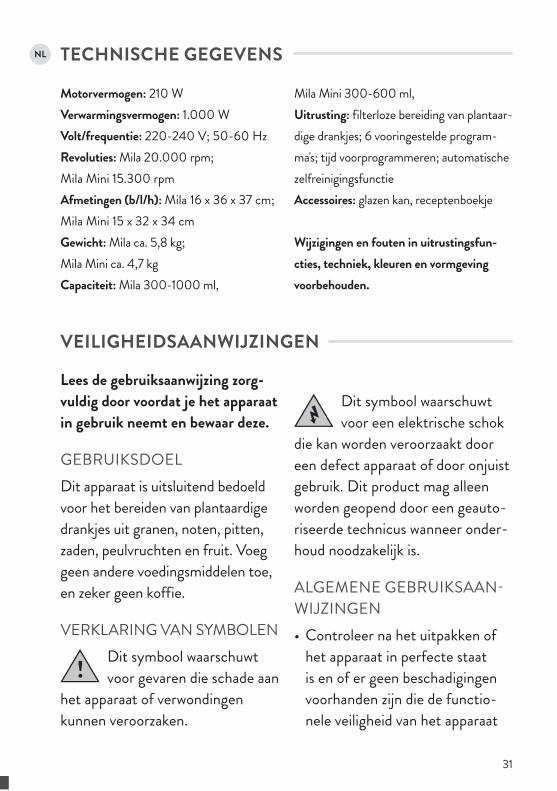
TECHNISCHE GEGEVENS
Motorvermogen: 210 WVerwarmingsvermogen: 1.000 W Volt/frequentie: 220-240 V; 50-60 Hz Revoluties: Mila 20.000 rpm; Mila Mini 15.300 rpm Afmetingen (b/l/h): Mila 16 x 36 x 37 cm; Mila Mini 15 x 32 x 34 cmGewicht: Mila ca. 5,8 kg; Mila Mini ca. 4,7 kgCapaciteit: Mila 300-1000 ml,
Mila Mini 300-600 ml, Uitrusting: filterloze bereiding van plantaar-dige drankjes; 6 vooringestelde program-ma's; tijd voorprogrammeren; automatische zelfreinigingsfunctieAccessoires: glazen kan, receptenboekje
Wijzigingen en fouten in uitrustingsfun-cties, techniek, kleuren en vormgeving voorbehouden.
VEILIGHEIDSAANWIJZINGEN
Lees de gebruiksaanwijzing zorg-vuldig door voordat je het apparaat in gebruik neemt en bewaar deze.
GEBRUIKSDOELDit apparaat is uitsluitend bedoeld voor het bereiden van plantaardige drankjes uit granen, noten, pitten, zaden, peulvruchten en fruit. Voeg geen andere voedingsmiddelen toe, en zeker geen koffie.
VERKLARING VAN SYMBOLENDit symbool waarschuwt voor gevaren die schade aan
het apparaat of verwondingen kunnen veroorzaken.
Dit symbool waarschuwt voor een elektrische schok
die kan worden veroorzaakt door een defect apparaat of door onjuist gebruik. Dit product mag alleen worden geopend door een geauto-riseerde technicus wanneer onder-houd noodzakelijk is.
ALGEMENE GEBRUIKSAANWIJZINGEN• Controleer na het uitpakken of
het apparaat in perfecte staat is en of er geen beschadigingen voorhanden zijn die de functio-nele veiligheid van het apparaat
NL
32
kunnen beïnvloeden. Als er ge-breken worden vastgesteld of als het apparaat op de grond is ge-vallen, mag je het niet in gebruik nemen en dien je contact op te nemen met onze klantenservice.
• Ondeskundige reparaties kunnen leiden tot risico's voor de gebruiker en uitsluiting van de garantie. Als afzonderlijke onderdelen bescha-digd zijn, moeten deze door de fabrikant, een erkende specialist of een vergelijkbaar gekwalificeerd persoon worden vervangen.
• Dit apparaat is uitsluitend bedoeld voor het bereiden van plantaardige drankjes uit granen, noten, pitten, zaden, peulvruchten en fruit. Voeg geen andere voedingsmiddelen toe.
• Bewaar het apparaat op een plaats die niet toegankelijk is voor kinderen.
• Houd kinderen jonger dan 8 jaar uit de buurt van het apparaat, of onder voortdurend toezicht.
• Kinderen ouder dan 8 jaar en personen met verminderde fysie-ke, sensorische of mentale ver-mogens of gebrek aan ervaring en/of kennis, mogen het apparaat alleen in- en uitschakelen/bedie-nen indien het apparaat zich in de normale gebruiksstand bevindt,
er voortdurend toezicht wordt gehouden en wanneer de gebru-iker de instructies voor veilig ge-bruik kent en de mogelijke risico's heeft begrepen. Kinderen vanaf 8 jaar mogen het apparaat niet aansluiten, schoonmaken of on-derhouden. Het apparaat is geen speelgoed. Kinderen moeten on-der toezicht gehouden worden om te garanderen dat ze niet met het apparaat spelen.
• Plaats het apparaat op een vrije en vlakke ondergrond.
• Het apparaat is uitsluitend bes-temd voor huishoudelijk gebruik, maar ook voor soortgelijke do-eleinden, zoals bijv.• in theekeukens, winkels, kanto-
ren of andere werkplaatsen• in landbouwbedrijven• voor gebruik door gasten in
accommodaties (hotels, mo-tels), particuliere pensions of vakantiehuizen.
• Gebruik het apparaat pas na-dat het op de juiste wijze is gemonteerd.
• Het apparaat mag uitsluitend met originele accessoires worden gebruikt.
• Mila mag tijdens gebruik niet in de koelkast staan.

33
• Voeg nooit warme of koude vlo-eistoffen toe aan de maalkamer, en gebruik alleen ingrediënten op kamertemperatuur.
• Vul het waterreservoir voor de optimale smaak en voor bescher-ming van je apparaat enkel met gefilterd, kalkarm water.
• Schakel de stroom van het appa-raat niet uit tijdens bereiding of bij het zelfreinigingsprogramma.
• Verwijder vóór verwerking pitten uit fruit (bijv. nectarines, kersen, pruimen).
• Voeg geen koffiebonen of oplos-koffie toe!
• Laat het apparaat volledig afko-elen voordat je het schoonmaakt.
LET OP: houd tijdens de uitvoer van je drankje nooit
je handen onder de uitloop. Gevaar voor verbranding!
LET OP: haal nooit de afsluitdop uit het deksel
tijdens de bereiding. Gevaar voor verbranding!
ELEKTRISCHE VEILIGHEID• Sluit het apparaat alleen aan op
wisselstroom zoals aangegeven op het typeplaatje. Sluit de netstek-ker alleen aan op een geaard stopcontact.
• Rol het netsnoer volledig af voor-dat je het gebruikt.
• Gebruik geen stekkerdozen of stroomgeneratoren in de directe nabijheid van het apparaat.
• Trek het netsnoer eruit zodra je het apparaat niet meer gebruikt. Trek niet aan het netsnoer zelf, anders kan deze beschadigd raken.
• Schakel de machine uit voordat je de netstekker van het apparaat in het stopcontact steekt of eruit trekt.
• Dit apparaat mag niet worden bediend met een externe timer of afstandsbediening.
• Trek de netstekker altijd uit het stopcontact na gebruik, voor het reinigen, of in geval van storingen tijdens het gebruik.
• Dompel het apparaat niet onder in water of een andere vloeistof en bescherm het netsnoer en de stekker tegen vochtigheid.

34
• Het apparaat mag niet in de vaat-wasmachine. De deksel, afsluit-dop, opvangbak en glazen kan kunnen in de vaatwasmachine worden schoongemaakt.
• Plaats of gebruik het apparaat of het netsnoer niet op of in de bu-urt van een heet oppervlak.
• De kabel mag niet over de rand van het werkblad hangen.
• Gebruik het apparaat niet buiten. • Houd tijdens gebruik geen voor-
werpen in het apparaat en steek je hand niet in het apparaat.
VÓÓR DE EERSTE INGEBRUIKNAME• Verwijder alle transportveiligheids-
en verpakkingsonderdelen en houd deze uit de buurt van kinde-ren – verstikkingsgevaar!
• Vóór de eerste ingebruikname en na langdurig niet-gebruik moet Mila worden schoongemaakt. Neem onze schoonmaak- en on-derhoudsinstructies in acht.
• Plaats het apparaat op een vlakke en droge ondergrond.
• Houd de Cleaning-knop inge-drukt om Mila te kalibreren. Het programma duurt 5 minuten.
35
MILA EN MILA MINI GEBRUIKEN PRODUCTBESCHRIJVINGAparaat – Mila en Mila Mini
1
5
7
9
10
3
2
4
6
8
1. Afneembaar deksel2. Afsluitdop3. Maalkamer4. Messen5. Display
6. Waterreservoir7. Opvangbak8. Behuizing9. Uitloop10. Glazen kan met deksel

36
Display Mila
1
4
3
65
2
1. Hoeveelheid2. Weergave van tijd, hoeveelheid, fout-
meldingen en reinigingsmodus3. Tijd voorprogrammeren
4. Reinigingsmodus en intensieve reinigingsmodus
5. Start/Stop6. Programma selecteren
Display Mila Mini 1
2
653 4
1. Weergave van tijd, hoeveelheid, fout-meldingen en reinigingsmodus
2. Tijd voorprogrammeren
3. Reinigingsmodus en intensieve reinigingsmodus
4. Hoeveelheid5. Programma selecteren6. Start/Stop

37
EEN DRANKJE BEREIDEN1. Steek de stekker in het stopcontact.2. Raak de display onderin in het midden
aan om Mila in te schakelen. De display wordt nu zichtbaa
2a
3. Met de knop “Program” kun je de verschillende programma's selecteren. Druk de knop herhaaldelijk voor het gewenste programma.
4. Druk herhaaldelijk op de knop “Capa-city” om de hoeveelheid te selecteren. In de grote Mila kun je 300 ml, 500 ml, 800 ml of 1000 ml bereiden.
In de Mila Mini kun je 300 ml of 600 ml bereiden. Bij grotere hoeveel-heden werkt Mila in twee fases. Voeg alsnog alle ingrediënten al aan het begin toe aan de maalkamer.
5. Vul het waterreservoir met gefilterd water.
6. Voeg de ingrediënten toe aan de maalkamer.
7. Druk op de knop “Start/Stop” om het programma te starten.
8. Druk binnen één minuten opnieuw op de knop “Start/Stop” om het program-ma te stoppen.
9. Mila giet je drankje in de glazen kan. Let op: het drankje en de glazen kan zijn erg heet. Houd de glazen kan alleen aan het handvat vast. Zodra de bereiding klaar is klinkt een signaal en start de zelfreinigingsmodus. Op de display verschijnt “Self-clean”. Het spoelwater wordt opgevangen in de opvangbak. Mila piept als de zelfreini-gingsmodus is voltooid.
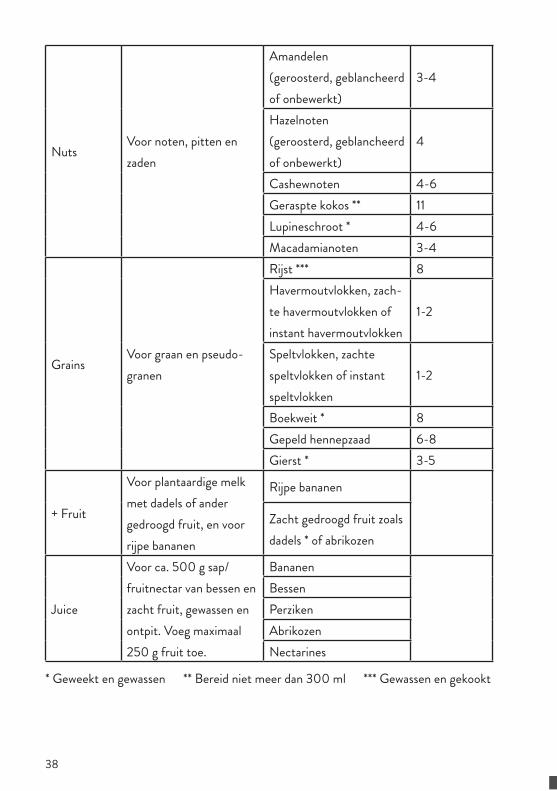
DE PROGRAMMA’SProgramma Beschrijving Ingrediënten gram ingre-
diënt/100 ml
Dry Soy / Soaked Soy
Voor gedroogde en geweekte sojabonen en andere peulvruchten
Gedroogde sojabonen 3
Sojabonen 12 uur geweekt 5
2b
38
NutsVoor noten, pitten en zaden
Amandelen (geroosterd, geblancheerd of onbewerkt)
3-4
Hazelnoten (geroosterd, geblancheerd of onbewerkt)
4
Cashewnoten 4-6Geraspte kokos ** 11Lupineschroot * 4-6Macadamianoten 3-4
GrainsVoor graan en pseudo-granen
Rijst *** 8Havermoutvlokken, zach-te havermoutvlokken of instant havermoutvlokken
1-2
Speltvlokken, zachte speltvlokken of instant speltvlokken
1-2
Boekweit * 8Gepeld hennepzaad 6-8Gierst * 3-5
+ Fruit
Voor plantaardige melk met dadels of ander gedroogd fruit, en voor rijpe bananen
Rijpe bananen
Zacht gedroogd fruit zoals dadels * of abrikozen
Juice
Voor ca. 500 g sap/fruitnectar van bessen en zacht fruit, gewassen en ontpit. Voeg maximaal 250 g fruit toe.
BananenBessenPerzikenAbrikozenNectarines
* Geweekt en gewassen ** Bereid niet meer dan 300 ml *** Gewassen en gekookt
39
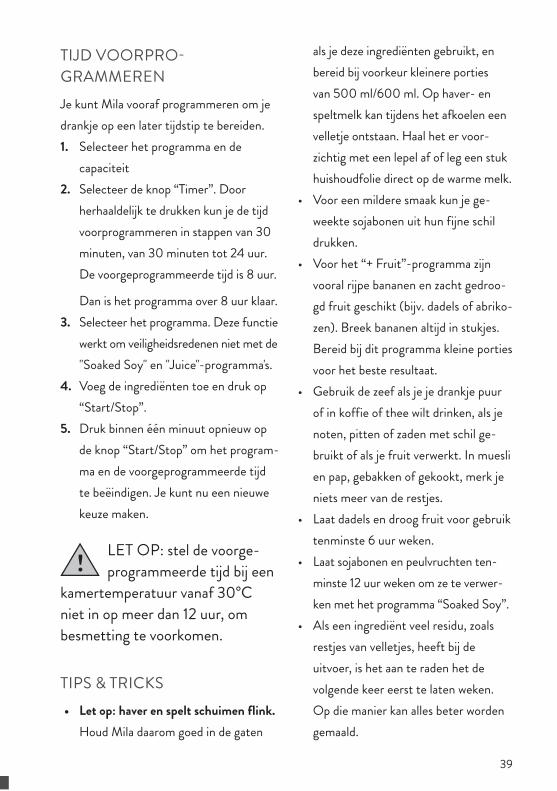
TIJD VOORPROGRAMMERENJe kunt Mila vooraf programmeren om je drankje op een later tijdstip te bereiden. 1. Selecteer het programma en de
capaciteit2. Selecteer de knop “Timer”. Door
herhaaldelijk te drukken kun je de tijd voorprogrammeren in stappen van 30 minuten, van 30 minuten tot 24 uur. De voorgeprogrammeerde tijd is 8 uur.
Dan is het programma over 8 uur klaar.3. Selecteer het programma. Deze functie
werkt om veiligheidsredenen niet met de "Soaked Soy" en "Juice"-programma's.
4. Voeg de ingrediënten toe en druk op “Start/Stop”.
5. Druk binnen één minuut opnieuw op de knop “Start/Stop” om het program-ma en de voorgeprogrammeerde tijd te beëindigen. Je kunt nu een nieuwe keuze maken.
LET OP: stel de voorge-programmeerde tijd bij een
kamertemperatuur vanaf 30°C niet in op meer dan 12 uur, om besmetting te voorkomen.
TIPS & TRICKS• Let op: haver en spelt schuimen flink.
Houd Mila daarom goed in de gaten
als je deze ingrediënten gebruikt, en bereid bij voorkeur kleinere porties van 500 ml/600 ml. Op haver- en speltmelk kan tijdens het afkoelen een velletje ontstaan. Haal het er voor-zichtig met een lepel af of leg een stuk huishoudfolie direct op de warme melk.
• Voor een mildere smaak kun je ge-weekte sojabonen uit hun fijne schil drukken.
• Voor het “+ Fruit”-programma zijn vooral rijpe bananen en zacht gedroo-gd fruit geschikt (bijv. dadels of abriko-zen). Breek bananen altijd in stukjes. Bereid bij dit programma kleine porties voor het beste resultaat.
• Gebruik de zeef als je je drankje puur of in koffie of thee wilt drinken, als je noten, pitten of zaden met schil ge-bruikt of als je fruit verwerkt. In muesli en pap, gebakken of gekookt, merk je niets meer van de restjes.
• Laat dadels en droog fruit voor gebruik tenminste 6 uur weken.
• Laat sojabonen en peulvruchten ten-minste 12 uur weken om ze te verwer-ken met het programma “Soaked Soy”.
• Als een ingrediënt veel residu, zoals restjes van velletjes, heeft bij de uitvoer, is het aan te raden het de volgende keer eerst te laten weken. Op die manier kan alles beter worden gemaald.
40
REINIGING EN ONDERHOUD
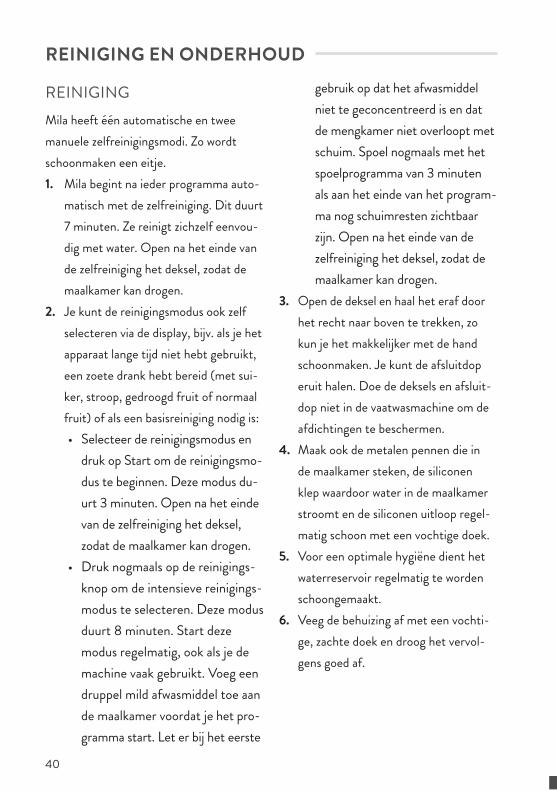
REINIGINGMila heeft één automatische en twee manuele zelfreinigingsmodi. Zo wordt schoonmaken een eitje. 1. Mila begint na ieder programma auto-
matisch met de zelfreiniging. Dit duurt 7 minuten. Ze reinigt zichzelf eenvou-dig met water. Open na het einde van de zelfreiniging het deksel, zodat de maalkamer kan drogen.
2. Je kunt de reinigingsmodus ook zelf selecteren via de display, bijv. als je het apparaat lange tijd niet hebt gebruikt, een zoete drank hebt bereid (met sui-ker, stroop, gedroogd fruit of normaal fruit) of als een basisreiniging nodig is:• Selecteer de reinigingsmodus en
druk op Start om de reinigingsmo-dus te beginnen. Deze modus du-urt 3 minuten. Open na het einde van de zelfreiniging het deksel, zodat de maalkamer kan drogen.
• Druk nogmaals op de reinigings-knop om de intensieve reinigings-modus te selecteren. Deze modus duurt 8 minuten. Start deze modus regelmatig, ook als je de machine vaak gebruikt. Voeg een druppel mild afwasmiddel toe aan de maalkamer voordat je het pro-gramma start. Let er bij het eerste
gebruik op dat het afwasmiddel niet te geconcentreerd is en dat de mengkamer niet overloopt met schuim. Spoel nogmaals met het spoelprogramma van 3 minuten als aan het einde van het program-ma nog schuimresten zichtbaar zijn. Open na het einde van de zelfreiniging het deksel, zodat de maalkamer kan drogen.
3. Open de deksel en haal het eraf door het recht naar boven te trekken, zo kun je het makkelijker met de hand schoonmaken. Je kunt de afsluitdop eruit halen. Doe de deksels en afsluit-dop niet in de vaatwasmachine om de afdichtingen te beschermen.
4. Maak ook de metalen pennen die in de maalkamer steken, de siliconen klep waardoor water in de maalkamer stroomt en de siliconen uitloop regel-matig schoon met een vochtige doek.
5. Voor een optimale hygiëne dient het waterreservoir regelmatig te worden schoongemaakt.
6. Veeg de behuizing af met een vochti-ge, zachte doek en droog het vervol-gens goed af.

41
LET OP: schakel het apparaat uit en haal de
stekker uit het stopcontact als je de messen met de hand schoon wilt maken. Wees bijzonder voorzichtig, de messen zijn vlijmscherp.
Schakel de stroom niet uit tijdens het reinigings-
programma en onderbreek het programma niet.
RESTJES VERWIJDEREN UIT DE MAALKAMERDoorloop de volgende stappen als je door stroomuitval of om een andere reden restjes of onafgemaakte melk uit de maal-kamer wilt verwijderen:1. Sluit Mila af van de stroomvoorziening.2. Zodra alle symbolen op het display
verschijnen kun je de restjes verwijde-ren door de "Capacity"-knop ingedrukt te houden.
3. Start daarna een manueel reinigings-programma met de knop “Cleaning”.
ONTKALKENGebruik alleen gefilterd water voor Mila, om het apparaat te beschermen. Ontkalk Mila daarnaast regelmatig. We raden je aan na elk vijftigste gebruik, of als je veel kalkaanslag op of in de machine ziet te ontkalken. Ga als volgt te werk:
1. Voeg 3 theelepels zuiveringszout (bak-soda) toe aan het waterreservoir en vul deze met water.
2. Voer een bereidingsprogramma zonder ingrediënten uit met een volume van 300 ml.
3. Stop de bereiding door het waterreser-voir te verwijderen. Gooi het overige sodawater weg. Wacht 1 uur en plaats het waterreservoir terug met vers water. Laat het programma doorlopen tot het einde.
4. Voer daarna twee programma's zonder ingrediënten uit met elk een hoeveelheid van 1000 ml. Herhaal het proces indien nodig. Mila is nu weer klaar voor gebruik.
Uitgesloten van de garantie zijn storingen of niet werkende functies als gevolg van niet-uitgevoerde ontkalking.
MESSEN VERVANGENAls de messen van Mila na enige tijd bot worden, kun je ze zelf vervangen. Gebruik uitsluitend originele reserveonderdelen!
LET OP! Wees bijzonder voorzichtig bij het hanteren
van de messen, ook als ze al bot zijn. Er bestaat verwondingsgevaar!

42
1. Zorg ervoor dat Mila niet is aangeslo-ten op het stroomnet.
2. Gebruik twee stuks stevig gereed-schap, zoals lange schroevendraaiers. Bescherm de bodem van de mengka-mer om krassen op de coating te voorkomen, plaats bijvoorbeeld een aantal lagen papier of een passend stuk siliconen onder de messen.
3. Leg één gereedschap zo tegen de ach-terkant van een mes, dat het mes licht kantelt en enige weerstand geeft.
4. Sla met het andere gereedschap boven de maalkamer tegen het gekantelde gereedschap om het mes los te maken.
5. Draai het mes voorzichtig los zodra het los is gekomen, en plaats het nieuwe mes.
6. Draai het nieuwe mes voorzichtig handvast. Start een manueel reini-gingsprogramma met de knop “Cle-aning”. Het mes draait zichzelf vast tijdens de eerste gebruiken.
FOUTEN OPLOSSEN
Als er een probleem is geeft Mila dit met een pieptoon en op de display aan.
E04E01 E02 E03
1. De glazen kan ontbreekt. 2. Het waterreservoir is leeg.
3. Het deksel is open of niet goed gesloten.
4. De opvangbak moet leeg worden gemaakt.
43
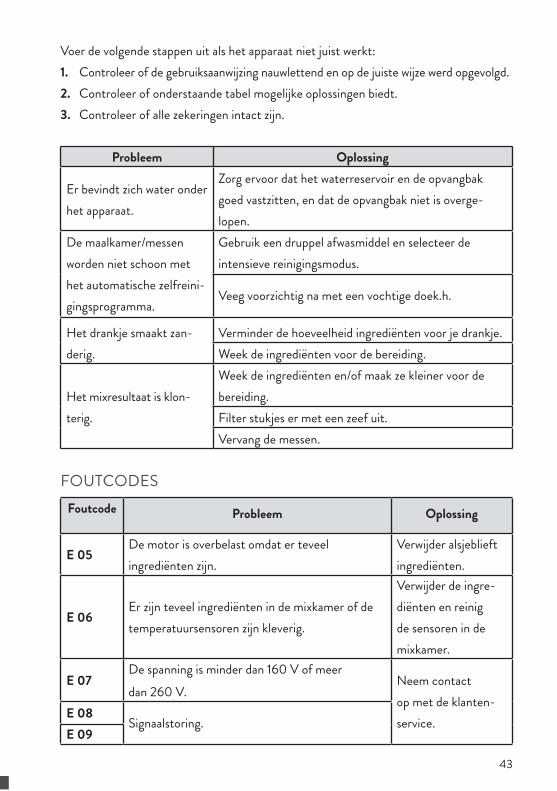
Voer de volgende stappen uit als het apparaat niet juist werkt:1. Controleer of de gebruiksaanwijzing nauwlettend en op de juiste wijze werd opgevolgd.2. Controleer of onderstaande tabel mogelijke oplossingen biedt.3. Controleer of alle zekeringen intact zijn.
Probleem Oplossing
Er bevindt zich water onder het apparaat.
Zorg ervoor dat het waterreservoir en de opvangbak goed vastzitten, en dat de opvangbak niet is overge-lopen.
De maalkamer/messen worden niet schoon met het automatische zelfreini-gingsprogramma.
Gebruik een druppel afwasmiddel en selecteer de intensieve reinigingsmodus.
Veeg voorzichtig na met een vochtige doek.h.
Het drankje smaakt zan-derig.
Verminder de hoeveelheid ingrediënten voor je drankje.Week de ingrediënten voor de bereiding.
Het mixresultaat is klon-terig.
Week de ingrediënten en/of maak ze kleiner voor de bereiding. Filter stukjes er met een zeef uit.Vervang de messen.
FOUTCODESFoutcode Probleem Oplossing
E 05De motor is overbelast omdat er teveel ingrediënten zijn.
Verwijder alsjeblieft ingrediënten.
E 06Er zijn teveel ingrediënten in de mixkamer of de temperatuursensoren zijn kleverig.
Verwijder de ingre-diënten en reinig de sensoren in de mixkamer.
E 07De spanning is minder dan 160 V of meer dan 260 V.
Neem contact op met de klanten-service.
E 08Signaalstoring.
E 09
44
E 10 De afvoerslang is verstopt. Maak deze schoon.E 11
De temperatuursensor is defect of beschadigd.Neem contact op met de klanten-service.
E 12E 13 De doorloopsensor is defect of beschadigd.E 14 Storing in het elektrische systeem.
E 15Verwarmingselement van de maalkamer is defect of beschadigd.
Mocht je Mila toch defect raken, neem dan contact op met een professionele reparatie-dienst. Probeer het apparaat niet zelf te repareren.
KLANTENSERVICE
Onze producten zijn in principe onderwor-pen aan de wettelijke garantieverplichting van 2 jaar. Claims die hierbuiten vallen kun-nen alleen in combinatie met het aanko-opbewijs worden behandeld. Slijtagedelen sluiten een garantieclaim door normale slijtage uit. De levensduur is afhankelijk van de behandeling en het gebruik van de pro-ducten, en is daarom verschillend.
Neem contact op met onze klantenser-vice wanneer u nog vragen hebt over de bediening en de werkwijze van onze pro-ducten:
Gratis hotline Nederland: 0800 090 00 58
Uit andere EU-landen: +49 211 749 55 10(Er kunnen andere kosten van toepassing zijn.)
E-Mail: [email protected]

45
AFVALVERWIJDERING/MILIEUBESCHERMING
Onze producten worden volgens hoge kwaliteitsnormen gepro-duceerd en zijn ontworpen voor
een lange levensduur. Regelmatig onder-houd en verzorging helpen de levensduur te verlengen. Als het apparaat defect is en niet meer kan worden gerepareerd, mag het niet samen met het normale huishou-delijke afval worden weggegooid.
U moet het apparaat terugbrengen naar een erkend afvalverwerkingspunt voor het recyclen van elektrische of elektronische apparatuur. Door professionele afvalverwijdering en recycling levert u een belangrijke bijdrage aan de bescherming van ons milieu.
Dit apparaat voldoet aan de WEEE-richt-lijn 2002/96/EG inzake de verwijdering van afgedankte elektrische en elektroni-sche apparatuur.

46
DATI TECNICI
Potenza del motore: 210 WPotenza di riscaldamento: 1.000 W Volt/frequenza: 220-240 V; 50-60 Hz Giri: Mila 20.000 rpm; Mila Mini 15.300 rpm Dimensioni (L/P/A): Mila 16 x 36 x 37 cm; Mila Mini 15 x 32 x 34 cmPeso: Mila ca. 5,8 kg; Mila Mini ca. 4,7 kgCapacità: Mila 300-1000 ml;
Mila Mini 300-600 mlDotazione: preparazione senza filtro di bevande vegetali; 6 programmi preimpost-ati; tempi di preparazione preimpostati; funzione automatica di auto-puliziaAccessori: caraffa di vetro, ricettario
Modifiche ed errori relativi a caratteristi-che, tecnologia, colori e design riservati.
INDICAZIONI PER LA SICUREZZA
Si prega di leggere attentamente le istruzioni prima dell’utilizzo e di attenervisi.
DESTINAZIONE D’USOL'apparecchio è adatto esclusiva-mente per la produzione di bevan-de vegetali a base di cereali, frutta a guscio, gherigli, semi, legumi o frutta. Non introdurre alimenti di altro genere, in particolare caffè.
SPIEGAZIONE DEI SIMBOLIIl simbolo ivi indicato, infor-ma circa i pericoli determi-
nati dal danneggiamento dell'appa-recchio o determinare lesioni dell'utente.
Il simbolo ivi indicato, infor-ma circa una possibile scos-
sa elettrica che può essere causata da un apparecchio difettoso oppure da un uso improprio del suddetto. Qualora fosse necessario un inter-vento di sicurezza, solo un tecnico autorizzato può procedere con l'apertura del prodotto.
AVVERTENZE GENERALI• Dopo aver disimballato il disposi-
tivo, controlla che sia in condizio-ni perfette ed esente da qualsiasi danno che possa averne com-promesso la sicurezza funzionale. Nel caso in cui siano presenti dei difetti o l'apparecchiatura sia ca-duta, non metterla in funzione e
IT

47
contatta il nostro servizio clienti.• Riparazioni improprie possono
causare un notevole pericolo per l'utente nonché l'esclusione dal diritto di garanzia. In caso di dan-neggiamento delle singole parti, queste devono essere sostitui-te dal produttore, da un tecnico specializzato oppure da una per-sona con qualifica simile.
• L'apparecchio è adatto esclusiva-mente per la produzione di be-vande vegetali a base di cereali, frutta a guscio, gherigli, semi, legumi o frutta. Non introdurre nell'apparecchio alimenti di altro genere.
• Tenere l'apparecchio lontano dalla portata dei bambini.
• I bambini al di sotto degli 8 anni devono stare lontani dall'appa-recchio oppure utilizzarlo sot-to la costante supervisione di un adulto.
• L'apparecchio, purché si trovi nel-la sua normale posizione di fun-zionamento, può essere acceso, spento e utilizzato da bambini di età pari o superiore agli 8 anni o da persone con ridotte capacità fisiche, sensoriali, mentali o pri-ve di esperienza e/o conoscenze adeguate, se sorvegliati, oppor-
tunamente istruiti sull'uso sicuro e ne abbiano compreso i pericoli associati. Ai bambini di età supe-riore agli 8 anni non è consentito collegare, pulire o riparare il dis-positivo. Questo apparecchio non è un giocattolo. I bambini devono essere sorvegliati ed è necessario assicurarsi che non giochino con il dispositivo.
• Posiziona l'apparecchio su una superficie libera e piana.
• L'apparecchio è destinato esclu-sivamente all'uso domestico o per usi simili, ad es.• all'interno dei cucinini di negozi
e uffici oppure in altri luoghi di lavoro
• nelle aziende agricole• per l'utilizzo da parte degli ospiti
nelle strutture ricettive (hotel, motel), pensioni private o case vacanza.
• Utilizza il dispositivo solo dopo un corretto assemblaggio.
• Il dispositivo può essere utilizzato solo con gli accessori e le parti di ricambio originali.
• Durante il funzionamento, Mila non deve essere posta all'interno di uno scaffale chiuso.
• Non versare mai liquidi freddi o caldi nel vano di miscelazione e
48
utilizza solo ingredienti a tempe-ratura ambiente.
• Per preservare l'apparecchio e il gusto ottimale del prodotto, riempi il serbatoio dell'acqua solo con acqua potabile, filtrata e po-vera di calcio.
• Non scollegare l'apparecchio dall'alimentazione elettrica durante la preparazione o il pro-gramma di auto-pulizia.
• Per la preparazione di bevande a base di frutta (ad es. nettarine, ciliegie, prugne e simili) si rac-comanda di rimuovere prima i noccioli.
• Non introdurre nell'apparecchio chicchi di caffè né caffè solubile.
• Prima di procedere alla pulizia, lascia raffreddare completamente il dispositivo.
ATTENZIONE: non mettere mai le mani
sotto il prodotto in fase di erogazi-one. Pericolo di ustioni!
ATTENZIONE: durante la preparazione non rimuo-
vere in nessun caso il tappo dal coperchio. Pericolo di ustioni!
SICUREZZA ELETTRICA• Collega l'apparecchio solo alla
corrente alternata, in conformità con le istruzioni presenti sulla targhetta segnaletica. Collega la spina di alimentazione solo a una presa con messa a terra.
• Srotola completamente il cavo di alimentazione prima dell'uso.
• Non collocare prese multi-ple o generatori di corren-te nelle immediate vicinanze dell'apparecchio.
• Scollega la spina di alimentazio-ne non appena hai terminato di usare l'apparecchio. Non tirare bruscamente il cavo di alimen-tazione poiché potrebbe subire danneggiamenti.
• Spegni l'apparecchio prima di estrarre la spina di alimentazione.
• Non utilizzare l'apparecchio con un timer esterno né con un siste-ma di controllo remoto.
• Estrai la spina prima di pulire l'apparecchio, dopo ogni utilizzo e nel caso di anomalie durante il funzionamento.
• Non immergere mai l'apparecchio in acqua o altri liquidi. Proteggi il cavo di alimentazione e la spina dall'umidità.

49
• L'apparecchio non è lavabile in la-vastoviglie. Il coperchio, il tappo, il vassoio raccogli-gocce e la car-affa di vetro possono essere lavati in lavastoviglie.
• Non posizionare l'apparecchio e il cavo di alimentazione nelle vici-nanze o sopra superfici calde.
• Non lasciar sporgere il cavo dal bordo della superficie di lavoro.
• Non utilizzare l'apparecchio all'aperto.
• Durante l'utilizzo non porre oggetti nel dispositivo in funzione e non toccarlo con le mani.
PRIMA DELLA PRIMA MESSA IN FUNZIONE• Rimuovi e tieni lontano dai bam-
bini tutti i componenti dell'imbal-laggio: pericolo di soffocamento!
• Mila deve essere pulita prima del primo utilizzo e dopo un lun-go periodo di inutilizzo. Pres-ta attenzione alle nostre is-truzioni per la pulizia e la cura dell'apparecchio.
• Posiziona il dispositivo su una su-perficie di lavoro piana e asciutta.
• Per calibrare Mila tieni premuto il pulsante Cleaning. Il programma dura 5 minuti.

50
USO MILA E MILA MINI
DESCRIZIONE DEL PRODOTTODispositivo – Mila e Mila Mini
1
5
7
9
10
3
2
4
6
8
1. Coperchio rimovibile2. Tappo3. Vano di miscelazione4. Lame5. Display
6. Serbatoio per l'acqua7. Contenitore di recupero dei liquidi8. Alloggiamento9. Scarico10. Caraffa di vetro con coperchio

51
Display Mila
1
4
3
65
2
1. Quantità2. Selezione del tempo di funzionamento3. Indicazione di tempo, quantità, errore
e modalità di pulizia
4. Modalità di pulizia e modalità di pulizia intensiva
5. Start/Stop6. Selezione del programma
Display Mila Mini 1
2
653 4
1. Indicazione di tempo, quantità, errore e modalità di pulizia
2. Selezione del tempo di funzionamento
3. Modalità di pulizia e modalità di pulizia intensiva
4. Quantità5. Selezione del programma6. Start/Stop
52
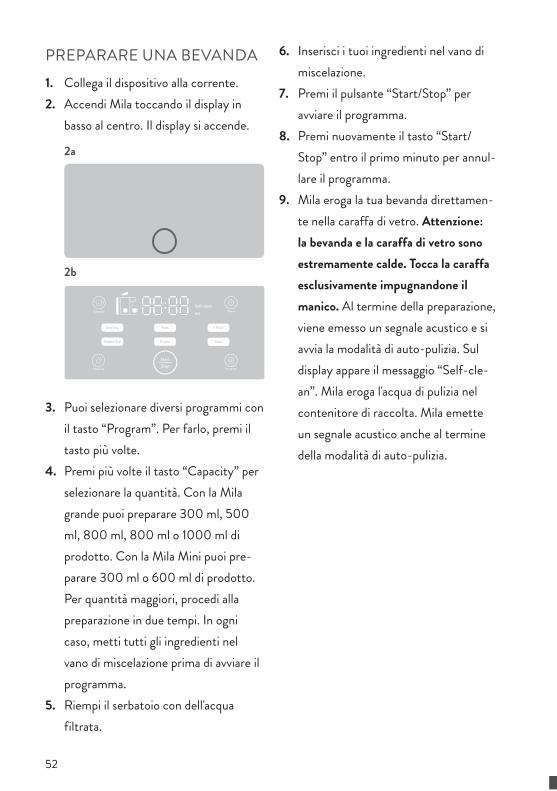
PREPARARE UNA BEVANDA1. Collega il dispositivo alla corrente.2. Accendi Mila toccando il display in
basso al centro. Il display si accende.
2a
2b
3. Puoi selezionare diversi programmi con il tasto “Program”. Per farlo, premi il tasto più volte.
4. Premi più volte il tasto “Capacity” per selezionare la quantità. Con la Mila grande puoi preparare 300 ml, 500 ml, 800 ml, 800 ml o 1000 ml di prodotto. Con la Mila Mini puoi pre-parare 300 ml o 600 ml di prodotto. Per quantità maggiori, procedi alla preparazione in due tempi. In ogni caso, metti tutti gli ingredienti nel vano di miscelazione prima di avviare il programma.
5. Riempi il serbatoio con dell'acqua filtrata.
6. Inserisci i tuoi ingredienti nel vano di miscelazione.
7. Premi il pulsante “Start/Stop” per avviare il programma.
8. Premi nuovamente il tasto “Start/Stop” entro il primo minuto per annul-lare il programma.
9. Mila eroga la tua bevanda direttamen-te nella caraffa di vetro. Attenzione: la bevanda e la caraffa di vetro sono estremamente calde. Tocca la caraffa esclusivamente impugnandone il manico. Al termine della preparazione, viene emesso un segnale acustico e si avvia la modalità di auto-pulizia. Sul display appare il messaggio “Self-cle-an”. Mila eroga l'acqua di pulizia nel contenitore di raccolta. Mila emette un segnale acustico anche al termine della modalità di auto-pulizia.
53
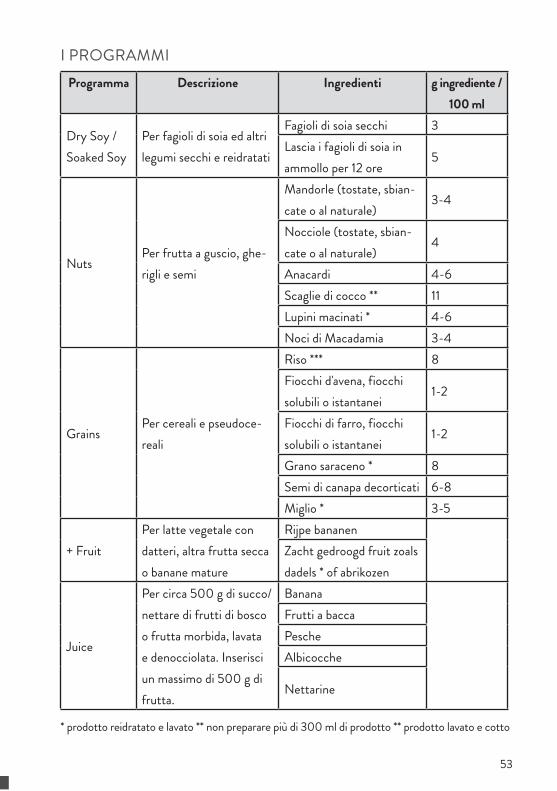
I PROGRAMMIProgramma Descrizione Ingredienti g ingrediente /
100 ml
Dry Soy / Soaked Soy
Per fagioli di soia ed altri legumi secchi e reidratati
Fagioli di soia secchi 3Lascia i fagioli di soia in ammollo per 12 ore
5
NutsPer frutta a guscio, ghe-rigli e semi
Mandorle (tostate, sbian-cate o al naturale)
3-4
Nocciole (tostate, sbian-cate o al naturale)
4
Anacardi 4-6Scaglie di cocco ** 11Lupini macinati * 4-6Noci di Macadamia 3-4
GrainsPer cereali e pseudoce-reali
Riso *** 8Fiocchi d'avena, fiocchi solubili o istantanei
1-2
Fiocchi di farro, fiocchi solubili o istantanei
1-2
Grano saraceno * 8Semi di canapa decorticati 6-8Miglio * 3-5
+ FruitPer latte vegetale con datteri, altra frutta secca o banane mature
Rijpe bananenZacht gedroogd fruit zoals dadels * of abrikozen
Juice
Per circa 500 g di succo/nettare di frutti di bosco o frutta morbida, lavata e denocciolata. Inserisci un massimo di 500 g di frutta.
BananaFrutti a baccaPescheAlbicocche
Nettarine
* prodotto reidratato e lavato ** non preparare più di 300 ml di prodotto ** prodotto lavato e cotto

54
LA SELEZIONE DEL TEMPO DI FUNZIONAMENTOPer preparare la tua bevanda in un secon-do momento, puoi pre-programmare Mila. 1. Scegli il tuo programma e la quantità2. Seleziona il tasto “Timer”. Premendolo
ripetutamente, puoi modificare l'im-postazione oraria in intervalli di 30 minuti, da un minimo di 30 minuti ad un massimo di 24 ore. Il tempo preimpostato è di 8 ore. Il programma termina dunque dopo 8 ore.
3. Seleziona il programma. Per motivi di sicurezza, i programmi "Soaked Soy" e "Juice" sono esclusi da questa funzione.
4. Inserisci gli ingredienti e premi il tasto “Start/Stop”.
5. Puoi interrompere il programma e la selezione del tempo di esecuzione premendo “Start/Stop” entro il primo minuto. Ora puoi effettuare nuova-mente la selezione.
ATTENZIONE: se la temperatura ambiente
supera i 30 °C, non preimpostare un tempo superiore alle 12 ore, onde evitare la proliferazione batterica.
CONSIGLI E SUGGERIMENTI• Attenzione: avena e farro producono
molta schiuma. Tieni d'occhio Mila soprattutto quando usi questi ingre-dienti e prepara porzioni più piccole che non superino i 500 ml/600 ml di prodotto. Nel caso del latte d'avena o di farro potrebbe formarsi una pellicola superficiale durante il raffreddamento. Puoi rimuoverla con cautela usando un cucchiaio oppure puoi poggiare una pellicola trasparente a contatto diretto con il latte caldo.
• Per un gusto più delicato, è consigli-abile privare i fagioli di soia reidratati della loro buccia.
• Il programma “+Fruit” è perfetto per la frutta secca (ad es. datteri o albicoc-che) nonché per le banane mature. Riduci sempre le banane in pezzi. Per un risultato perfetto usa questo pro-gramma preparando porzioni quanto più piccole possibili.
• Utilizza il setaccio se per preparare la tua bevanda hai utilizzato frutta a guscio, semi o gherigli con buccia, della frutta e se desideri gustarla pura o aggiungerla a caffè o tè. Se invece pre-pari müsli e porridge già cotti, i piccoli residui invece si sfalderanno.
• Prima dell'utilizzo, lascia a bagno dat-teri e frutta secca per almeno 6 ore.

55
• Se intendi usare il programma “Soaked Soy”, lascia a bagno i fagioli di soia e i legumi per almeno 12 ore.
• Se utilizzi un ingrediente che in fase di erogazione rilascia molti residui,
la prossima volta, prima di usarlo, è consigliabile lasciarlo a bagno. Questo accorgimento permette di ottenere un prodotto più omogeneo.
PULIZIA E MANUTENZIONE
PULIZIAMila è dotata di una modalità automatica e due modalità di auto-pulizia manuale. Questo rende la pulizia un gioco da ragazzi. 1. Dopo l'esecuzione di ogni program-
ma, Mila attiva automaticamente l'auto-pulizia. Questa modalità dura 7 minuti. Per la pulizia viene semplice-mente utilizzata dell'acqua. Al termine dell'auto-pulizia, apri il coperchio per consentire al vano di miscelazione di asciugarsi.
2. Puoi altresì selezionare la modalità di pulizia semplicemente attraverso il display, ad es. se non usi il dispositivo da qualche tempo, se hai preparato una bevanda dolce (con zucchero, sciroppo, frutta secca e altri tipi di frutta) o se intendi eseguire una pulizia profonda:• Seleziona la modalità di pulizia e
premi Start per avviarla. Ques-ta modalità dura 3 minuti. Al termine dell'auto-pulizia, apri il coperchio per consentire al vano
di miscelazione di asciugarsi.• Premi nuovamente il pulsante di
pulizia per selezionare la modalità di pulizia intensiva. Questa moda-lità dura 8 minuti. Ti consigliamo di avviarla regolarmente, anche se utilizzi spesso il dispositivo. Prima di avviare il programma, versa una goccia di detergente delicato nel vano di lavorazione. Quando lo usi per la prima volta, accertati che il detergente non sia troppo con-centrato e che non lasci eccessivi residui nel vano di miscelazione. Se alla fine del programma sono ancora visibili residui di schiuma, risciacqua con il programma di pulizia di 3 minuti. Al termine dell'auto-pulizia, apri il coperchio per consentire al vano di miscela-zione di asciugarsi.
3. Apri il coperchio e tiralo semplice-mente verticalmente verso l'alto, in modo da poterlo pulire a mano in modo ottimale. Per farlo, è sufficiente
56
rimuovere il tappo. Per preservare le guarnizioni, non lavare coperchio e tappo in lavastoviglie.
4. Pulisci regolarmente con un panno umido anche i perni metallici che sporgono dal vano di miscelazione, la valvola in silicone attraverso la quale l'acqua penetra nel vano di miscelazio-ne e l'erogatore in silicone.
5. È consigliabile lavare regolarmente anche il serbatoio dell'acqua, così che sia sempre igienicamente pulito.
6. L'alloggiamento può essere pulito con un panno morbido e umido, per poi essere asciugato accuratamente.
ATTENZIONE: se desideri pulire le lame a mano,
assicurati di aver spento il dispositi-vo e di averlo scollegato dall'ali-mentazione elettrica. Presta particolare attenzione: le lame sono molto affilate.
Durante il programma di pulizia, non scollegare il
dispositivo dalla corrente e non interrompere il programma.
RIMUOVERE I RESIDUI DAL VANO DI MISCELAZIONESe, a causa di un'interruzione di corrente o per qualsiasi altra ragione, nel vano di
miscelazione sono rimasti dei residui o del latte non del tutto erogato, attieniti alla seguente procedura:1. Collega Mila all'alimentazione elettrica.2. Quando tutti i simboli appaiono sul
display, puoi rimuovere i residui tenen-do premuto il pulsante "Capacity".
3. Avvia quindi un programma di pulizia manuale premendo il tasto “Cleaning”.
DECALCIFICAZIONEPer preservare il dispositivo, utilizza esclu-sivamente acqua filtrata. Inoltre, è buona norma decalcificare Mila regolarmente. Consigliamo di procedere con la decalcifi-cazione dopo ogni 50° utilizzo o ogni volta che noti dei depositi di calcare su o nel dispositivo. A tal fine, procedi come segue:1. Metti 3 cucchiaini da tè di bicarbonato
di sodio nel serbatoio e riempilo con dell'acqua.
2. Esegui un programma di preparazio-ne senza ingredienti e seleziona una quantità di 300 ml.
3. Interrompi il processo di preparazione e rimuovi il serbatoio dell'acqua. Elimi-na la restante acqua con il bicarbonato. Attendi 1 ora e riempi il serbatoio de-ll'acqua con della nuova acqua. Lascia completare il programma.
4. Esegui quindi due programmi di prepa-razione senza ingredienti, selezionando per ciascuno la quantità di 1000 ml.

57
Se necessario, ripeti il procedimento. Ora Mila è pronta per essere nuovamen-te utilizzata.
La garanzia non copre guasti o malfun-zionamenti dell'apparecchio a seguito di decalcificazioni non eseguite.
SOSTITUIRE LE LAMESe le lame di Mila con il tempo dovessero smussarsi, puoi procedere personalmente alla sostituzione. Utilizza esclusivamente ricambi originali!
ATTENZIONE! Presta particolare attenzione
quando maneggi le lame, anche se sono smussate. Pericolo di lesioni!
1. Assicurati che Mila non sia collegata all'elettricità.
2. Utilizza due strumenti piuttosto resis-tenti come, ad esempio, due cacciaviti
lunghi. Proteggi il fondo del vano di miscelazione, ad esempio posizionan-do diversi strati di carta o un pezzo di silicone sotto le lame in modo che il rivestimento non possa graffiarsi.
3. Posiziona uno dei due strumenti sul dorso inferiore della lama, in modo che possa inclinarsi leggermente e che eserciti una certa resistenza sulla lama.
4. Utilizza dunque l'altro strumento posizionandolo sulla parte superiore del vano di miscelazione, per far leva sull'altro strumento inclinato ed allen-tare la lama.
5. Quando è allentata, svita la lama deli-catamente, dunque procedi all'installa-zione della nuova lama.
6. Stringi con attenzione a mano la nuova lama. Avvia un programma di pulizia manuale premendo il tasto “Cleaning”. Durante i primi utilizzi, la lama si stringe da sola.
58
RISOLUZIONE DEI PROBLEMI
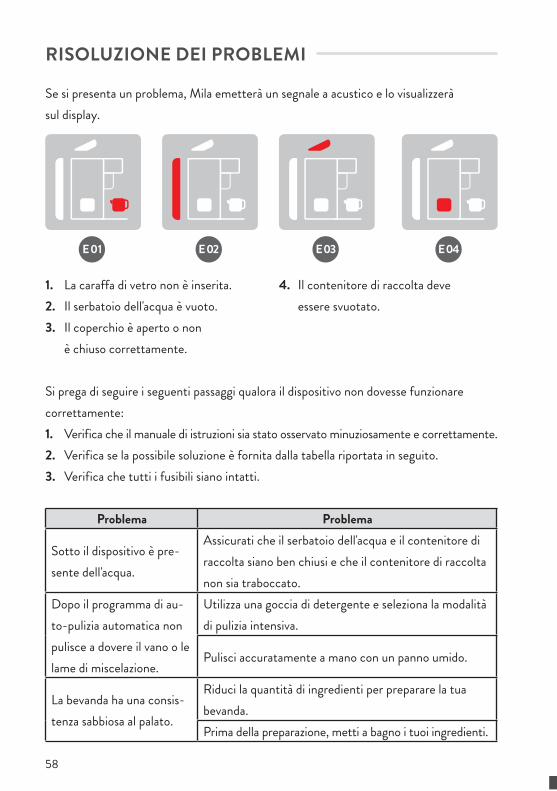
Se si presenta un problema, Mila emetterà un segnale a acustico e lo visualizzerà sul display.
E04E01 E02 E03
1. La caraffa di vetro non è inserita.2. Il serbatoio dell'acqua è vuoto.3. Il coperchio è aperto o non
è chiuso correttamente.
4. Il contenitore di raccolta deve essere svuotato.
Si prega di seguire i seguenti passaggi qualora il dispositivo non dovesse funzionarecorrettamente:1. Verifica che il manuale di istruzioni sia stato osservato minuziosamente e correttamente.2. Verifica se la possibile soluzione è fornita dalla tabella riportata in seguito.3. Verifica che tutti i fusibili siano intatti.
Problema Problema
Sotto il dispositivo è pre-sente dell'acqua.
Assicurati che il serbatoio dell'acqua e il contenitore di raccolta siano ben chiusi e che il contenitore di raccolta non sia traboccato.
Dopo il programma di au-to-pulizia automatica non pulisce a dovere il vano o le lame di miscelazione.
Utilizza una goccia di detergente e seleziona la modalità di pulizia intensiva.
Pulisci accuratamente a mano con un panno umido.
La bevanda ha una consis-tenza sabbiosa al palato.
Riduci la quantità di ingredienti per preparare la tua bevanda.Prima della preparazione, metti a bagno i tuoi ingredienti.
59
Il risultato della miscelazio-ne è grumoso.
Metti a bagno o riduci in piccoli pezzi gli ingredienti prima della preparazione. Filtra i pezzetti attraverso il setaccio.Sostituisci le lame.
CODICE DI ERRORECodice di
erroreProblema Soluzione
E 05Il motore è sovraccaricato da un eccesso di ingredienti.
Rimuovi gli ingre-dienti.
E 06Nel contenitore di miscelazione sono stati inseriti troppi ingredienti oppure i sensori di temperatura sono coperti da una sostanza collosa.
Rimuovi gli ingre-dienti e pulisci i sen-sori nel contenitore di miscelazione.
E 07La tensione è inferiore a 160 V o superiore a 260 V.
Ti preghiamo di rivolgerti al servizio clienti.
E 08Segnale di malfunzionamento.
E 09E 10 Il tubo di scarico è ostruito. Per favore, puliscilo.E 11 Il sensore della temperatura è difettoso
o danneggiato. Ti preghiamo di rivolgerti al servizio clienti.
E 12E 13 Il misuratore di flusso è difettoso o danneggiato.E 14 Malfunzionamento elettrico.
E 15L'unità di riscaldamento del vano di miscelazione è difettosa o danneggiata.
Se la tua Mila è difettosa, contatta un servizio di riparazione professionale. Non tentare di riparare l'apparecchio personalmente.

60
SERVIZIO CLIENTI
I nostri prodotti sono soggetti alla garanzia legale di 2 anni. Reclami ulteriori possonoessere accettati soltanto se accompagnati dalla ricevuta di acquisto. Tra le partisoggette ad usura vi è anche il sigillo di ga-ranzia. La durata dipende dall’utilizzo edalla manutenzione del prodotto ed è per-tanto variabile.
Per domande sul funzionamento dei nostri prodotti rivolgersi al nostro servizioclienti:
Numero di telefono: +49 211 749 55 10(Potrebbero essere applicati costi addizionali.)
E-Mail: [email protected]
SMALTIMENTO/PROTEZIONE DELL’AMBIENTE
I nostri prodotti sono realizzati seguendo standard di alta qualità e progettati per una lunga
durata. Una manutenzione e assistenza costante ne preservano la durata. Qualora il dispositivo fosse difettoso e non può essere più riparato non procedere con lo smaltimento assieme ai rifiuti domestici normali.
È necessario procedere con lo smaltimento dell'apparecchiatura presso uno stabilimen-to designato per il riciclaggio di dispositivi elettrici o elettronici. Mediante il riutilizzo o il riciclaggio si rende un importante cont-ributo alla tutela dell'ambiente.
Quest'apparecchiatura è conforme alla direttiva WEEE 2002/96/CE circa lo smaltimento di rifiuti di apparecchiature elettriche o elettroniche.

61
CARACTERISTIQUES TECHNIQUES
Puissance du moteur : 210 WPuissance de chauffage : 1.000 W Tension/Fréquence : 220-240 V ; 50-60 Hz Rotation: Mila 20.000 rpm ; Mila Mini 15.300 rpm Dimensions (L/l/h) : Mila 16 x 36 x 37 cm ; Mila Mini 15 x 32 x 34 cmPoids : Mila env. 5,8 kg ; Mila Mini env. 4,7 kgCapacité : Mila 300-1000 ml; Mila Mini 300-600 ml
Équipement : préparation sans filtre de boissons végétales ; 6 programmes prédé-finis ; réglage de la durée de préparation ; fonction d'auto-nettoyage automatiqueAccessoires : verseuse en verre, livre de recettes
Sous réserve de modifications et d’erreurs relatives à l’équipement, à la technique, aux coloris et au design.
CONSIGNES DE SECURITE
Merci de lire attentivement ce mode d’emploi avant la mise en marche et de le conserver.
UTILISATIONCet appareil est exclusivement des-tiné à la préparation de boissons végétales à base de céréales, noix, pépins, graines, fruits à coques ou fruits. Ne place aucun autre aliment à l'intérieur et surtout pas de café.
EXPLICATION DES SYMBOLESCe symbole met en garde contre les risques qui pour-
raient causer des dommages à l'ap-pareil ou entraîner des blessures.
Ce symbole met en garde contre une électrocution
qui peut être déclenchée par un appareil défectueux ou une mani-pulation incorrecte. En cas de tra-vaux de maintenance nécessaires, ce produit doit uniquement être ouvert par un technicien agréé.
REMARQUES GENERALES• Après déballage, vérifie que ton
appareil soit en parfait état et ne présente aucun dommage éven-tuel qui pourrait compromettre la sécurité de fonctionnement de l'appareil. En présence de défauts ou si l'appareil est tombé au sol,
FR

62
ne l'utilise pas et adresse-toi à notre service client.
• Des réparations non-confor-mes peuvent entraîner des ris-ques pour l'utilisateur et avoir pour conséquence l'exclusion de la garantie. Si des éléments sont endommagés, ils doivent être remplacés par le fabricant, une entreprise spécialisée mandatée ou une personne possédant des qualifications comparables.
• Cet appareil est exclusivement destiné à la préparation de bois-sons végétales à base de céréa-les, noix, pépins, graines, fruits à coques ou fruits. Ne place aucun autre aliment à l'intérieur.
• Stocke l'appareil hors de portée des enfants.
• Les enfants de moins de 8 ans doivent rester loin de l'appareil ou être surveillés en permanence.
• Les enfants âgés d'au moins 8 ans et les personnes présentant des capacités physiques, sensorielles ou mentales réduites ou un man-que d'expérience et de connais-sances doivent allumer/éteind-re/utiliser l'appareil uniquement lorsque celui-ci se trouve dans sa position de fonctionnement normale et prévue, lorsqu'elles
sont surveillées ou lorsqu'on leur a montré l'utilisation sécurisée de l'appareil et qu'elles compren-nent les dangers qui en résultent. Les enfants à partir de 8 ans ne doivent ni brancher, ni nettoyer, ni entretenir l'appareil. L'appareil n'est pas un jouet. Les enfants doivent être surveillés pour s'as-surer qu'ils ne jouent pas avec l'appareil.
• Pose l'appareil sur une surface dégagée et plane.
• L'appareil est uniquement destiné à un usage domestique et à des utilisations similaires, comme par exemple• dans les kitchenettes des bou-
tiques, les bureaux et divers au-tres lieux de travail
• dans les exploitations agricoles• pour une utilisation par les cli-
ents dans les logements tou-ristiques (hôtels, motels), les maisons d'hôtes ou les maisons de vacances.
• Utilise l’appareil uniquement après un assemblage conforme.
• L’appareil ne doit être utilisé qu’avec les accessoires et pièces de rechange d’origine.
• Ne pas mettre Mila dans un placard pendant son utilisation.

63
• Ne remplis jamais le bol de li-quides froids ou chauds et utili-se uniquement des ingrédients à température ambiante.
• Afin de protéger l'appareil et d'obtenir une saveur excepti-onnelle, ne verse que de l'eau po-table, filtrée et pauvre en calcaire dans le réservoir d'eau.
• Ne débranche pas l'appareil pen-dant la préparation ou le pro-gramme d'auto-nettoyage.
• Retire les noyaux lors tu utilises des fruits (p. ex. nectarines, ceri-ses, prunes, etc.).
• Ne place pas de grain de café ou de café instantané à l'intérieur !
• Laisse l'appareil refroidir complè-tement avant de le nettoyer.
ATTENTION : pendant la distribution de ta boisson,
ne place jamais ta main sous la sortie. Risque de brûlures !
ATTENTION : ne retire jamais le bouchon du
couvercle pendant la préparation. Risque de brûlures !
SECURITE ELECTRIQUE• Branche uniquement l'appareil
au courant alternatif, conformé-ment aux informations figurant sur la plaque signalétique. Bran-che uniquement la prise d'alimen-tation à une prise reliée à la terre.
• Avant utilisation, déroule en-tièrement le câble d’alimentation.
• Ne place aucune multiprise ou générateur de courant dans les environs immédiats de l'appareil.
• Débranche la prise d'alimentati-on dès que tu n'utilises plus l'ap-pareil. Ne tire pas sur le câble d'alimentation. Cela risquerait de l'endommager.
• Éteins la machine avant de débrancher la prise d'alimentation de l'appareil.
• Cet appareil ne peut pas foncti-onner avec une minuterie exter-ne ou un système de commande à distance séparé.
• Après utilisation, avant le net-toyage ou en cas d'éventuels pro-blèmes pendant le fonctionne-ment, débranche toujours la prise d'alimentation.
• Ne plonge jamais l’appareil dans l’eau ou tout autre liquide et protège le câble d’alimentati-

64
on et la prise d’alimentation de l’humidité.
• L'appareil ne va pas au lave-vais-selle. Le couvercle, le bouchon, le bac de récupération et la verseu-se en verre peuvent être nettoyés au lave-vaisselle.
• Ne dépose ou n'utilise jamais l'appareil et le câble d'alimentati-on sur ou à proximité de surfaces chaudes.
• Le câble ne doit pas se trouver sur le bord du plan de travail.
• N'utilise pas l'appareil en plein air. • Pendant l'utilisation, ne tiens au-
cun objet dans l'appareil en fonc-tionnement et n'attrape pas l'ap-pareil avec les mains.
AVANT LA PREMIÈRE UTILISATION• Retire tous les éléments d’embal-
lage et de protection utilisés pour le transport et conserve-les hors de portée des enfants – risque de suffocation !
• Veille à bien nettoyer ton robot multifonction Mila avant la pre-mière utilisation ou après toute période prolongée sans utilisati-on. Réfère-toi pour cela aux con-seils de nettoyage et d’entretien.
• Installe l’appareil sur un plan de travail plat et sec.
• Calibre Mila en maintenant le bouton « Cleaning » enfoncé. Le programme dure 5 minutes.

65
COMMENT UTILISER MILA ET MILA MINI
DESCRIPTION DU PRODUITAppareil – Mila et Mila Mini
1. Couvercle amovible2. Bouchon3. Bol4. Couteau5. Écran
6. Réservoir d’eau7. Bac de récupération8. Boîtier9. Sortie10. Verseuse en verre avec couvercle
1
5
7
9
10
3
2
4
6
8
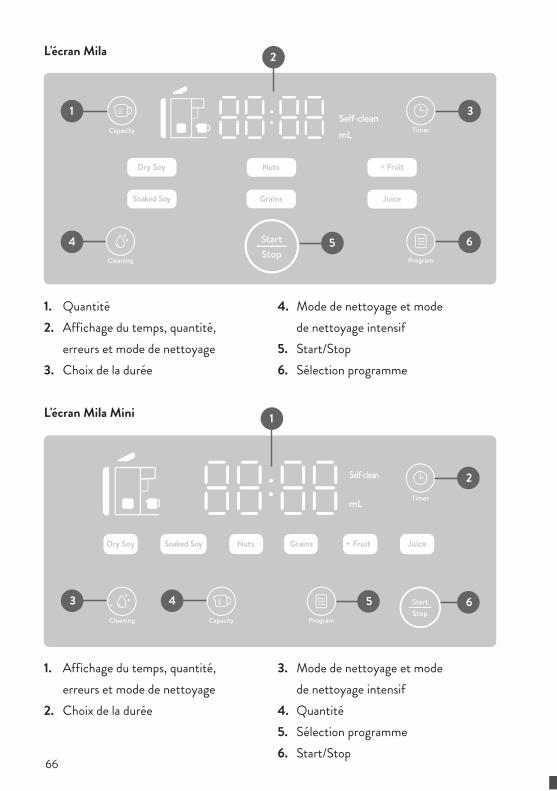
66
L'écran Mila
1
4
3
65
2
1. Quantité2. Affichage du temps, quantité,
erreurs et mode de nettoyage3. Choix de la durée
4. Mode de nettoyage et mode de nettoyage intensif
5. Start/Stop6. Sélection programme
L'écran Mila Mini 1
2
653 4
1. Affichage du temps, quantité, erreurs et mode de nettoyage
2. Choix de la durée
3. Mode de nettoyage et mode de nettoyage intensif
4. Quantité5. Sélection programme6. Start/Stop

67
PRÉPARER UNE BOISSON1. Raccorde l'appareil à la prise
électrique.2. Allume Mila en touchant le bas de
l'écran au milieu. L'affichage est maintenant visible. 2a
2b
3. La touche « Programme » permet de sélectionner les différents program-mes. Pour cela, appuie plusieurs fois sur le bouton. Appuie plusieurs fois sur le bouton « Capacity » afin de sélec-tionner la quantité. Tu peux préparer 300 ml, 500 ml, 800 ml ou 1 000 ml
dans le grand Mila. Tu peux préparer 300 ml ou 600 ml dans le Mila Mini. En cas de grandes quantités, Mila travaille en deux fois. Verse néanmoins tous les ingrédients dans le bol dès le début.
4. Remplis le réservoir d'eau avec de l'eau filtrée.
5. Place les ingrédients dans le bol.6. Appuie sur le bouton « Start/Stop »
afin de lancer le programme.7. Appuie à nouveau sur le bouton «
Start/Stop » après quelques minutes afin d'annuler le programme.
8. Mila déverse la boisson dans la verseu-se en verre. Attention : la boisson et la verseuse en verre sont très chaudes. Saisis la verseuse en verre par la poig-née uniquement. Une fois la prépa-ration finie, un signal sonore retentit et le mode de nettoyage est lancé. Le message « Self-clean » apparaît à l'écran. Mila déverse l'eau de nettoyage dans le récipient. Mila sonne lorsque le mode de nettoyage est terminé.
LES PROGRAMMESProgramme Description Ingrédients g d'ingrédients
/ 100 ml
Dry Soy / Soaked Soy
Pour les graines de soja sèches ou non gonflées et autres fruits à coques
Graines de soja sèches 3Graines de soja gonflées 12 heures
5

68
NutsPour les noix, pépins et graines
Amandes (grillées, blanchies ou naturelles)
3-4
Noisettes (grillées, blan-chies ou naturelles)
4
Cashews 4-6Noix de coco râpée ** 11Gruau de lupin * 4-6Noix de macadamia 3-4
GrainsPour les céréales et pseudo-céréales
Riz *** 8Flocons d'avoine, flocons d'avoine solubles ou avoine instantanée
1-2
Flocons d'épeautre, flo-cons d'épeautre solubles ou épeautre instantané
1-2
Sarrasin * 8Graines de chanvre décortiquées
6-8
Millet * 3-5
+ FruitPour le lait végétal à base de dattes, d'autres fruits secs ou de bananes mûres
Banane mûreFruits secs mous comme les dates* ou les abricots*
Juice
Pour env. 500 g de jus/nectar de fruit à base de baies et de fruits mous, lavés et dénoyautés. Utilise au maximum 250 g de fruits.
BananeBaiesPêchesAbricots
Nectarines
* gonflé et lavé ** ne pas préparer plus de 300 ml *** lavé et séché

69
LE CHOIX DE LA DURÉETu peux préprogrammer Mila afin que ta boisson soit préparée plus tard. 1. Pour cela, sélectionne le programme
et la capacité2. Appuie sur le bouton « Timer ». En ap-
puyant plusieurs fois, tu peux régler le temps de démarrage par palier de 30 minutes, de 30 minutes à 24 heures au maximum. Le temps préréglé est de 8 heures. Le programme prendra alors fin dans 8 heures.
3. Sélectionne le programme. Pour des raisons de sécurité, les programmes « Soaked Soy » et « Juice » sont exclus de cette fonction.
4. Verse les ingrédients et appuie sur « Start/Stop ».
5. Tu peux mettre fin au programme et au choix de la durée en appuyant sur le bouton « Start/Stop » lors des pre-mières minutes. Maintenant, tu peux sélectionner ton nouveau réglage.
ATTENTION : si la température dépasse les
30 °C, le choix de la durée ne doit pas dépasser les 12 h afin d'éviter la prolifération des germes.
TRUCS ET ASTUCES• Attention : l'avoine et l'épeautre
moussent énormément. Garde Mila bien à l’œil lorsque tu utilises ces ingrédients et préfère les petites quan-tités ne dépassant pas les 500/600 ml. En refroidissant, il est possible que le lait d'avoine et d'épeautre forme une peau. Retire-la délicatement avec une cuillère ou mets directement du film étirable sur le lait chaud.
• Pour une saveur plus douce, nous te conseillons d'enlever la fine peau des graines de soja gonflées.
• Le programme « + Fruit » est parti-culièrement adapté aux fruits secs mous (p. ex. dates ou abricots) ainsi qu'aux bananes mûres. Toujours couper les bananes en morceaux. Pour un résultat parfait, prépare toujours les plus petites portions possibles avec ce programme.
• Utilise le tamis lorsque tu veux boire ta boisson pure, ou avec du café ou du thé, lorsque tu utilises des noix, graines ou pépins avec coque ou lorsque tu utilises des fruits. Les résidus légers ne tombent pas dans le muesli, le porrid-ge, les produits cuits ou cuisinés.
• Fais tremper les dattes et les fruits secs au moins 6 heures avant utilisation.

70
• Fais tremper les graines de soja et les fruits à coques au moins 12 heures afin de pouvoir utiliser le programme « Soaked Soy ».
• Si tu as un ingrédient qui crée beau-
coup de résidus comme des restes de coquilles, nous te conseillons de le faire tremper avant la prochaine utilisation. Ainsi, tout peut être réduit plus facilement.
NETTOYAGE ET ENTRETIEN
NETTOYAGEMila est équipée d'un mode de nettoyage automatique et de deux modes de net-toyage manuels. Ainsi, le nettoyage est un jeu d'enfant. 1. Après chaque exécution d'un program-
me, Mila lance automatiquement l'au-to-nettoyage. Il dure 7 minutes. Il se nettoie tout simplement avec de l'eau. Ouvre le couvercle à la fin de l'auto-net-toyage afin de laisser sécher le bol.
2. Tu peux également sélectionner le mode de nettoyage depuis l'écran, p. ex. si tu n'as pas utilisé l'appareil pen-dant longtemps, a préparé une boisson sucrée (avec du sucre, sirop, fruits secs ou fruits) ou qu'un nettoyage de base est nécessaire :• Sélectionne le mode de nettoya-
ge et appuie sur Start afin de lan-cer le mode de nettoyage. Il dure 3 minutes. Ouvre le couvercle à la fin de l'auto-nettoyage afin de laisser sécher le bol.
• Appuie de nouveau sur la touche nettoyage pour sélectionner le mode nettoyage intensif. Il dure 8 minutes. Si tu utilises la machine souvent, nous te conseillons d'utili-ser ce mode régulièrement. Verse une goutte de liquide vaisselle dans la chambre de traitement avant de lancer le programme. Lors de la première utilisation, veille bien à ce que le liquide vaisselle ne soit pas trop concentré et à ce que la chambre de mélange ne mousse pas trop. Si des restes de mousse sont encore visibles à la fin du programme, utilise le programme de rinçage en 3 minutes. Ouvre le couvercle à la fin de l'auto-net-toyage afin de laisser sécher le bol.
3. Ouvre le couvercle et tire-le vers le haut afin de pouvoir mieux le nettoyer à la main. Tu peux tout simplement retirer le bouchon. Afin de protéger les joints, ne nettoie pas le couvercle au lave-vaisselle.

71
4. Nettoie aussi régulièrement les tiges en métal qui dépassent du bol, la valve en silicone par laquelle l'eau se déverse dans le bol ainsi que le bec verseur en silicone avec un chiffon humide.
5. Le réservoir d'eau doit être nettoyé régulièrement afin qu'il soit propre.
6. Toujours essuyer le boîtier à l'aide d'un chiffon doux légèrement humide et le faire sécher minutieusement.
ATTENTION : si tu nettoies les lames à la main,
l'appareil doit être éteint et la fiche d'alimentation doit être débran-chée. Fais particulièrement atten-tion au fait que les lames soient très aiguisées..
Ne débranche pas l'appareil pendant le mode de net-
toyage et ne met pas fin brusque-ment fin au programme.
RETIRE LES RESTES DU BOLSi, en raison d'une panne de courant ou pour une autre raison, il y a des restes ou du lait dans le bol que tu souhaites retirer, procède de la façon suivante :1. Raccorde Mila à l'alimentation électrique.2. Lorsque tous les symboles apparais-
sent à l'écran, tu peux laisser les restes s'écouler tout en maintenant le bouton « Capacity » enfoncé.
3. Lance un programme de nettoyage manuel en appuyant sur « Cleaning ».
DÉTARTRAGEAvec Mila, utilise exclusivement de l'eau filtrée afin de protéger l'appareil. Il convi-ent également de détartrer régulièrement Mila. Nous te recommandons de détartrer après la 50e préparation ou si tu remar-ques des dépôts de calcaire sur ou dans la machine. Procède comme suit :1. Verse 3 cuillères à café de bicarbona-
te de soude dans le réservoir d'eau et remplis-le d'eau.
2. Lance un programme de préparation sans ingrédients avec une quantité de 300 ml.
3. Annule la préparation en retirant le réservoir d'eau. Verse l'eau au bicarbo-nate de soude reste. Attends 1 heure et remets le réservoir d'eau avec de l'eau fraîche. Laisse le programme se terminer.
4. Ensuite, lance deux programmes de préparation sans ingrédients avec une quantité de 1000 ml. Répète le processus si nécessaire. Mila est enfin détartrée.
Sont exclus de la garantie les pannes ou dysfonctionnements de l'appareil dus à une absence de détartrage.

72
CHANGER LES LAMESSi les lames de ta Mila s'émoussent après un certain temps, tu peux les échanger toi-même. Pour cela, utilise exclusi-vement les pièces de rechange d’origine.
Attention ! Fais très attention lorsque tu mani-
pules les lames, même si ces dernières sont émoussées. Risques de blessure !
1. Fais en sorte que l'appareil ne soit pas branché au secteur.
2. Utilise deux outils stables, comme de longs tournevis par exemple. Protège le fond du bol, p. ex. en plaçant plusieurs feuilles de papier ou un morceau de silicone adapté sous les lames afin de ne pas rayer le revêtement.
3. Place un outil en dessous des lames de façon à les incliner légèrement et que la lame présente une résistance.
4. Avec l'autre outil, appuie contre la lame inclinée au-dessus du bol afin de libérer la lame.
5. Une fois la lame desserrée, dévisse-la prudemment et installe une nouvelle lame.
6. Visse la nouvelle lame prudemment à la main. Lance un programme de nettoyage manuel en appuyant sur « Cleaning ». La lame se resserre d'elle-même pendant la première utilisation.
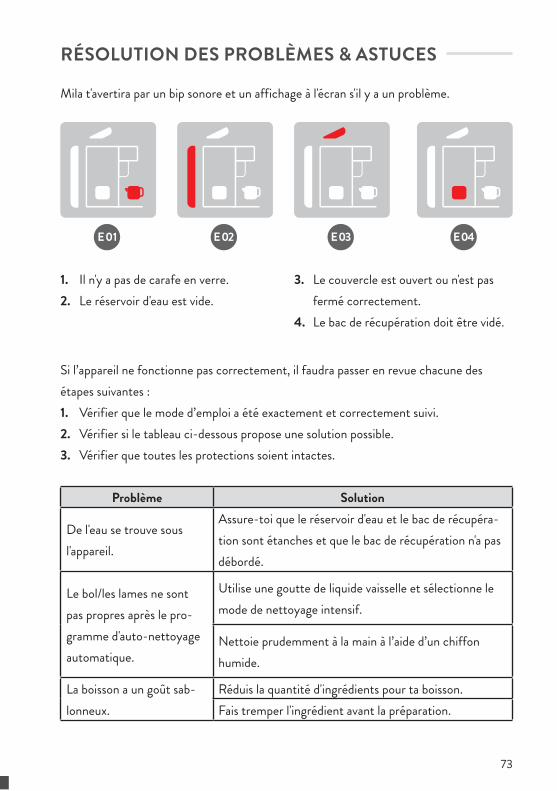
73
RÉSOLUTION DES PROBLÈMES & ASTUCES
Mila t'avertira par un bip sonore et un affichage à l'écran s'il y a un problème.
1. Il n'y a pas de carafe en verre.2. Le réservoir d'eau est vide.
3. Le couvercle est ouvert ou n'est pas fermé correctement.
4. Le bac de récupération doit être vidé.
Si l’appareil ne fonctionne pas correctement, il faudra passer en revue chacune des étapes suivantes :1. Vérifier que le mode d’emploi a été exactement et correctement suivi.2. Vérifier si le tableau ci-dessous propose une solution possible.3. Vérifier que toutes les protections soient intactes.
Problème Solution
De l'eau se trouve sous l'appareil.
Assure-toi que le réservoir d'eau et le bac de récupéra-tion sont étanches et que le bac de récupération n'a pas débordé.
Le bol/les lames ne sont pas propres après le pro-gramme d'auto-nettoyage automatique.
Utilise une goutte de liquide vaisselle et sélectionne le mode de nettoyage intensif.
Nettoie prudemment à la main à l’aide d’un chiffon humide.
La boisson a un goût sab-lonneux.
Réduis la quantité d'ingrédients pour ta boisson.Fais tremper l'ingrédient avant la préparation.
E04E01 E02 E03
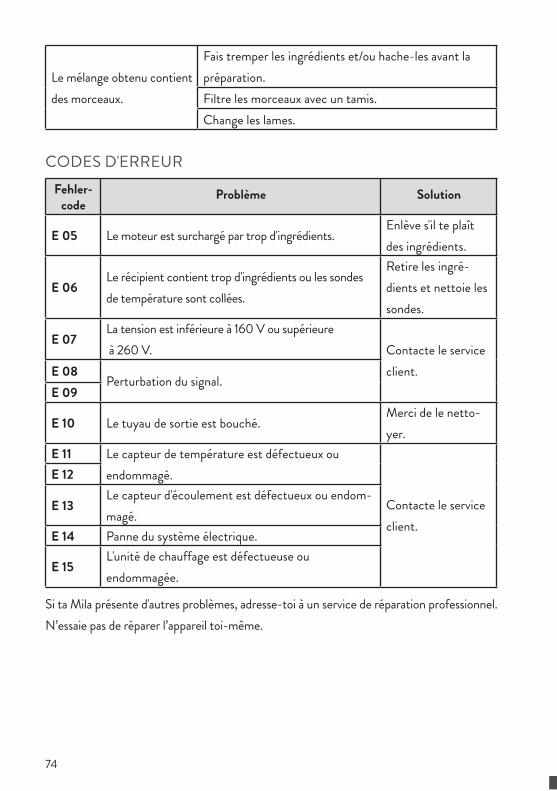
74
Le mélange obtenu contient des morceaux.
Fais tremper les ingrédients et/ou hache-les avant la préparation. Filtre les morceaux avec un tamis.Change les lames.
CODES D'ERREURFehler-
codeProblème Solution
E 05 Le moteur est surchargé par trop d'ingrédients.Enlève s'il te plaît des ingrédients.
E 06Le récipient contient trop d'ingrédients ou les sondes de température sont collées.
Retire les ingré-dients et nettoie les sondes.
E 07La tension est inférieure à 160 V ou supérieure à 260 V. Contacte le service
client.E 08Perturbation du signal.
E 09
E 10 Le tuyau de sortie est bouché. Merci de le netto-yer.
E 11 Le capteur de température est défectueux ou endommagé.
Contacte le service client.
E 12
E 13Le capteur d'écoulement est défectueux ou endom-magé.
E 14 Panne du système électrique.
E 15L'unité de chauffage est défectueuse ou endommagée.
Si ta Mila présente d'autres problèmes, adresse-toi à un service de réparation professionnel. N’essaie pas de réparer l’appareil toi-même.

75
SERVICE CLIENTÈLE
En principe, nos produits sont soumis à la garantie légale de 2 ans. Passée cette péri-ode, les réclamations ne peuvent se faire qu’en relation avec la preuve d’achat.
Les pièces endommagées doivent être compatibles à l’usure normale de garantie.La durée de vie dépend du traitement et de l'utilisation des produits, elle est donc variable.
Pour des questions concernant l’utilisation ou le fonctionnement de nos articles,veuille contacter notre service client :
Numéro de téléphone: +49 211 749 55 10(Des frais d'appels supplémentaires peuvent
s'appliquer.)
E-Mail: [email protected]
ÉLIMINATION/ PROTECTION DE L'ENVIRONNEMENT
Nos produits sont fabriqués conformément à des exigences de qualité élevées et sont conçus
pour une longue durée de vie. Un nettoya-ge et un entretien réguliers participent à prolonger leur durée d’utilisation. Si le produit est défectueux ou ne peut plus être réparé, il ne doit pas être éliminé avec les déchets ménagers.
Tu dois déposer l'appareil auprès d’un point de collecte connu pour le recyclage des appareils électriques ou électroniques. En respectant l’élimination professionnelle et le recyclage, tu apportes une contribution importante à la protection de l’environne-ment.
Cet appareil respecte la directive DEEE 2002/96/CE relative à l’élimination des appareils électriques et électroniques.

76
DATOS TÉCNICOS
Potencia del motor: 210 WPotencia calorífica: 1.000 W Voltaje/Frecuencia: 220-240 V; 50-60 Hz Revoluciones: Mila 20.000 rpm; Mila Mini 15.300 rpm Dimensiones (ancho/largo/alto): Mila 16 x 36 x 37 cm; Mila Mini 15 x 32 x 34 cm Peso: Mila aprox. 5,8 kg; Mila Mini aprox. 4,7 kgCapacidad: Mila 300-1000 ml;
Mila Mini 300-600 mlEquipamiento: preparación sin filtro de bebidas vegetales; 6 programas predeter-minados; configuración del tiempo; función automática de limpiezaAccesorios: recipiente de cristal, recetario
Nos reservamos el derecho de modifi-cación y error en relación con las carac-terísticas del equipamiento, la tecnología, los colores y el diseño.
ADVERTENCIAS DE SEGURIDAD
Lee atentamente estas instruccio-nes de uso antes de poner en mar-cha el aparato y consérvalas.
USO PREVISTOEste aparato está concebido exclu-sivamente para preparar bebidas vegetales a partir de cereales, frutos secos, pepitas, semillas, legumbres o frutas. No introduzcas ningún otro tipo de alimento, especialmente café.
EXPLICACIÓN DE SÍMBOLOSEste símbolo advierte de los riesgos que puedan provocar
daños en el aparato o lesiones físicas.
Este símbolo advierte de la posibilidad de descarga
eléctrica producida por un aparato defectuoso o por una manipulación incorrecta. Si es necesario realizar reparaciones, este producto podrá ser abierto exclusivamente por un técnico autorizado.
INDICACIONES GENERALES• Después de desembalar el apara-
to, comprueba que se encuentra en perfecto estado busca posibles daños que pudieran afectar a la seguridad de funcionamiento del aparato. Si existieran defectos o el aparato hubiera caído al suelo,
ES

77
no lo uses y dirígete a nuestro servicio al cliente.
• Las reparaciones inadecuadas pueden provocar una situación de riesgo para el usuario y anular la garantía. Si algún componente estuviera dañado, este debe ser sustituido por el fabricante, una empresa especializada autoriza-da o una persona con una cualifi-cación similar.
• Este aparato está concebido exclusivamente para preparar be-bidas vegetales a partir de cerea-les, frutos secos, pepitas, semillas, legumbres o frutas. No introduz-cas ningún otro tipo de alimento.
• Guarda el aparato en un lugar le-jos del alcance de los niños.
• Los niños menores de 8 años de-berán mantenerse alejados del aparato o ser vigilados en todo momento.
• Los niños a partir de 8 años y las personas con capacidades físicas, sensoriales o mentales reducidas, o con falta de conocimientos y/o experiencia, solo podrán encen-der o apagar el equipo cuando este se encuentre en su posición de uso prevista, cuando sean su-pervisados o hayan sido instruidos sobre el uso seguro del equipo y
hayan comprendido los riesgos derivados de su uso. Los niños a partir de 8 años de edad no de-ben enchufar, limpiar ni realizar ningún mantenimiento al aparato. El aparato no es ningún juguete. Los niños deben ser supervisados para asegurarse de que no jue-guen con el aparato.
• Coloca el aparato sobre una su-perficie despejada y plana.
• Este aparato está destinado exclusivamente para uso domé-stico, además de para fines simil-ares como, p. ej.,• en zonas de pausa de empre-
sas, oficinas u otros lugares de trabajo,
• en explotaciones agrarias,• para su uso por huéspedes en
alojamientos (hoteles, mote-les), pensiones particulares o viviendas vacacionales.
• Utiliza el aparato únicamen-te después de haberlo montado correctamente.
• El aparato debe usarse única-mente con los accesorios y repu-estos originales.
• Mila no debe colocarse en un ar-mario durante su uso.
• Nunca rellenes líquidos fríos o ca-lientes en la cámara de mezclado

78
y utiliza solamente ingredientes a temperatura ambiente.
• Rellena el depósito de agua exclusivamente con agua filtrada sin cal para proteger tu aparato y conseguir el sabor óptimo.
• No desenchufes el aparato durante la preparación o el pro-grama de limpieza automática.
• Retira los huesos cuando proce-ses fruta (p. ej. nectarinas, cere-zas, ciruelas o similares).
• ¡No introduzcas granos de café ni café instantáneo!
• Deja que el aparato se enfríe com-pletamente antes de limpiarlo.
ADVERTENCIA: durante la preparación de tu bebida,
nunca coloques las manos en la salida. ¡Peligro de escaldadura!
ADVERTENCIA: nunca retires los tapones
de la tapa durante la preparación. ¡Peligro de escaldadura!
SEGURIDAD ELÉCTRICA• Enchufa el aparato únicamente
a corriente alterna según la pla-ca de características. Conecta el enchufe solo a una toma de corri-ente con toma de tierra.
• Desenrolla totalmente el cable de alimentación antes del uso.
• No coloques bases múltiples ni generadores eléctricos cerca del aparato.
• Desenchufa el aparato cuando no lo estés utilizando. No tires del cable de alimentación, ya que este puede dañarse.
• Apaga el aparato antes de desenchufarlo.
• El aparato no es apto para ser operado con un temporizador ex-terno ni con un sistema de cont-rol a distancia separado.
• Desenchufa el aparato después de su uso, antes de limpiarlo o en caso de anomalías durante su funcionamiento.
• No sumerjas nunca el aparato en agua u otros líquidos y protege el cable de alimentación, el enchufe y la fuente de alimentación de la humedad.
• El aparato no es apto para el la-vavajillas. La tapa, los tapones, el recipiente colector y el recipien-te de cristal se pueden lavar en el lavavajillas.
• No colocar o usar el aparato o el cable de alimentación cerca de superficies calientes.
• El cable no debe colgar sobre el
79
borde de la superficie de trabajo. • No utilices el aparato en el
exterior. • Durante su uso, no introduz-
cas ningún objeto en el apara-to estando en funcionamiento y tampoco introduzcas la mano.
ANTES DEL PRIMER USO• Retira todas las piezas de seguri-
dad de transporte y de embalaje y mantenlas fuera del alcance de los niños. ¡Peligro de asfixia!
• Antes de la primera puesta en marcha y después de un largo periodo en desuso, Mila deberá limpiarse. Ten en cuenta nue-stras indicaciones de limpieza y mantenimiento.
• Coloca el aparato sobre una su-perficie de trabajo plana y seca.
• Calibra el dispositivo Mila mante-niendo pulsado el botón de limpie-za. Este programa dura 5 minutos.
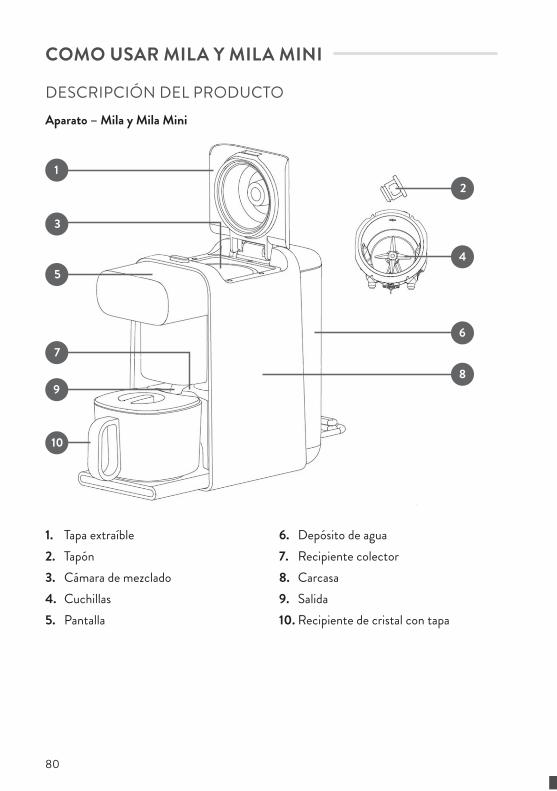
80
COMO USAR MILA Y MILA MINI
DESCRIPCIÓN DEL PRODUCTOAparato – Mila y Mila Mini
1
5
7
9
10
3
2
4
6
8
1. Tapa extraíble2. Tapón3. Cámara de mezclado4. Cuchillas5. Pantalla
6. Depósito de agua7. Recipiente colector8. Carcasa9. Salida10. Recipiente de cristal con tapa

81
La pantalla Mila
1
4
3
65
2
1. Cantidad2. Indicador de tiempo, cantidad,
error y modo de limpieza3. Selección de tiempo
4. Modo de limpieza y modo de limpieza intensiva
5. Start/Stop6. Selección de programa
La pantalla Mila Mini 1
2
653 4
1. Indicador de tiempo, cantidad, error y modo de limpieza
2. Selección de tiempo3. Modo de limpieza y modo de limpieza
intensiva
4. Selección de programa5. Cantidad6. Start/Stop
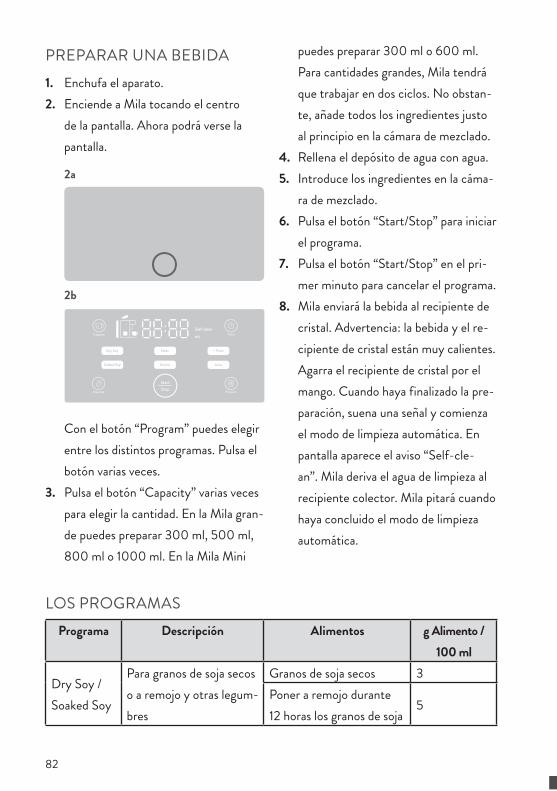
82
PREPARAR UNA BEBIDA1. Enchufa el aparato.2. Enciende a Mila tocando el centro
de la pantalla. Ahora podrá verse la pantalla.
2a
2b
Con el botón “Program” puedes elegir entre los distintos programas. Pulsa el botón varias veces.
3. Pulsa el botón “Capacity” varias veces para elegir la cantidad. En la Mila gran-de puedes preparar 300 ml, 500 ml, 800 ml o 1000 ml. En la Mila Mini
puedes preparar 300 ml o 600 ml. Para cantidades grandes, Mila tendrá que trabajar en dos ciclos. No obstan-te, añade todos los ingredientes justo al principio en la cámara de mezclado.
4. Rellena el depósito de agua con agua.5. Introduce los ingredientes en la cáma-
ra de mezclado.6. Pulsa el botón “Start/Stop” para iniciar
el programa.7. Pulsa el botón “Start/Stop” en el pri-
mer minuto para cancelar el programa.8. Mila enviará la bebida al recipiente de
cristal. Advertencia: la bebida y el re-cipiente de cristal están muy calientes. Agarra el recipiente de cristal por el mango. Cuando haya finalizado la pre-paración, suena una señal y comienza el modo de limpieza automática. En pantalla aparece el aviso “Self-cle-an”. Mila deriva el agua de limpieza al recipiente colector. Mila pitará cuando haya concluido el modo de limpieza automática.
LOS PROGRAMASPrograma Descripción Alimentos g Alimento /
100 ml
Dry Soy / Soaked Soy
Para granos de soja secos o a remojo y otras legum-bres
Granos de soja secos 3Poner a remojo durante 12 horas los granos de soja
5

83
NutsPara frutos secos, pepitas y semillas
Almendras (tostadas, escaldadas o naturales)
3-4
Avellanas (tostadas, escaldadas o naturales)
4
Anacardos 4-6Coco rallado ** 11Harina de altramuz * 4-6Nuez de Macadamia 3-4
GrainsPara cereales y pseu-docereales
Arroz *** 8Copos de avena, copos solubles o copos instantáneos
1-2
Copos de espelta, copos solubles o copos instantáneos
1-2
Trigo sarraceno * 8Semilla de cáñamo pelada 6-8Mijo * 3-5
+ FruitPara leche vegetal con dátiles u otra fruta seca o plátanos maduros
Plátano maduroFruta seca blanda como dátiles* o albaricoques*
Juice
Para aprox. 500 g de zumo/néctar de fruta de frutos rojos y fruta blanda, lavada y descora-zonada. Llena un máximo de 250 g de fruta.
PlátanoBayasMelocotones Albaricoques
Nectarinas
* a remojo y lavados ** no preparar más de 300 ml *** lavados y cocidos

84
LA SELECCIÓN DEL TIEMPOPuedes preprogramar a Mila para que prepare tu bebida más tarde. 1. Para ello, selecciona el programa y la
capacidad2. Elige el botón “Timer”. Pulsando varias
veces puedes modificar la configuración del tiempo en intervalos de 30 minutos hasta un máximo de 24 horas. El tiempo predeterminado es de 8 horas. El pro-grama finalizaría entonces en 8 horas.
3. Selecciona el programa. Los programas "Soaked Soy" y "Juice" están bloqueados en esta función por motivos de seguridad.
4. Introduce los ingredientes y pulsa “Start/Stop”.
5. Puedes cancelar el programa y la selección de tiempo pulsando el botón “Start/Stop” durante el primer minuto. Ahora puedes realizar una nueva selección.
ADVERTENCIA: si la temperatura ambiente es
superior a 30 °C, no debes regular el parámetro de tiempo para más de 12 horas para evitar contamina-ción por microbios.
CONSEJOS Y TRUCOS• Advertencia: la avena y la espelta
generan mucha espuma. Controla especialmente a Mila cuando utilices estos ingredientes y prepara porciones pequeñas de hasta 500 ml/600 ml. La leche de avena y espelta puede formar una capa superior mientras se enfría. Retírala con cuidado con una cuchara o coloca film transparente directamente sobre la leche caliente.
• Para un sabor más suave, tienes que presionar los granos de soja a remojo para quitarles la capa fina de piel.
• Para el programa “+Fruit” se recomi-endan sobre todo frutas secas blandas (p. ej. dátiles o albaricoques) además de plátanos maduros. Desmenuza los plátanos en porciones. Prepara en este programa porciones pequeñas siempre que sea posible para lograr un resulta-do perfecto.
• Utiliza el colador cuando quieras beber tu bebida sola, con café o con té, cuando utilices frutos secos, semillas o pepitas con cáscara o cuando proceses fruta. Para utilizarla en muesli, papilla y otros preparados horneados y cocidos, los restos no se notarán.
• Pon a remojo los dátiles blandos y las frutas secas al menos durante 6 horas antes de utilizarlos.

85
• Pon a remojo los granos de soja y las legumbres al menos durante 12 horas para utilizar el programa “Soaked Soy”.
• Si tienes un ingrediente que deja muchos restos, como restos de piel, debes ponerlo a remojo antes de volver a utilizarlo. Así se podrá triturar mejor.
LIMPIEZA Y CUIDADO
LIMPIEZAMila incluye un modo de autolimpieza au-tomático y dos modos manuales. Gracias a eso, la limpieza será coser y cantar. 1. Después de cada ciclo de programa,
Mila activa automáticamente la au-tolimpieza. Dura 7 minutos. Para ello, utiliza solamente agua para limpiar. Tras concluir la autolimpieza, tienes que abrir la tapa para secar la cámara de mezclado.
2. También puedes seleccionar el modo limpieza fácilmente a través de la pan-talla, p. ej. si no utilizas el aparato, si preparas una bebida dulce (con azúcar, sirope, frutas secas o frutas) o si el aparato necesita una limpieza a fondo:• Selecciona el modo de limpieza
y pulsa Start para iniciar el modo limpieza. Dura 3 minutos. Tras concluir la autolimpieza, tienes que abrir la tapa para secar la cámara de mezclado.
• Vuelve a pulsar el botón de limpieza para seleccionar el modo intensivo de limpieza.
Dura 8 minutos. Debes activar este modo regularmente, incluso cuando utilices con frecuencia la máquina. Antes de iniciar el programa, añade una gota de lavavajillas neutro a la cámara de mezclado. Durante el primer uso, ten en cuenta que el lavavajillas no sea demasiado concentrado y no llene de espuma la cámara de mezcla. Si todavía quedan restos de espuma tras finalizar el programa, utiliza el programa de enjuague de 3 minutos. Tras con-cluir la autolimpieza, tienes que abrir la tapa para secar la cámara de mezclado.
3. Abre la tapa y tira de ella en posición vertical hacia arriba para que puedas lavarla a mano. El tapón se puede des-montar fácilmente. No laves la tapa y el tapón en el lavavajillas para proteger las juntas.
4. Limpia con un paño húmedo también los pernos metálicos que sobresalen de la cámara de mezclado, la válvula de
86
silicona a través de la cual fluye el agua a la cámara de mezclado y la boquilla de silicona.
5. El depósito de agua debe limpiarse con frecuencia para que siempre se mantenga su higiene.
6. Limpia la carcasa con un paño húmedo y suave y sécala a continuación cui-dadosamente.
ADVERTENCIA: si quieres lavar las cuchillas
a mano, debes apagar el aparato y desenchufarlo. Ten mucho cuidado, las cuchillas son muy afiladas.
No desenchufes el aparato durante el programa de lim -
pieza y no interrumpas el programa.
QUITAR LOS RESTOS DE LA CÁMARA DE MEZCLASi todavía quedan restos o leche sin preparar que quieras quitar de la cámara de mezcla debido a un corte de luz u otro motivo, sigue estos pasos:1. Conecta a Mila al suministro eléctrico.2. Cuando todos los símbolos aparezcan en
pantalla, puedes verter los restos man-teniendo pulsado el botón "Capacity".
3. A continuación, inicia un programa de limpieza manual con el botón “Cleaning”.
DESCALCIFICACIÓNPara Mila, utiliza exclusivamente agua filtra-da para proteger el aparato. Además, debes descalcificar a Mila regularmente. Te reco-mendamos descalcificar el aparato después de 50 ciclos de preparación o si detectas depósitos de cal visibles encima o dentro de la máquina. Procede del siguiente modo:1. Añade 3 cucharaditas de bicarbonato
doméstico al depósito de agua y llénalo de agua.
2. Activa un programa de preparación sin ingredientes con 300 ml.
3. Interrumpe la preparación retirando el depósito de agua. Vierte el agua con bicarbonato sobrante. Espera 1 hora y llena el depósito con agua limpia. Deja que el programa llegue al final.
4. A continuación, activa un programa de preparación sin ingredientes con 1000 ml. Repite el proceso si fuera necesario. Ahora Mila estará como nueva.
Quedan excluidos de la garantía acci-dentes o fallos en el funcionamiento del aparato como consecuencia de no haber realizado una descalcificación.
CAMBIAR LAS CUCHILLASSi las cuchillas de tu Mila se desgastan después de un tiempo, podrás cambiarlas. Utiliza exclusivamente repuestos originales.

87
¡ATENCIÓN! Ten mucho cuidado cuando
agarres las cuchillas, incluso cuando ya estén desgastadas. Existe riesgo de lesiones.
1. Asegúrate de que Mila no esté conec-tada a la red eléctrica.
2. Utiliza dos herramientas estables, como destornilladores largos. Protege el suelo de la cámara de mezcla, por ejemplo, colocando varias capas de papel o un trozo de silicona a medida bajo las cuchillas para no arañar el recubrimiento.
3. Introduce una herramienta en la parte trasera de la cuchilla de manera que haga palanca y que la cuchilla oponga algo de resistencia.
4. Con la otra herramienta, golpea por encima de la cámara de mezclado con-tra la herramienta ladeada para soltar la cuchilla.
5. Extrae la cuchilla con cuidado cuando se haya aflojado y coloca la cuchilla nueva.
6. Aprieta la cuchilla nueva con la mano con cuidado. A continuación, inicia un programa de limpieza manual con el botón “Cleaning”. La cuchilla se aprie-ta sola durante los primeros usos.
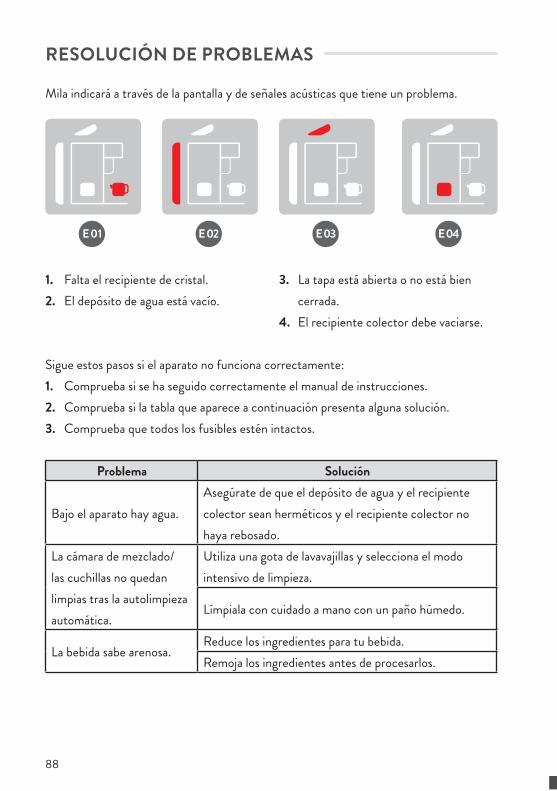
88
RESOLUCIÓN DE PROBLEMAS
Mila indicará a través de la pantalla y de señales acústicas que tiene un problema.
E04E01 E02 E03
1. Falta el recipiente de cristal. 2. El depósito de agua está vacío.
3. La tapa está abierta o no está bien cerrada.
4. El recipiente colector debe vaciarse.
Sigue estos pasos si el aparato no funciona correctamente:1. Comprueba si se ha seguido correctamente el manual de instrucciones.2. Comprueba si la tabla que aparece a continuación presenta alguna solución.3. Comprueba que todos los fusibles estén intactos.
Problema Solución
Bajo el aparato hay agua.Asegúrate de que el depósito de agua y el recipiente colector sean herméticos y el recipiente colector no haya rebosado.
La cámara de mezclado/las cuchillas no quedan limpias tras la autolimpieza automática.
Utiliza una gota de lavavajillas y selecciona el modo intensivo de limpieza.
Límpiala con cuidado a mano con un paño húmedo.
La bebida sabe arenosa.Reduce los ingredientes para tu bebida.Remoja los ingredientes antes de procesarlos.
89
El resultado de mezcla tiene tropezones.
Pon a remojo los ingredientes y/o tritúralos antes de la preparación. Filtra los pedazos con el colador.Sustituye las cuchillas.
CÓDIGOS DE ERRORCódigo de error
Problema Solución
E 05Sobrecarga del motor debido a un exceso de alimentos.
Por favor, extrae alimentos.
E 06La cámara de mezclado tiene demasiados alimen-tos o los sensores térmicos están taponados.
Extrae los alimentos y limpia los sensores de la cámara de mezclado.
E 07 La tensión es inferior a 160 V o superior a 260 V. Por favor, contacta con el servicio de atención al cliente.
E 08Avería en la señal.
E 09E 10 El conducto de salida está obstruido. Límpialo.E 11 El sensor de temperatura está defectuoso o
dañado. Por favor, contacta con el servicio de atención al cliente.
E 12E 13 El sensor de paso está defectuoso o dañado.E 14 Avería eléctrica.
E 15La unidad calefactora de la cámara de mezcla está defectuosa o dañada.
Si Mila mostrara otros defectos distintos a los descritos, contacta con un servicio de reparaciones profesional. Nunca intentes reparar el aparato por tu cuenta.

90
ATENCIÓN AL CLIENTE
En principio, nuestros productos tienen una garantía legal de 2 años. Reclamacio-nes adicionales sólo serán procesadas junto a una prueba de compra. Las piezas reem-plazables excluyen cualquier reclamación de garantía cuando se ha producido un desgaste natural. La durabilidad está de-terminada por el manejo respectivo y uso del producto, y, por lo tanto, es variable.
Si tienes preguntas sobre el manejo y la funcionalidad de nuestros productos,ponte en contacto con nuestro servicio de atención al cliente:Número telefónico: +49 211 749 55 10(Se pueden aplicar cargos adicionales.)
Correo electrónico: [email protected]
ELIMINACIÓN/ PROTECCIÓN DEL MEDIO AMBIENTE
Nuestros productos están fabricados con altas exigencias de calidad y están concebidos
para que tengan una larga vida útil. El mantenimiento y cuidado regular contri-buyen a alargar su vida útil. Si el aparato estuviera averiado y ya no se pudiera reparar, no debe ser eliminarlo en la basura doméstica común.
Debes entregar el aparato en un punto de eliminación indicado para el reciclaje de aparatos eléctricos o electrónicos. Con la correcta eliminación y el reciclaje contri-buyes de manera importante a la protec-ción de nuestro medioambiente.
Este aparato se ajusta a lo indicado en la Directiva RAEE 2002/96/CE sobre la eliminación de aparatos eléctricos y elec-trónicos.

91

Bedienungsanleitung Mandelmilchbereiter Mila/Mila MiniArtikel-Nr.: 943766/943767
Stand: November 2019Druck- und Satzfehler vorbehalten.
Copyright ©Springlane GmbH, Reisholzer Werftstraße 25a, 40589 Düsseldorf, Germany
Service Hotline: 0800 270 70 27E-Mail: [email protected] | Internet: www.springlane.de


