F STEINEL FRANCE SAS ACTICENTRE - CRT 2 Rue des Famards - Bât. M - Lot 3F-59818 Lesquin Cedex Tél.: +33/3/20 30 34 00Fax: +33/3/20 30 34 [email protected]
NL Van Spijk B.V. Postbus 25688 HP OIRSCHOTDe Scheper 4025688 HP OIRSCHOTTel. +31 499 571810Fax. +31 499 [email protected]
B VSA BelgiumHagelberg 29B-2440 GeelTel.: +32/14/256050Fax: +32/14/[email protected]
L Minusines S.A. 8, rue de HogenbergL-1022 LuxembourgTél. : (00 352) 49 58 58 1Fax : (00 352) 49 58 66/67www.minusines.lu
GR PANOS Lingonis + Sons O. E.Aristofanous 8 Str.GR-10554 AthensTel.: +30/210/3212021Fax: +30/210/[email protected]
TR SAOS Teknoloji Elektrik Sanayi veTicaret Limited ŞirketiHalil Rıfat Paşa mahallesiYüzerhavuz Sokak PERPA Ticaret Merkezi A Blok Kat 5 No.313 Şişli / İSTANBULTel.: +90 212 220 09 20Fax: +90 212 220 09 [email protected]
• Alle Bauteile auf Beschädigungen prüfen.• Bei Schäden das Produkt nicht in Betrieb
nehmen.• Geeigneten Montageort auswählen unter
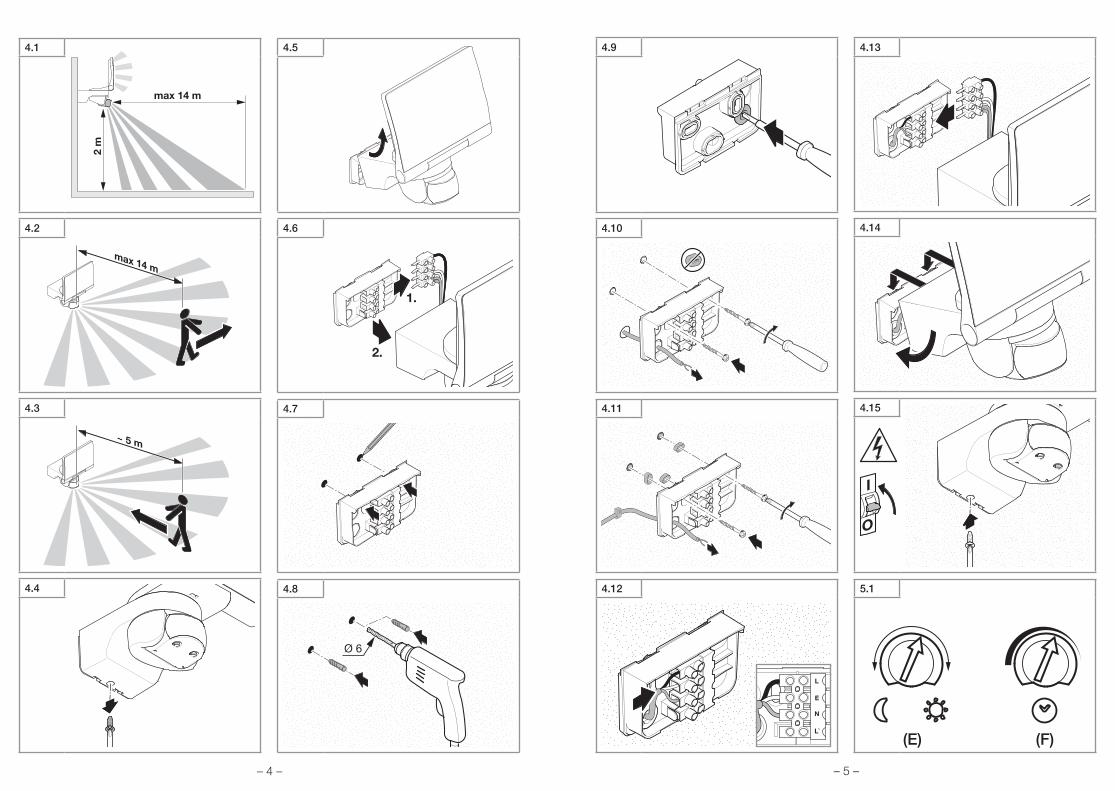
Berücksichtigung der Reichweite und Bewegungserfassung. (Abb� 4�1)
Die sicherste Bewegungserfassung wird erreicht, wenn das Gerät seitlich zur Gehrichtung montiert wird und keine Hindernisse (z.B. Bäume, Mauern etc.) die Sicht des Sensors behindern (Abb� 4�2/4�3).
Werkseinstellungen EinstellreglerDämmerungseinstellung (E): 2000 LuxZeiteinstellung (F): 8 s
Dämmerungseinstellung (Abb� 5�1 /E)stufenlos einstellbarEinstellregler auf = Dämmerungsbetrieb ca. 2 Lux
Einstellregler auf = Tageslichtbetrieb ca. 2000 Lux
Hinweis: Bei Einstellung des Erfassungsbereiches bei Tageslicht ist der Einstellregler auf = Tageslichtbetrieb zu stellen.
Zeiteinstellung (Abb� 5�1 / F)Einstellregler max = längste Zeit, ca. 35 minEinstellregler min = kürzeste Zeit, ca. 8 s
Hinweis: Bei Einstellung des Erfassungsbereiches wird empfohlen die kürzeste Zeit zu wählen.
Reichweiteneinstellung/JustierungJe nach Bedarf kann der Erfassungsbereich optimal eingestellt werden.
Sensoreinheit – Schwenken der Sensoreinheit horizontal 180°.
(Abb� 5�3) – Kippen der Sensoreinheit vertikal 90°.
(Abb� 5�6)
Abdeckaufkleber (Abb� 5�4)Die Abdeckfolie dient dazu, beliebig viele Linsen-segmente abzudecken und somit die Reichweite individuell einzuschränken. Fehlschaltungen werden ausgeschlossen oder Gefahrenstellen gezielt über-wacht (Abb� 5�5).
Für spezielle Einbruchalarmanlagen ist das Gerät nicht geeignet, da die hierfür vorgeschriebene Sabotagesicherheit fehlt. Witterungseinflüsse können die Funktion der Sensor-LED-Strahler beeinflussen. Bei starken Windböen, Schnee, Regen, Hagel kann es zu einer Fehlschaltung kommen, da die plötzlichen Temperaturschwan-kungen nicht von Wärmequellen unterschieden werden können. Die Erfassungslinse kann bei Verschmutzung mit einem feuchten Tuch (ohne Reinigungsmittel) gesäubert werden.
D
1� Zu diesem Dokument
Bitte sorgfältig lesen und aufbewahren! – Urheberrechtlich geschützt. Nachdruck, auch
auszugsweise, nur mit unserer Genehmigung. – Änderungen, die dem technischen Fortschritt
dienen, vorbehalten. Symbolerklärung
! Warnung vor Gefahren!
...Verweis auf Textstellen im Dokument�
2� Allgemeine Sicherheitshinweise
! Vor allen Arbeiten am Gerät die Spannungszufuhr unterbrechen!
• Bei der Installation dieser Geräte handelt es sich um eine Arbeit an der Netzspannung; sie muss daher fachgerecht nach den länderspezifischen Installationsvorschriften und Anschlussbedingun-gen durchgeführt werden (D-VDE 0100, a -ÖVE/ÖNORM E 8001-1, h-SEV 1000)
• Die Leuchte ist so zu positionieren, dass länge-res in die Leuchte starren in einem geringeren Abstand als 0,3 m nicht zu erwarten ist.
• Das Strahlergehäuse erwärmt sich während des Betriebes. Die Ausrichtung des LED-Panels nur durchführen wenn dieses abgekühlt ist. Nicht aus kurzer Distanz oder einen längeren Zeitraum (> 5 min) in die LED-Leuchte blicken. Dies kann zu einer Schädigung der Netzhaut führen.
• Montieren Sie das Gerät nicht auf (gewöhnlich) leicht entflammbaren Oberflächen.
3� XLED home 2 / XLED home 2 XL
Bestimmungsgemäßer Gebrauch – Sensor-Strahler zur Wandmontage im Außenbe-
reich geeignet. – Frei schwenkbares LED Panel und beweglicher
Sensor. – Als Einzelstrahler oder vernetzt mit der Slave-
Version erhältlich.
Bewegung schaltet Licht, Alarm und vieles mehr. Mit dem frei schwenkbaren Panel lässt sich der Strahler im privaten Bereich zur Haus- und Grund-
stücksbeleuchtung oder im gewerblichen Bereich z.B. zur Beleuchtung des Firmengeländes perfekt einsetzen. Die höchst effiziente LED-Technologie sorgt in Verbindung mit der opalen Scheibe für flächiges Licht.
Anschluss NetzzuleitungDie Netzzuleitung besteht aus einem 3-adrigen Kabel:L = Phase (meistens schwarz, braun oder grau)N = Neutralleiter (meistens blau)PE = Schutzleiter (grün/gelb)
Im Zweifel müssen Sie die Kabel mit einem Span-nungsprüfer identifizieren; anschließend wieder spannungsfrei schalten. Phase (L) und Neutralleiter (N) werden an der Lüsterklemme angeschlossen. Der Schutzleiter kann mit Hilfe der Klemme (E) durchgeschleift werden.
Anschlussdiagramm (Abb� 3�7)
Wichtig:Ein Vertauschen der Anschlüsse führt im Gerät oder Ihrem Sicherungskasten später zum Kurz-schluss. In diesem Fall müssen nochmals die einzelnen Kabel identifiziert und neu verbunden werden. Die Lichtquelle dieser Leuchte ist nicht ersetzbar; falls die Lichtquelle ersetzt werden muss (z.B. am Ende Ihrer Lebensdauer), ist die komplette Leuchte zu ersetzen.
D
– 10 – – 11 –
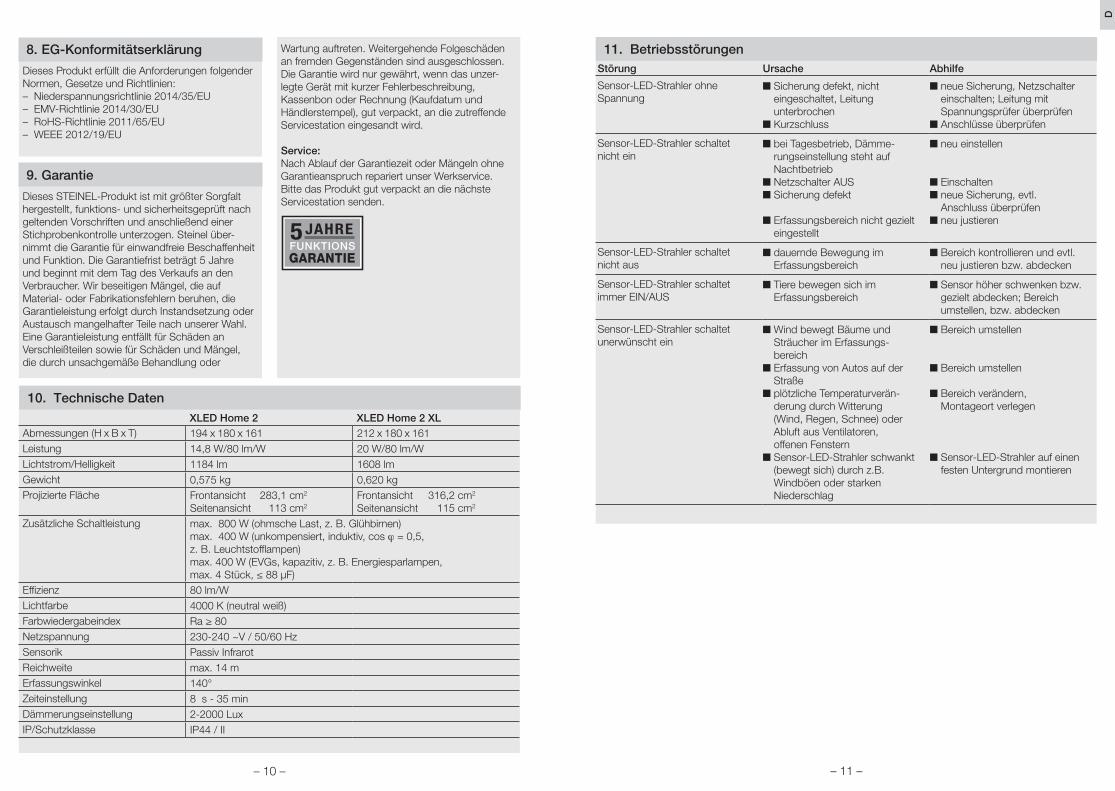
Störung Ursache Abhilfe
Sensor-LED-Strahler ohne Spannung
n Sicherung defekt, nicht eingeschaltet, Leitung unterbrochen
n Kurzschluss
n neue Sicherung, Netzschalter einschalten; Leitung mit Spannungsprüfer überprüfen
n Anschlüsse überprüfen
Sensor-LED-Strahler schaltet nicht ein
n bei Tagesbetrieb, Dämme-rungseinstellung steht auf Nachtbetrieb
n Netzschalter AUSn Sicherung defekt
n Erfassungsbereich nicht gezielt eingestellt
n neu einstellen
n Einschaltenn neue Sicherung, evtl.
Anschluss überprüfenn neu justieren
Sensor-LED-Strahler schaltet nicht aus
n dauernde Bewegung im Erfassungsbereich
n Bereich kontrollieren und evtl. neu justieren bzw. abdecken
Sensor-LED-Strahler schaltet immer EIN/AUS
n Tiere bewegen sich im Erfassungsbereich
n Sensor höher schwenken bzw. gezielt abdecken; Bereich umstellen, bzw. abdecken
Sensor-LED-Strahler schaltet unerwünscht ein
n Wind bewegt Bäume und Sträucher im Erfassungs- bereich
n Erfassung von Autos auf der Straße
n plötzliche Temperaturverän- derung durch Witterung (Wind, Regen, Schnee) oder Abluft aus Ventilatoren, offenen Fenstern
n Sensor-LED-Strahler schwankt (bewegt sich) durch z.B. Windböen oder starken Niederschlag
n Bereich umstellen
n Bereich umstellen
n Bereich verändern, Montageort verlegen
n Sensor-LED-Strahler auf einen festen Untergrund montieren
11� Betriebsstörungen
XLED Home 2 XLED Home 2 XLAbmessungen (H x B x T) 194 x 180 x 161 212 x 180 x 161Leistung 14,8 W/80 lm/W 20 W/80 lm/WLichtstrom/Helligkeit 1184 lm 1608 lmGewicht 0,575 kg 0,620 kgProjizierte Fläche Frontansicht 283,1 cm2
Seitenansicht 113 cm2Frontansicht 316,2 cm2
Seitenansicht 115 cm2
Zusätzliche Schaltleistung max. 800 W (ohmsche Last, z. B. Glühbirnen)max. 400 W (unkompensiert, induktiv, cos ϕ = 0,5, z. B. Leuchtstofflampen)max. 400 W (EVGs, kapazitiv, z. B. Energiesparlampen, max. 4 Stück, ≤ 88 μF)
Effizienz 80 lm/WLichtfarbe 4000 K (neutral weiß)Farbwiedergabeindex Ra ≥ 80Netzspannung 230-240 ~V / 50/60 HzSensorik Passiv InfrarotReichweite max. 14 mErfassungswinkel 140°Zeiteinstellung 8 s - 35 minDämmerungseinstellung 2-2000 LuxIP/Schutzklasse IP44 / II
8� EG-Konformitätserklärung
Dieses Produkt erfüllt die Anforderungen folgender Normen, Gesetze und Richtlinien: – Niederspannungsrichtlinie 2014/35/EU – EMV-Richtlinie 2014/30/EU – RoHS-Richtlinie 2011/65/EU – WEEE 2012/19/EU
9� Garantie
Dieses STEINEL-Produkt ist mit größter Sorgfalt hergestellt, funktions- und sicherheitsgeprüft nach geltenden Vorschriften und anschließend einer Stichprobenkontrolle unterzogen. Steinel über-nimmt die Garantie für einwandfreie Beschaffenheit und Funktion. Die Garantiefrist beträgt 5 Jahre und beginnt mit dem Tag des Verkaufs an den Verbraucher. Wir beseitigen Mängel, die auf Material- oder Fabrikationsfehlern beruhen, die Garantieleistung erfolgt durch Instandsetzung oder Austausch mangelhafter Teile nach unserer Wahl. Eine Garantieleistung entfällt für Schäden an Verschleißteilen sowie für Schäden und Mängel, die durch unsachgemäße Behandlung oder
Wartung auftreten. Weitergehende Folgeschäden an fremden Gegenständen sind ausgeschlossen. Die Garantie wird nur gewährt, wenn das unzer- legte Gerät mit kurzer Fehlerbeschreibung, Kassenbon oder Rechnung (Kaufdatum und Händlerstempel), gut verpackt, an die zutreffende Servicestation eingesandt wird.
Service:Nach Ablauf der Garantiezeit oder Mängeln ohne Garantieanspruch repariert unser Werkservice. Bitte das Produkt gut verpackt an die nächste Servicestation senden.
10� Technische Daten
– 12 – – 13 –
GB
1� About this document
Please read carefully and keep in a safe place� – Under copyright. Reproduction either in whole or
in part only with our consent. – Subject to change in the interest of technical
progress. Symbols
! Hazard warning!
...Reference to other information in the document�
2� General safety precautions
! Disconnect the power supply before attempting any work on the unit�
• Installing these units involves work on the mains voltage supply; installation must therefore be carried out professionally in accordance with the applicable national wiring regulations and electrical operating conditions (D-VDE 0100, a -ÖVE/ÖNORM E 8001-1, h-SEV 1000)
• The light must be positioned so that it is not expected that anybody can stare into the light for any prolonged period from a distance of less than 0.3 m.
• The floodlight enclosure heats up when the light is on. Only adjust the angle of the LED panel once it has cooled down. Do not look into the LED light at short range or for any prolonged period (> 5 min). You could damage your retina.
• Do not install the unit on (normally) flammable surfaces.
3� XLED home 2 / XLED home 2 XL
Proper use – Sensor-switched floodlight suitable for wall
mounting outdoors. – Fully swivelling LED panel and moveable sensor. – Available as a standalone floodlight or intercon-
nected with the slave version.
Movement triggers lights, alarms and many other devices. With the fully swivelling panel, the floodlight can be used at home to provide perfect illumination for lighting up property, or commercially for lighting up business premises. In conjunction with the opal cover, this extremely efficient technol-ogy provides wide-area lighting.
Models – XLED home 2
– XLED home 2 XL
Package contents (Fig� 3�1)Sensor adjustment range (Fig� 3�2 / 3�3 / 5�6)Product dimensions (Fig� 3�4 / 3�5)Product components (Fig� 3�6)A LED panelB EnclosureC Wall mountD Sensor unit E Twilight settingF Time setting
4� Electrical installation
• Switch OFF power supply (Fig� 3�7)
Connecting the mains power supply leadThe supply lead consist of three wires:L = phase conductor (usually black, brown or grey)N = neutral conductor (usually blue)PE = protective-earth conductor (green/yellow)
If you are in any doubt, identify the conductors using a voltage tester; then disconnect from the power supply again. Connect the phase conductor (L) and neutral conductor (N) to the terminal block. The protective-earth conductor can be looped through by means of terminal (E).
Wiring diagram (Fig� 3�7)
Important:Incorrectly wired connections will produce a short circuit later on in the product or your fuse box. In this case, you must identify the individual conduc-tors once again and re-connect them. The light source of this luminaire cannot be replaced. If the light source needs to be replaced (e.g. at the end of its service life), the complete luminaire must be replaced.
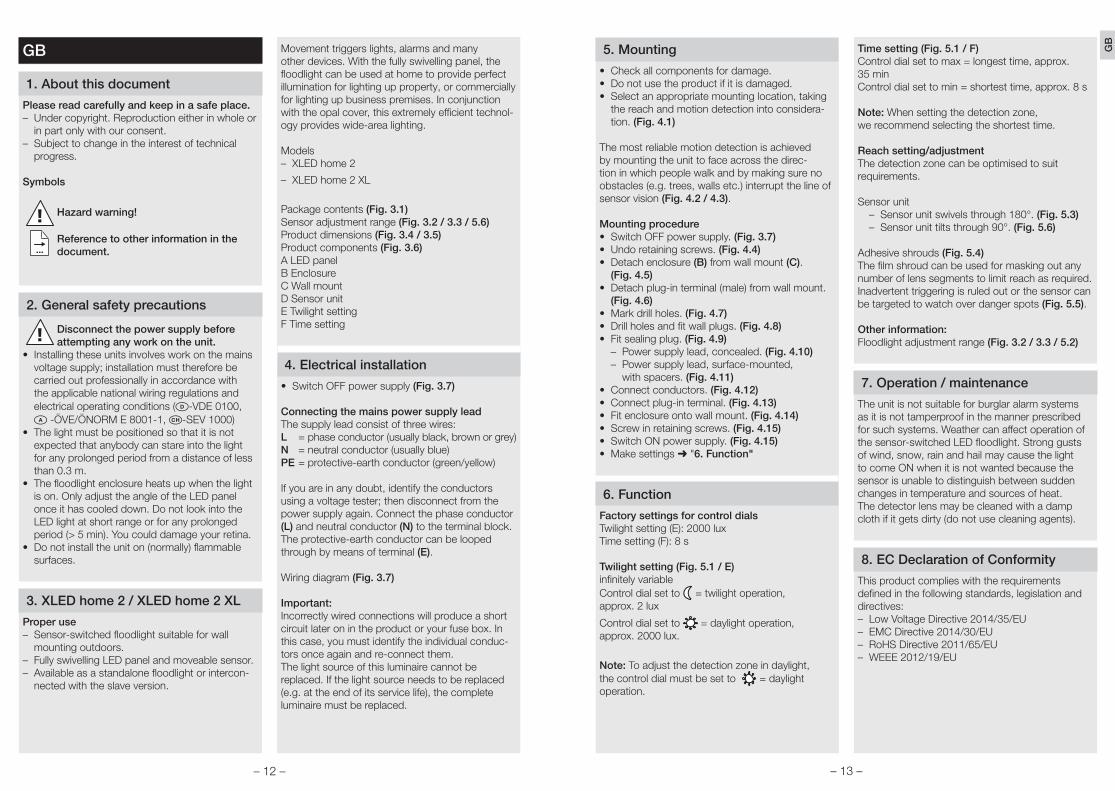
5� Mounting
• Check all components for damage.• Do not use the product if it is damaged.• Select an appropriate mounting location, taking
the reach and motion detection into considera-tion. (Fig� 4�1)
The most reliable motion detection is achieved by mounting the unit to face across the direc-tion in which people walk and by making sure no obstacles (e.g. trees, walls etc.) interrupt the line of sensor vision (Fig� 4�2 / 4�3).
Mounting procedure• Switch OFF power supply. (Fig� 3�7)• Undo retaining screws. (Fig� 4�4)• Detach enclosure (B) from wall mount (C).
(Fig� 4�5)• Detach plug-in terminal (male) from wall mount.
(Fig� 4�6)• Mark drill holes. (Fig� 4�7)• Drill holes and fit wall plugs. (Fig� 4�8)• Fit sealing plug. (Fig� 4�9)
– Power supply lead, concealed. (Fig� 4�10) – Power supply lead, surface-mounted,
with spacers. (Fig� 4�11)• Connect conductors. (Fig� 4�12)• Connect plug-in terminal. (Fig� 4�13)• Fit enclosure onto wall mount. (Fig� 4�14)• Screw in retaining screws. (Fig� 4�15)• Switch ON power supply. (Fig� 4�15)• Make settings ➜ "6� Function"
6� Function
Factory settings for control dialsTwilight setting (E): 2000 luxTime setting (F): 8 s
Twilight setting (Fig� 5�1 / E)infinitely variableControl dial set to = twilight operation, approx. 2 lux
Control dial set to = daylight operation, approx. 2000 lux.
Note: To adjust the detection zone in daylight, the control dial must be set to = daylight operation.
Time setting (Fig� 5�1 / F)Control dial set to max = longest time, approx. 35 minControl dial set to min = shortest time, approx. 8 s
Note: When setting the detection zone, we recommend selecting the shortest time.
Reach setting/adjustmentThe detection zone can be optimised to suit requirements.
Sensor unit – Sensor unit swivels through 180°. (Fig� 5�3) – Sensor unit tilts through 90°. (Fig� 5�6)
Adhesive shrouds (Fig� 5�4)The film shroud can be used for masking out any number of lens segments to limit reach as required. Inadvertent triggering is ruled out or the sensor can be targeted to watch over danger spots (Fig� 5�5).
Other information:Floodlight adjustment range (Fig� 3�2 / 3�3 / 5�2)
7� Operation / maintenance
The unit is not suitable for burglar alarm systems as it is not tamperproof in the manner prescribed for such systems. Weather can affect operation of the sensor-switched LED floodlight. Strong gusts of wind, snow, rain and hail may cause the light to come ON when it is not wanted because the sensor is unable to distinguish between sudden changes in temperature and sources of heat. The detector lens may be cleaned with a damp cloth if it gets dirty (do not use cleaning agents).
8� EC Declaration of Conformity
This product complies with the requirements defined in the following standards, legislation and directives: – Low Voltage Directive 2014/35/EU – EMC Directive 2014/30/EU – RoHS Directive 2011/65/EU – WEEE 2012/19/EU
GB
– 14 – – 15 –
XLED Home 2 XLED Home 2 XLDimensions (H x W x D) 194 x 180 x 161 212 x 180 x 161Output 14.8 W / 80 lm/W 20 W / 80 lm/WLuminous flux / brightness 1184 lm 1608 lmWeight 0.575 kg 0.620 kgArea illuminated Front view 283.1 cm2
Side view 113 cm2Front view 316.2 cm2
Side view 115 cm2
Additional switching capacity max. 800 W (resistive load, e.g. light bulbs)max. 400 W (uncorrected, inductive, cos ϕ = 0.5, e.g. fluorescent lamps)max. 400 W (electronic ballasts, capacitive, e.g. low-energy bulbs, max. 4 each, ≤ 88 μF))
Efficiency 80 lm/WColour temperature 4000 K (neutral white)Colour rendering index Ra ≥ 80Supply voltage 230-240 ~V / 50/60 HzSensor system Passive infraredReach max. 14 mAngle of coverage 140°Time setting 8 s - 35 minTwilight setting 2 - 2000 luxIP / protection class IP44 / II
9� Warranty
This STEINEL product has been manufactured with utmost care, tested for proper operation and safety and then subjected to random sample inspection. Steinel guarantees that it is in perfect condition and proper working order. The warranty period is 5 years and starts on the date of sale to the con-sumer. We will remedy defects caused by material flaws or manufacturing faults. The warranty will be met by repair or replacement of defective parts at our own discretion. The warranty shall not cover damage to wear parts, damage or defects caused by improper treatment or maintenance. Further consequential damage to other objects shall be excluded. Claims under the warranty will only be accepted if the unit is sent fully assembled and well-packed with a brief description of the fault, a receipt or invoice (date of purchase and dealer's stamp) to the appropriate Service Centre.
Service:Our Customer Service Department will repair faults not covered by warranty or after the warranty pe-riod. Please send the product well-packed to your nearest Service Centre.
10� Technical specifications
Malfunction Cause Remedy
Sensor-switched LED floodlight without power
n Fuse faulty, not switched ON, break in wiring
n Short circuit
n Replace fuse, turn ON mains switch, check lead with voltage tester
n Check connections
Sensor-switched LED floodlight will not switch ON
n Twilight setting in night mode during daytime operation
n Mains power switch OFFn Fuse faulty
n Detection zone not properly targeted
n Readjust
n Switch ONn Fit new fuse, check connec-
tion if necessaryn Readjust
Sensor-switched LED floodlight will not switch OFF
n Continuous movement in the detection zone
n Check zone and readjust if necessary or apply shroud
Sensor-switched LED floodlight keeps switching ON and OFF
n Animals moving in the detec-tion zone
n Tilt sensor higher or apply specific shrouds; adjust detection zone or fit shrouds
Sensor-switched LED floodlight switches ON when it should not
n Wind is moving trees and bushes in the detection zone
n Cars on the road are being detected
n Sudden change in tempera-ture caused by weather (wind, rain, snow) or air discharged from fans, open windows
n Sensor-switched LED flood-light swaying (moving), resulting, for example, from gusts of wind or heavy precipitation
n Change detection zone
n Change detection zone
n Change detection zone, mount in a different place
n Fit sensor-switched LED flood-light to a firm surface