Mehr Informationen unter www.juwel-aquarium.com DE 2. Wählen Sie den Punkt „Allgemeine Einstellungen“ und bestätigen Sie mit [SET]. 3. Wählen Sie mit den Pfeiltasten „Datum festlegen“ und bestätigen Sie mit [SET]. 4. Stellen Sie mit den Pfeiltasten das Datum ein. Mit [SET ] wechseln Sie zwischen Tagen, Monaten und Jahren. Bestätigen Sie das eingestellte Datum mit der Back Taste [«]. 5. Das Datum wurde gespeichert. Drücken Sie die Back Taste [«], um zurück ins Hauptmenü zu gelangen. Lichtprofile Jedem Wochentag kann ein individuelles Lichtprofil zugewiesen werden. Jedes Licht- profil besteht aus vier unterschiedlich einstellbaren Dimmphasen (Morgendämme- rung, Sonnenaufgang, Sonnenuntergang, Abenddämmerung) und den jeweiligen Zeiträumen dazwischen (Standphasen). Für jede Dimmphase kann ein individueller Start- und Endzeitpunkt gewählt werden, sowie die zu erreichende Leuchtstärke der jeweils weißen und blauen LEDs. Während der Standphasen, dies sind die Zeiträume zwischen den Dimmphasen, wird bis zur Startzeit der nächsten Dimmphase, die zuletzt erreichte Lichtintensität gehal- ten. Beispiel Tagbeleuchtung: Endet die Dimmphase „Sonnenaufgang“ z.B. um 10 Uhr mit der Lichtintensität von 100% (weiß 100%, blau 100%) und die Startzeit der nächsten Dimmphase ‚Sonnen- untergang‘ ist für 17 Uhr eingestellt, so leuchtet die HeliaLux LED in dieser Zeit (10-17 Uhr) mit 100%. Beispiel Nachtbeleuchtung: Endet die Dimmphase „Abenddämmerung“ z.B. um 20 Uhr mit der Lichtintensität von Weiß 0% , blau 30% und die Startzeit der nächsten Dimmphase „Morgendämmerung“ ist für 7 Uhr eingestellt, so leuchten die blauen LEDs der HeliaLux LED in dieser Zeit (20-7 Uhr) mit 30%. Hinweis: Die eingestellte Intensität einer Dimmphase (z.B. Morgendämmerung) wird zur jewei- ligen Endzeit der Dimmphase erreicht. In der darauf folgenden Standphase bleibt die eingestellte Lichtintensität bis zur Startzeit der nächsten Dimmphase (z.B. Sonnenauf- gang) bestehen. QuickStart HeliaLux Day+Night Control Konfigurieren der Lichtprofile (Werksseitig ist „Profil 1“ vorkonfiguriert.) Zur Konfiguration eines Lichtprofils gehen Sie bitte wie folgt vor: 1. Drücken Sie die Taste [SET], um in das Hauptmenü zu gelangen. 2. Wählen Sie mit den Pfeiltasten das Profil, welches Sie konfigurieren möchten und bestätigen Sie mit der Taste [SET]. 3. Wählen den Punkt „Profil einrichten“ und bestätigen Sie mit der Taste [SET]. 4. Konfigurieren Sie nun jede der vier Dimmphasen (Morgendämmerung, Sonnen- aufgang, Sonnenuntergang, Abenddämmerung). Wählen hierzu die gewünschte Dimmphase z.B. „Morgendämmerung“ aus und bestätigen Sie mit der Taste [SET]. 4.1 Einstellen der Start- und Endzeit - Wählen Sie den Punkt „Startzeit festlegen“ und bestätigen Sie mit [SET]. - Stellen Sie mit den Pfeiltasten die Startzeit ein. Mit [SET] wechseln Sie zwischen Stunden und Minuten. Bestätigen Sie die eingestellte Startzeit mit der Back Taste [«]. - Die Startzeit wurde gespeichert. - Wählen Sie den Punkt „Endzeit festlegen“ mit den Pfeiltasten und bestätigen Sie mit [SET]. - Stellen Sie mit den Pfeiltasten die Endzeit ein. Mit [SET] wechseln Sie zwischen Stunden und Minuten. Bestätigen Sie die eingestellte Endzeit mit der Back Taste [«]. 4.2 Konfigurieren der Lichtintensität - Wählen Sie den Punkt „Leuchtstärke festlegen“ und bestätigen Sie mit der [SET]. - Stellen Sie mit den Pfeiltasten die Intensität der weißen und blauen LEDs ein. Die auf dem Display angezeigte Lichtintensität wird während der Einstellung di- rekt durch die Leuchte wiedergegeben. - Bestätigen Sie die eingestellte Lichtintensität mit der Back Taste [«]. - Die Lichtintensität wurde gespeichert. Mit der Back Taste [«] gelangen Sie zu- rück ins Hauptmenü. Zuweisen der Lichtprofile zu den Wochentagen (Werksseitig ist allen Wochentagen „Profil 1“ zugewiesen) 1. Drücken Sie die Taste [SET], um in das Hauptmenü zu gelangen. 2. Wählen Sie mit den Pfeiltasten das Profil „Profil einstellen“, welches Sie einzelnen Wochentagen zuweisen möchten und bestätigen Sie mit der Taste [SET]. 3. Wählen Sie den Punkt „Wochentage zuweisen“ und bestätigen Sie mit der Taste [SET]. 4. Wählen Sie mit den Pfeiltasten den Wochentag aus, dem Sie das gewünschte Profil zuweisen möchten. Drücken Sie die Taste [SET] bis die Nummer des ge- wünschten Profils erscheint und bestätigen Sie mit der Back Taste [«]. 5. Die Einstellung wurde gespeichert. Drücken Sie die Back Taste [«], um zurück ins Hauptmenü zu gelangen. Shop-Modus Im Shop-Modus dimmt die HeliaLux LED in verschiedenen Lichtkonfigurationen auf und ab. 1. Über das gleichzeitige längere Drücken der Pfeiltaste ‚oben‘ und der Back Taste [«] aktivieren Sie den Shop-Modus. 2. Mit der Back Taste [«] verlassen Sie den Shop-Modus und wechseln zum Normal- betrieb. Hinweis: Die beiliegende Halterung ist für die Anbringung am Aquarienschrank vorgesehen. Die Halterung darf nicht auf oder am Aquarienrahmen angebracht werden. Inbetriebnahme Verbinden Sie die beiden Stecker (A+B) des HeliaLux Day+Night Control mit denen der HeliaLux LED Leuchte entsprechend der Abbildung und schrauben Sie den Ver- schlussring vollständig auf den Schraubstecker. Entfernen Sie den Batteriesicherungs- streifen und schalten Sie das Gerät mit der Taste [ON] ein. Auswahl der Sprache 1. Drücken Sie die Taste [SET], um in das Hauptmenü zu gelangen. 2. Wählen Sie den Punkt „Allgemeine Einstellungen“ und bestätigen Sie mit [SET ]. 3. Wählen Sie mit den Pfeiltasten „Sprache festlegen“ und bestätigen Sie mit [SET]. 4. Wählen Sie mit den Pfeiltasten Ihre Sprache aus und bestätigen Sie mit [SET]. 5. Die Sprache wurde gespeichert. Drücken Sie die Back Taste [«], um zurück ins Hauptmenü zu gelangen. Einstellen der Uhrzeit 1. Drücken Sie die Taste [SET], um in das Hauptmenü zu gelangen. 2. Wählen Sie den Punkt „Allgemeine Einstellungen“ und bestätigen Sie mit [SET]. 3. Wählen Sie mit den Pfeiltasten „Uhrzeit festlegen“ und bestätigen Sie mit [SET]. 4. Stellen Sie mit den Pfeiltasten die Uhrzeit ein. Mit [SET ] wechseln Sie zwischen Stunden, Minuten und Sekunden. Bestätigen Sie die eingestellte Uhrzeit mit der Back Taste [«]. 5. Die Uhrzeit wurde gespeichert. Drücken Sie die Back Taste [«], um zurück ins Hauptmenü zu gelangen. Einstellen des Datums 1. Drücken Sie die Taste [SET], um in das Hauptmenü zu gelangen. For further information, visit www.juwel-aquarium.com Start-up of the HeliaLux Day+Night Control Connect both plugs (A+B) of the HeliaLux Day+Night Control with the HeliaLux LED light unit and the chargers in accordance with the illustration and screw the locking ring completely onto the screw connector. Remove the battery safety strip and switch the device on with the [ON] key. Selection of the language 1. Press the [SET] key, to reach the main menu. 2. Select ‚General Settings‘ and confirm with the [SET] key. 3. Select ‚Set Language‘ and confirm with the [SET] key. 4. Select the language using the arrow keys and confirm with [SET ]. 5. The language has been saved. Press the Back key [«] to return to the main menu. Setting the time 1. Press the [SET] key, to reach the main menu. 2. Select ‚General Settings‘ and confirm with the [SET] key. 3. Select ‚Set Time‘ and confirm with the [SET] key. 4. Set the time using the arrow keys. Switch between hours, minutes and seconds with [SET ]. Confirm the set time with the Back key [«]. 5. The time has been saved. Press the Back key [«] to return to the main menu. Setting the date 1. Press the [SET] key, to reach the main menu. 2. Select ‚General Settings‘ and confirm with the [SET] key. 3. Select ‚Set Date‘ and confirm with the [SET] key. 4. Set the date using the arrow keys. Switch between days, months and years with [SET ]. Confirm the set date with the Back key [«]. 5. The date has been saved. Press the Back key [«] to return to the main men Lighting profiles Each weekday may be assigned an individual lighting profile. Each lighting profile consists of four differently adjustable dimming phases (Dawn, Sunrise, Sunset, Dusk) and the respective time periods in between (static phases). For each dimming phase, an individual start and end time may be selected, as well as the lighting intensity of the respective white and blue LEDs to be reached at the end of the relevant phase. During the static phases, these are the time periods in between the dimming phases, until the starting time of the next dimming phase, the last reached lighting intensity reached at the end of the preceding phase is maintained. Example of daytime lighting: If the ‚Sunrise’ dimming phase ends e.g. at 10:00 a.m. with a lighting intensity of 100% (white 100%, blue 100%) and the start time of the next ‚Sunset‘ dimming phase is set for 5:00 p.m., the HeliaLux LED will illuminate with 100% during this time (10:00 a.m. - 5:00 p.m.). Example of night lighting: If the ‚Dusk’ dimming phase ends e.g. at 8:00 p.m. with a light intensity of white 0%, blue 30% and the start time of the next ‚Dawn‘ dimming phase is set for 7:00 a.m., the blue LEDs of the HeliaLux will illuminate with 30% during this time (8:00 p.m. - 7:00 a.m.). Notice: The set intensity of a dimming phase (e.g. Dawn) will be reached at the end time of the respective dimming phase. In the following static phase, the set light intensity remains until the start time of the next dimming phase (e.g. Sunrise). Configuration of the lighting profiles (As a factory setting, ‚Profile 1‘ is preconfigured.) Please proceed as follows to configure the lighting profile: 1. Press the [SET] key, to reach the main menu. 2. With the arrow keys, select the profile that you want to configure and confirm with the [SET] key. 3. Select ‚Set Profile‘ and confirm with the [SET] key. 4. Now, configure each of the four dimming phases (Dawn, Sunrise, Sunset, Dusk). For this, select the required dimming phase e.g. ‚Dawn‘ and confirm with the [SET] key. 4.1 Setting the start and end time - Select ‚Set Start Time‘ and confirm with the [SET] key. - Set the start time using the arrow keys. Switch between hours and minutes with [SET ]. Confirm the set start time with the Back key [«]. - The start time has been saved. - Select ‚Set End Time‘ with the arrow keys and confirm with [SET ]. - Set the end time using the arrow keys. Switch between hours and minutes with [SET ]. Confirm the set end time with the Back key [«]. 4.2 Configuration of the lighting intensity - Select ‚Set Luminosity‘ and confirm with the [SET] key. - With the arrow keys, set the intensity of the white and blue LEDs. The light inten- sity shown on the display will be reproduced directly by the light unit during the setting. - Confirm the set lighting intensity with the Back key [«]. - The lighting intensity has been saved. With the Back key [«], return to the main menu. Assigning the lighting profiles to the relevant weekdays (As a factory setting, all weekdays are assigned to ‚Profile 1‘) 1. Press the [SET] key, to reach the main menu. 2. Using the arrow keys , select the ‚Set profile’ function, to which you would like to assign the weekdays and confirm with the [SET ] key. 3. Select ‚Assign Weekdays‘ and confirm with the [SET] key. 4. Using the arrow keys , select the weekday to which you would like to assign the required profile. Press the [SET] key until the number of the required profile appe- ars and confirm with the Back key [«]. 5. The setting has been saved. Press the Back key [«] to return to the main menu. Shop mode In Shop mode, the HeliaLux LED dims up and down in various light configurations. 1. Activate the Shop mode by keeping the ‚up’ arrow key and the Back key pressed down and [SET ] at the same time. 2. With the Back key [«], exit the Shop mode and switch to normal operation. Notice: The enclosed holder is intended for the installation inside the aquarium cabinet. The holder may not be attached to or on the aquarium frame. EN FR DE EN IT Weitere Sprachen auf der CD oder im Internet Other languages on the CD or on the Internet Altre lingue su CD o su Internet Autres langues sur le CD ou sur Internet Beispielkonfiguration Profil 1 Example configuration profile 1 JUWEL AQUARIUM AG & CO. KG Karl-Göx-Straße 1 D-27356 Rotenburg/Wümme . GERMANY Telefon +49 (0)42 61/93 79-0 Telefax +49 (0)42 61/93 79-856 Service-Hotline (0800 0278274) Service-Mail [email protected]STATIC PHASE TIME INTENSITY 100% 80% 60% 40% 24h 20h 19h 18h 17h 16h 11h 10h 9h 8h 7h 0h 20% white LEDs blue LEDs DIMMING PHASE DAWN DIMMING PHASE SUNRISE DIMMING PHASE SUNSET DIMMING PHASE DUSK STATIC PHASE STATIC PHASE STATIC PHASE B A B A ZEIT INTENSITÄT 100% 80% 60% 40% 24h 20h 19h 18h 17h 16h 11h 10h 9h 8h 7h 0h 20% weiße LEDs blaue LEDs DIMMPHASE MORGENDÄMMERUNG STANDPHASE DIMMPHASE SONNENAUFGANG DIMMPHASE SONNENUNTERGANG DIMMPHASE ABENDDÄMMERUNG STANDPHASE STANDPHASE STANDPHASE
Transcript
Mehr Informationen unter www.juwel-aquarium.com
DE
2. Wählen Sie den Punkt „Allgemeine Einstellungen“ und bestätigen Sie mit [SET].
3. Wählen Sie mit den Pfeiltasten „Datum festlegen“ und bestätigen Sie mit [SET].
4. Stellen Sie mit den Pfeiltasten das Datum ein. Mit [SET] wechseln Sie zwischen Tagen, Monaten und Jahren. Bestätigen Sie das eingestellte Datum mit der Back Taste [«].
5. Das Datum wurde gespeichert. Drücken Sie die Back Taste [«], um zurück ins Hauptmenü zu gelangen.
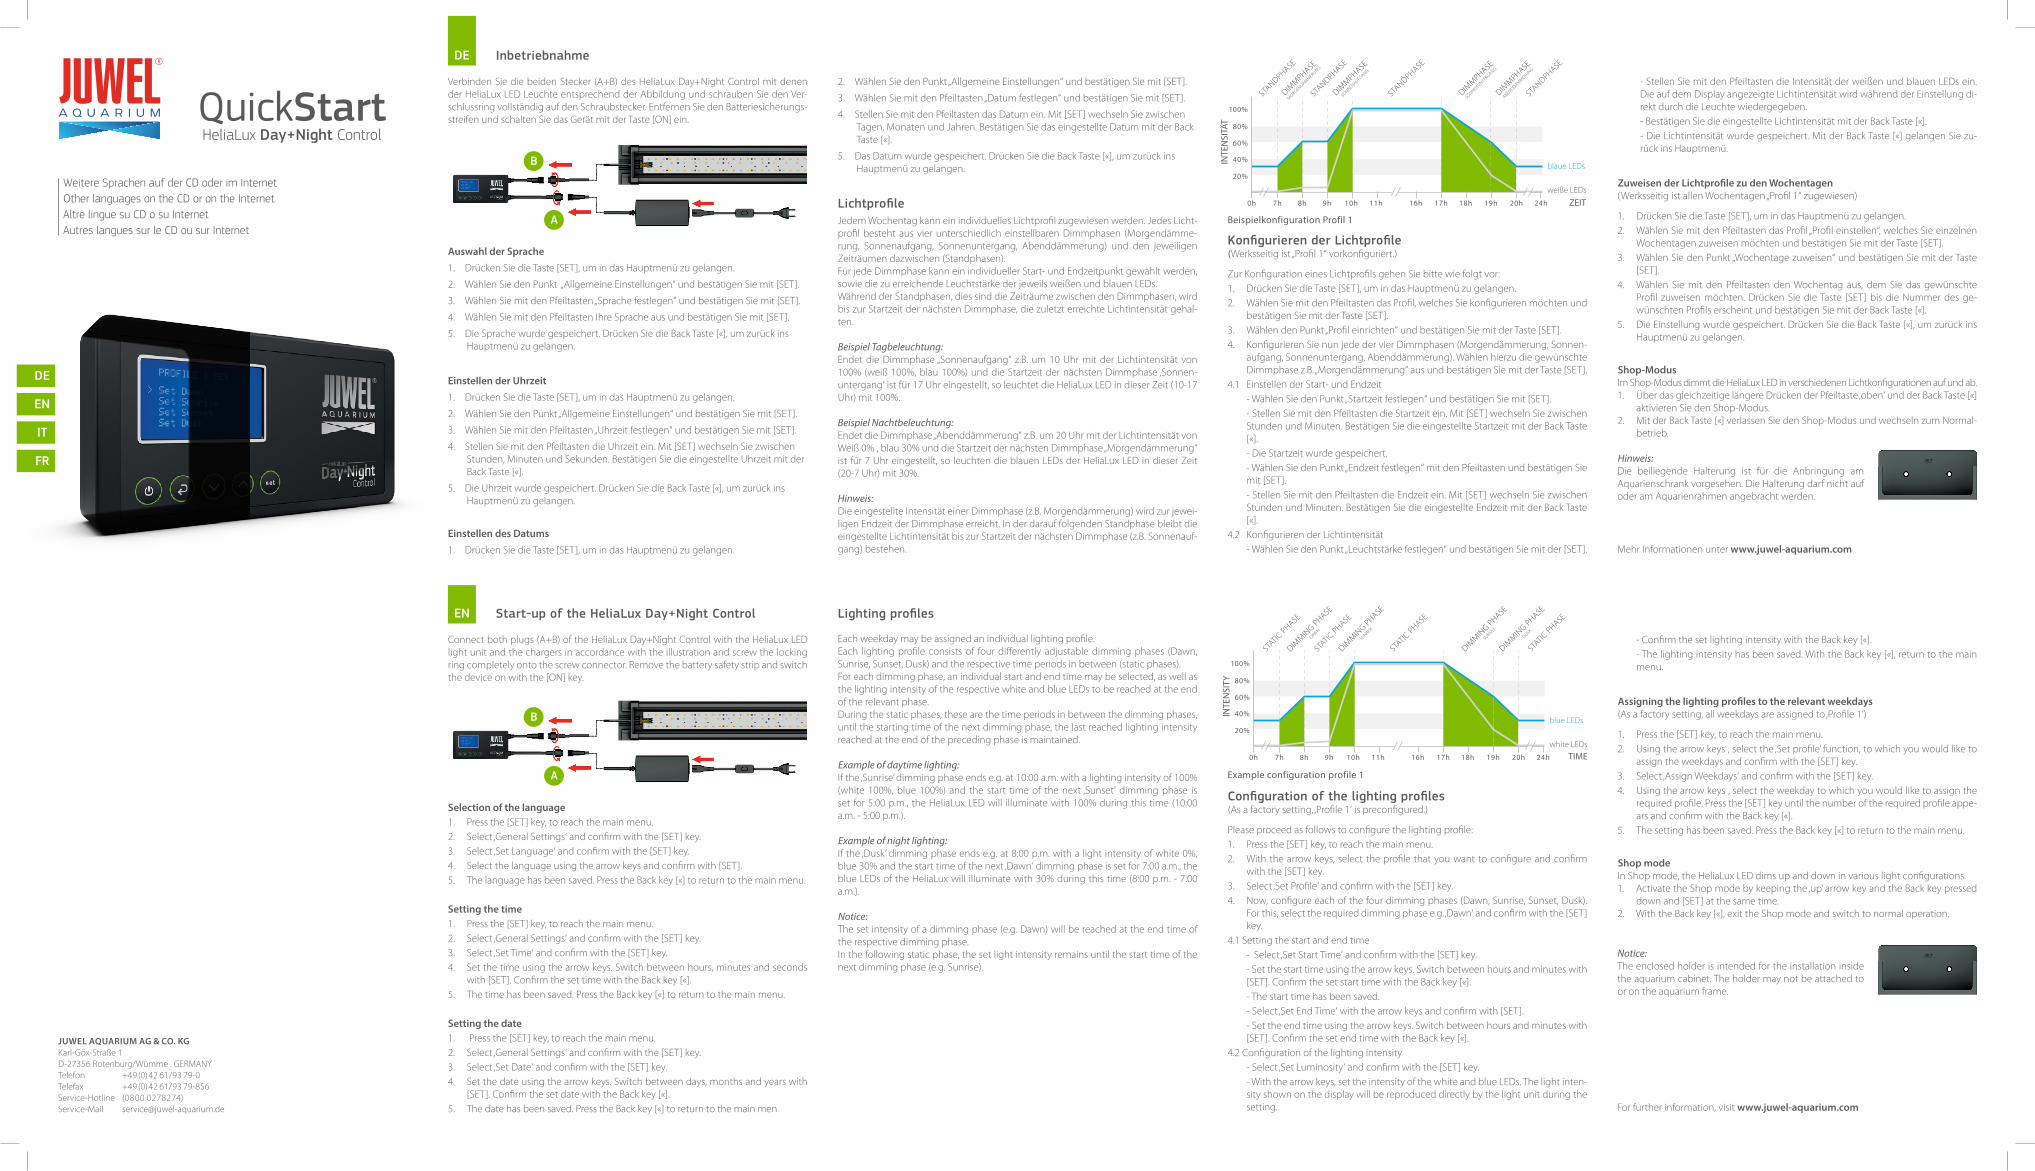
LichtprofileJedem Wochentag kann ein individuelles Lichtprofil zugewiesen werden. Jedes Licht-profil besteht aus vier unterschiedlich einstellbaren Dimmphasen (Morgendämme-rung, Sonnenaufgang, Sonnenuntergang, Abenddämmerung) und den jeweiligen Zeiträumen dazwischen (Standphasen).Für jede Dimmphase kann ein individueller Start- und Endzeitpunkt gewählt werden, sowie die zu erreichende Leuchtstärke der jeweils weißen und blauen LEDs.Während der Standphasen, dies sind die Zeiträume zwischen den Dimmphasen, wird bis zur Startzeit der nächsten Dimmphase, die zuletzt erreichte Lichtintensität gehal-ten.
Beispiel Tagbeleuchtung:Endet die Dimmphase „Sonnenaufgang“ z.B. um 10 Uhr mit der Lichtintensität von 100% (weiß 100%, blau 100%) und die Startzeit der nächsten Dimmphase ‚Sonnen-untergang‘ ist für 17 Uhr eingestellt, so leuchtet die HeliaLux LED in dieser Zeit (10-17 Uhr) mit 100%.
Beispiel Nachtbeleuchtung:Endet die Dimmphase „Abenddämmerung“ z.B. um 20 Uhr mit der Lichtintensität von Weiß 0% , blau 30% und die Startzeit der nächsten Dimmphase „Morgendämmerung“ ist für 7 Uhr eingestellt, so leuchten die blauen LEDs der HeliaLux LED in dieser Zeit (20-7 Uhr) mit 30%.
Hinweis:Die eingestellte Intensität einer Dimmphase (z.B. Morgendämmerung) wird zur jewei-ligen Endzeit der Dimmphase erreicht. In der darauf folgenden Standphase bleibt die eingestellte Lichtintensität bis zur Startzeit der nächsten Dimmphase (z.B. Sonnenauf-gang) bestehen.
QuickStartHeliaLux Day+Night Control
Konfigurieren der Lichtprofile(Werksseitig ist „Profil 1“ vorkonfiguriert.)
Zur Konfiguration eines Lichtprofils gehen Sie bitte wie folgt vor:1. Drücken Sie die Taste [SET], um in das Hauptmenü zu gelangen.2. Wählen Sie mit den Pfeiltasten das Profil, welches Sie konfigurieren möchten und
bestätigen Sie mit der Taste [SET].3. Wählen den Punkt „Profil einrichten“ und bestätigen Sie mit der Taste [SET].4. Konfigurieren Sie nun jede der vier Dimmphasen (Morgendämmerung, Sonnen-
aufgang, Sonnenuntergang, Abenddämmerung). Wählen hierzu die gewünschte Dimmphase z.B. „Morgendämmerung“ aus und bestätigen Sie mit der Taste [SET].
4.1 Einstellen der Start- und Endzeit - Wählen Sie den Punkt „Startzeit festlegen“ und bestätigen Sie mit [SET]. - Stellen Sie mit den Pfeiltasten die Startzeit ein. Mit [SET] wechseln Sie zwischen
Stunden und Minuten. Bestätigen Sie die eingestellte Startzeit mit der Back Taste [«].
- Die Startzeit wurde gespeichert. - Wählen Sie den Punkt „Endzeit festlegen“ mit den Pfeiltasten und bestätigen Sie
mit [SET]. - Stellen Sie mit den Pfeiltasten die Endzeit ein. Mit [SET] wechseln Sie zwischen
Stunden und Minuten. Bestätigen Sie die eingestellte Endzeit mit der Back Taste [«].
4.2 Konfigurieren der Lichtintensität - Wählen Sie den Punkt „Leuchtstärke festlegen“ und bestätigen Sie mit der [SET].
- Stellen Sie mit den Pfeiltasten die Intensität der weißen und blauen LEDs ein. Die auf dem Display angezeigte Lichtintensität wird während der Einstellung di-rekt durch die Leuchte wiedergegeben.
- Bestätigen Sie die eingestellte Lichtintensität mit der Back Taste [«]. - Die Lichtintensität wurde gespeichert. Mit der Back Taste [«] gelangen Sie zu-
rück ins Hauptmenü.
Zuweisen der Lichtprofile zu den Wochentagen(Werksseitig ist allen Wochentagen „Profil 1“ zugewiesen)
1. Drücken Sie die Taste [SET], um in das Hauptmenü zu gelangen.2. Wählen Sie mit den Pfeiltasten das Profil „Profil einstellen“, welches Sie einzelnen
Wochentagen zuweisen möchten und bestätigen Sie mit der Taste [SET].3. Wählen Sie den Punkt „Wochentage zuweisen“ und bestätigen Sie mit der Taste
[SET].4. Wählen Sie mit den Pfeiltasten den Wochentag aus, dem Sie das gewünschte
Profil zuweisen möchten. Drücken Sie die Taste [SET] bis die Nummer des ge-wünschten Profils erscheint und bestätigen Sie mit der Back Taste [«].
5. Die Einstellung wurde gespeichert. Drücken Sie die Back Taste [«], um zurück ins Hauptmenü zu gelangen.
Shop-ModusIm Shop-Modus dimmt die HeliaLux LED in verschiedenen Lichtkonfigurationen auf und ab.1. Über das gleichzeitige längere Drücken der Pfeiltaste ‚oben‘ und der Back Taste [«]
aktivieren Sie den Shop-Modus.2. Mit der Back Taste [«] verlassen Sie den Shop-Modus und wechseln zum Normal-
betrieb.
Hinweis:Die beiliegende Halterung ist für die Anbringung am Aquarienschrank vorgesehen. Die Halterung darf nicht auf oder am Aquarienrahmen angebracht werden.
Inbetriebnahme
Verbinden Sie die beiden Stecker (A+B) des HeliaLux Day+Night Control mit denen der HeliaLux LED Leuchte entsprechend der Abbildung und schrauben Sie den Ver-schlussring vollständig auf den Schraubstecker. Entfernen Sie den Batteriesicherungs-streifen und schalten Sie das Gerät mit der Taste [ON] ein.
Auswahl der Sprache
1. Drücken Sie die Taste [SET], um in das Hauptmenü zu gelangen.
2. Wählen Sie den Punkt „Allgemeine Einstellungen“ und bestätigen Sie mit [SET].
3. Wählen Sie mit den Pfeiltasten „Sprache festlegen“ und bestätigen Sie mit [SET].
4. Wählen Sie mit den Pfeiltasten Ihre Sprache aus und bestätigen Sie mit [SET].
5. Die Sprache wurde gespeichert. Drücken Sie die Back Taste [«], um zurück ins Hauptmenü zu gelangen.
Einstellen der Uhrzeit
1. Drücken Sie die Taste [SET], um in das Hauptmenü zu gelangen.
2. Wählen Sie den Punkt „Allgemeine Einstellungen“ und bestätigen Sie mit [SET].
3. Wählen Sie mit den Pfeiltasten „Uhrzeit festlegen“ und bestätigen Sie mit [SET].
4. Stellen Sie mit den Pfeiltasten die Uhrzeit ein. Mit [SET] wechseln Sie zwischen Stunden, Minuten und Sekunden. Bestätigen Sie die eingestellte Uhrzeit mit der Back Taste [«].
5. Die Uhrzeit wurde gespeichert. Drücken Sie die Back Taste [«], um zurück ins Hauptmenü zu gelangen.
Einstellen des Datums
1. Drücken Sie die Taste [SET], um in das Hauptmenü zu gelangen.
For further information, visit www.juwel-aquarium.com
Start-up of the HeliaLux Day+Night Control
Connect both plugs (A+B) of the HeliaLux Day+Night Control with the HeliaLux LED light unit and the chargers in accordance with the illustration and screw the locking ring completely onto the screw connector. Remove the battery safety strip and switch the device on with the [ON] key.
Selection of the language1. Press the [SET] key, to reach the main menu.2. Select ‚General Settings‘ and confirm with the [SET] key.3. Select ‚Set Language‘ and confirm with the [SET] key.4. Select the language using the arrow keys and confirm with [SET].5. The language has been saved. Press the Back key [«] to return to the main menu.
Setting the time1. Press the [SET] key, to reach the main menu.2. Select ‚General Settings‘ and confirm with the [SET] key.3. Select ‚Set Time‘ and confirm with the [SET] key.4. Set the time using the arrow keys. Switch between hours, minutes and seconds
with [SET]. Confirm the set time with the Back key [«].5. The time has been saved. Press the Back key [«] to return to the main menu.
Setting the date1. Press the [SET] key, to reach the main menu.2. Select ‚General Settings‘ and confirm with the [SET] key.3. Select ‚Set Date‘ and confirm with the [SET] key.4. Set the date using the arrow keys. Switch between days, months and years with
[SET]. Confirm the set date with the Back key [«].5. The date has been saved. Press the Back key [«] to return to the main men
Lighting profiles
Each weekday may be assigned an individual lighting profile.Each lighting profile consists of four differently adjustable dimming phases (Dawn, Sunrise, Sunset, Dusk) and the respective time periods in between (static phases).For each dimming phase, an individual start and end time may be selected, as well as the lighting intensity of the respective white and blue LEDs to be reached at the end of the relevant phase.During the static phases, these are the time periods in between the dimming phases, until the starting time of the next dimming phase, the last reached lighting intensity reached at the end of the preceding phase is maintained.
Example of daytime lighting: If the ‚Sunrise’ dimming phase ends e.g. at 10:00 a.m. with a lighting intensity of 100% (white 100%, blue 100%) and the start time of the next ‚Sunset‘ dimming phase is set for 5:00 p.m., the HeliaLux LED will illuminate with 100% during this time (10:00 a.m. - 5:00 p.m.).
Example of night lighting:If the ‚Dusk’ dimming phase ends e.g. at 8:00 p.m. with a light intensity of white 0%, blue 30% and the start time of the next ‚Dawn‘ dimming phase is set for 7:00 a.m., the blue LEDs of the HeliaLux will illuminate with 30% during this time (8:00 p.m. - 7:00 a.m.).
Notice:The set intensity of a dimming phase (e.g. Dawn) will be reached at the end time of the respective dimming phase. In the following static phase, the set light intensity remains until the start time of the next dimming phase (e.g. Sunrise).
Configuration of the lighting profiles(As a factory setting, ‚Profile 1‘ is preconfigured.)
Please proceed as follows to configure the lighting profile:1. Press the [SET] key, to reach the main menu.2. With the arrow keys, select the profile that you want to configure and confirm
with the [SET] key.3. Select ‚Set Profile‘ and confirm with the [SET] key.4. Now, configure each of the four dimming phases (Dawn, Sunrise, Sunset, Dusk).
For this, select the required dimming phase e.g. ‚Dawn‘ and confirm with the [SET] key.
4.1 Setting the start and end time - Select ‚Set Start Time‘ and confirm with the [SET] key. - Set the start time using the arrow keys. Switch between hours and minutes with
[SET]. Confirm the set start time with the Back key [«]. - The start time has been saved. - Select ‚Set End Time‘ with the arrow keys and confirm with [SET]. - Set the end time using the arrow keys. Switch between hours and minutes with
[SET]. Confirm the set end time with the Back key [«].4.2 Configuration of the lighting intensity - Select ‚Set Luminosity‘ and confirm with the [SET] key. - With the arrow keys, set the intensity of the white and blue LEDs. The light inten-
sity shown on the display will be reproduced directly by the light unit during the setting.
- Confirm the set lighting intensity with the Back key [«]. - The lighting intensity has been saved. With the Back key [«], return to the main
menu.
Assigning the lighting profiles to the relevant weekdays(As a factory setting, all weekdays are assigned to ‚Profile 1‘)
1. Press the [SET] key, to reach the main menu. 2. Using the arrow keys , select the ‚Set profile’ function, to which you would like to
assign the weekdays and confirm with the [SET] key.3. Select ‚Assign Weekdays‘ and confirm with the [SET] key.4. Using the arrow keys , select the weekday to which you would like to assign the
required profile. Press the [SET] key until the number of the required profile appe-ars and confirm with the Back key [«].
5. The setting has been saved. Press the Back key [«] to return to the main menu.
Shop modeIn Shop mode, the HeliaLux LED dims up and down in various light configurations.1. Activate the Shop mode by keeping the ‚up’ arrow key and the Back key pressed
down and [SET] at the same time.2. With the Back key [«], exit the Shop mode and switch to normal operation.
Notice:The enclosed holder is intended for the installation inside the aquarium cabinet. The holder may not be attached to or on the aquarium frame.
EN
FR
DE
EN
IT
Weitere Sprachen auf der CD oder im InternetOther languages on the CD or on the InternetAltre lingue su CD o su InternetAutres langues sur le CD ou sur Internet
Per ulteriori informazioni visitare il sito www.juwel-aquarium.com
3. Selezionare con i tasti direzionali ‚Impostazione della data‘ e confermare con [SET].4. Impostare la data con i tasti direzionali. Con [SET] si commuta tra giorni, mesi e anni. Confermare la data impostata con il tasto Indietro [«].5. La data viene memorizzata. Premere il tasto Indietro [«] per tornare il menu principale.
PROFILI LUMINOSIAd ogni giorno della settimana si può assegnare un profilo luminoso personalizzato.Ogni profilo luminoso consiste in quattro diverse fasi di variazione luce impostabili (alba, sorgere del sole, tramonto, crepuscolo) e le rispettive fasi intermedie (fasi fisse).Per ogni fase di variazione luce si può selezionare un momento di inizio e fine perso-nalizzato e l‘intensità luminosa che deve raggiungere il LED bianco e quello blu. Durante le fasi fisse, cioè i periodi tra le fasi di variazione luce, viene mantenuta l‘ultima intensità luminosa raggiunta fino alla successiva fase di variazione luce.
Esempio di illuminazione diurna: Se ad es. la fase di variazione luce ‚sorgere del sole‘ termina alle ore 10 con un‘intensità luminosa del 100% (bianco 100%, blu 100%) e l‘ora iniziale della successiva fase di variazione luce ‚tramonto‘ è impostata per le ore 17, in questo periodo di tempo (ore 10-17) il LED HeliaLux si accende al 100%.
Esempio di illuminazione notturna:Se ad es. la fase di variazione luce ‚crepuscolo‘ termina alle ore 20 con un‘intensità luminosa dello 0% per il bianco e del 30% per il blu e l‘ora iniziale della successiva fase di variazione luce ‚alba‘ è impostata per le ore 7, in questo periodo di tempo (ore 20-7) il LED HeliaLux si accende al 30%.
Avvertenza:l‘intensità impostata di una fase di variazione luce (ad es. alba) viene raggiunta alla fine della rispettiva fase di variazione luce. Nella fase fissa successiva, l‘intensità luminosa impostata rimane attiva fino all‘inizio della successiva fase di variazione luce (ad es. sorgere del sole).
CONFIGURAZIONE DEI PROFILI LUMINOSI(In fabbrica è preconfigurato il ‚profilo 1‘.)
Per la configurazione del profilo luminoso, procedere come segue:1. Premere il tasto [SET] per attivare il menu principale.2. Selezionare con i tasti direzionali il profilo che si vuole configurare e confermare
con il tasto [SET].3. Selezionare l’opzione ‚Configurazione profilo‘ e confermare con il tasto [SET].4. Configurare adesso ognuna delle quattro fasi di variazione luce (alba, sorgere
del sole, tramonto, crepuscolo). Selezionare a tale scopo la fase desiderata, ad es. ‚Alba‘ e confermare con il tasto [SET].
4.1 Impostazione dell‘ora di inizio e fine - Selezionare l’opzione ‚Impostazione dell‘ora iniziale‘ e confermare con [SET]. - Impostare l‘ora iniziale con i tasti direzionali. Con [SET] si commuta tra ore e
minuti. Confermare l‘ora iniziale impostata con il tasto Indietro [«]. - L‘ora iniziale viene memorizzata. - Selezionare l’opzione ‚Impostazione dell‘ora finale‘ con i tasti direzionali e confer-
mare con [SET]. - Impostare l‘ora finale con i tasti direzionali. Con [SET] si commuta tra ore e minu-
ti. Confermare l‘ora finale impostata con il tasto Indietro [«].4.2 Configurazione dell‘intensità luminosa - Selezionare l’opzione ‚Impostazione dell‘intensità luminosa‘ e confermare con
[SET].
- Impostare con i tasti direzionali l‘intensità dei LED bianchi e blu. L‘intensità lu-minosa indicata sul display viene riprodotta direttamente dalla lampada durante l’impostazione.
- Confermare l‘intensità luminosa impostata con il tasto Indietro [«]. - L‘intensità luminosa viene memorizzata. Con il tasto Indietro [«] si ritorna al menu
principale.
ASSEGNAZIONE DEI PROFILI LUMINOSI AI GIORNI DELLA SETTIMANA(In fabbrica viene assegnato a tutti i giorni della settimana il ‚profilo 1‘)
1. Premere il tasto [SET] per attivare il menu principale. 2. Selezionare con i tasti direzionali il profilo ‚Impostazione profilo‘ che si vuole as-
segnare ai singoli giorni della settimana e confermare con il tasto [SET].3. Selezionare l’opzione ‚Assegnazione giorni della settimana‘ e confermare con il
tasto [SET].4. Selezionare con i tasti direzionali il giorno della settimana al quale si desidera as-
segnare il profilo desiderato. Premere il tasto [SET] finché non appare il numero del profilo desiderato e confermare con il tasto Indietro [«].
5. L‘impostazione viene memorizzata. Premere il tasto Indietro [«] per tornare il menu principale.
MODALITÀ NEGOZIO Nella modalità Negozio, il LED HeliaLux aumenta e riduce la luce con diverse configurazioni.1. Premendo insieme a lungo il tasto direzionale ‚sopra‘ e il tasto di ritorno [«] si attiva
la modalità Negozio.2. Con il tasto Indietro [«] si esce dalla modalità Negozio e si ritorna alla modalità
normale.
Avvertenza:il supporto in dotazione è previsto per essere applicato sull‘armadio dell‘acquario. Il supporto non si deve fissare sul o al telaio dell‘acquario.
Messa in funzione dell‘HeliaLux Day+Night Control
Collegare i due connettori (A+B) dell‘HeliaLux Day+Night Control con quelli della lam-pada HeliaLux a LED come indicato in figura e avvitare a fondo l‘anello di chiusura sul connettore a vite. Rimuovere la striscetta di protezione dalla batteria e accendere l’apparecchio con il tasto [ON].
SELEZIONE DELLA LINGUA1. Premere il tasto [SET] per attivare il menu principale.2. Selezionare l’opzione ‚Impostazioni generali‘ e confermare con [SET].3. Selezionare con i tasti direzionali ‚Impostazione della lingua‘ e confermare con [SET].4. Selezionare con i tasti direzionali la propria lingua e confermare con [SET].5. La lingua viene memorizzata. Premere il tasto Indietro [«] per tornare il menu principale.
IMPOSTAZIONE DELL‘ORA1. Premere il tasto [SET] per attivare il menu principale.2. Selezionare l’opzione ‚Impostazioni generali‘ e confermare con [SET].3. Selezionare con i tasti direzionali ‚Impostazione dell‘ora‘ e confermare con [SET].4. Impostare l‘ora con i tasti direzionali. Con [SET] si commuta tra ore, minuti e secondi. Confermare l‘ora impostata con il tasto Indietro [«].5. L‘ora viene memorizzata. Premere il tasto Indietro [«] per tornare il menu principale.
IMPOSTAZIONE DELLA DATA1. Premere il tasto [SET] per attivare il menu principale.2. Selezionare l’opzione ‚Impostazioni generali‘ e confermare con [SET].
IT
Pour plus d’informations sous www.juwel-aquarium.com
RÉGLAGE DE LA DATE1. Appuyer sur la touche [SET] pour accéder au menu principal.2. Sélectionner l‘option de menu ‚Paramètres généraux‘ et confirmer la sélection avec [SET].3. Avec les touches fléchées, sélectionner l‘option de menu ‚Régler la date‘ et con- firmer la sélection avec [SET].4. Régler la date à l‘aide des touches fléchées. Utiliser la touche [SET] pour commuter entre les jours, les mois et les années. Confirmer la date ainsi réglée avec la touche Back [«].5. La date a été mémorisée. Appuyer sur la touche Back [«] pour retourner au menu principal.
PROFILS D‘ÉCLAIRAGE
Un profil d‘éclairage individuel peut être affecté à chaque jour de la semaine.Chaque profil d‘éclairage comporte quatre phases de variation réglables individuel-lement (aurore, lever de soleil, coucher de soleil, crépuscule) ainsi que les périodes intermédiaires (phases d‘arrêt).Pour chaque phase de variation, il est possible de sélectionner une heure de démarra-ge et une heure d‘arrêt, ainsi que l‘intensité lumineuse souhaitée respectivement pour les LED blanches et bleues. Pendant les phases d‘arrêt, c‘est-à-dire les périodes entre les phases de variation, la dernière valeur d‘intensité lumineuse obtenue est maintenue jusqu‘au démarrage de la prochaine phase de variation.
Exemple d‘éclairage diurne : si la phase de variation ‚Lever de soleil‘ prend par exemple fin à 10h00 avec une inten-sité lumineuse de 100% (LED blanches 100%, LED bleues 100%) et le démarrage de la prochaine phase de variation ‚Coucher de soleil‘ est prévu à 17h00, la galerie d‘éc-lairage HeliaLux LED fonctionne à 100% pendant cet intervalle de temps (10-17h00).
Exemple d‘éclairage nocturne :si la phase de variation ‚Crépuscule‘ prend par exemple fin à 20h00 avec une intensité lumineuse des LED blanches à 0% et des LED bleues à 30% et le démarrage de la prochaine phase de variation ‚Aurore‘ (aurore) est prévu à 07h00, les LED bleues de la galerie d‘éclairage HeliaLux LED fonctionnent à 30% pendant cet intervalle de temps (20-07h00).
CONFIGURATION DES PROFILS D‘ÉCLAIRAGE (Le ‚Profil 1‘ a été préconfiguré en usine.)
Procéder de la manière suivante pour configurer un profil d‘éclairage :1. Appuyer sur la touche [SET] pour accéder au menu principal.2. Avec les touches fléchées, sélectionner le profil à configurer et confirmer la sélec-
tion avec la touche [SET].3. Sélectionner l‘option de menu ‚Configurer le profil‘ et confirmer la sélection avec
la touche [SET].4. Configurer ensuite chacune des quatre phases de variation (aurore, lever de soleil,
coucher de soleil, crépuscule). Pour ce faire, sélectionner la phase de variation souhaitée, p. ex. ‚Aurore‘ et confirmer la sélection avec la touche [SET].
4.1 Réglage de l‘heure de démarrage et de l‘heure d‘arrêt - Sélectionner l‘option de menu ‚Régler l’heure de démarrage‘ et confirmer la
sélection avec la touche [SET]. - Régler l‘heure de démarrage à l‘aide des touches fléchées. Utiliser la touche [SET]
pour commuter entre les heures et les minutes. Confirmer l‘heure de démarrage ainsi réglée avec la touche Back [«].
- L‘heure de démarrage a été mémorisée. - Sélectionner l‘option de menu ‚Régler l’heure d’arrêt‘ et confirmer la sélection
avec la touche [SET]. - Régler l‘heure d‘arrêt à l‘aide des touches fléchées. Utiliser la touche [SET] pour
commuter entre les heures et les minutes. Confirmer l‘heure d‘arrêt ainsi réglée avec la touche Back [«].
4.2 Configuration de l‘intensité lumineuse - Sélectionner l‘option de menu ‚Régler l’intensité lumineuse‘ et confirmer la sélec-
tion avec la touche [SET]. - Avec les touches fléchées, régler l‘intensité des LED blanches et bleues. Le niveau
d‘intensité lumineuse affiché à l‘écran est directement retransmis par la galerie d‘éclairage pendant le réglage.
- Confirmer l‘intensité lumineuse ainsi réglée avec la touche Back [«]. - L‘intensité lumineuse a été mémorisée. Appuyer sur la touche Back [«] pour re-
tourner au menu principal.
AFFECTATION DES PROFILS D‘ÉCLAIRAGE AUX JOURS DE LA SEMAINE(Le ‚Profil 1‘ a été affecté à tous les jours de la semaine en usine)
1. Appuyer sur la touche [SET] pour accéder au menu principal. 2. Avec les touches fléchées, sélectionner le profil ‚Régler le profil‘ que vous souhaitez affecter aux différents jours de la semaine et confirmer la sélection avec la touche [SET].3. Sélectionner l‘option de menu ‚Affecter les jours de la semaine‘ et confirmer la sélection avec la touche [SET].4. Avec les touches fléchées, sélectionner le jour de la semaine auquel vous voulez affecter le profil souhaité. Appuyer sur la touche [SET] jusqu‘à ce que le numéro du profil souhaité s‘affiche et confirmer la sélection avec la touche Back [«].5. Les réglages ont été mémorisés. Appuyer sur la touche Back [«] pour retourner au menu principal.
Mise en service de la commande HeliaLux Day+Night Control
Raccorder les deux connecteurs (A+B) de la commande HeliaLux Day+Night Control à ceux de la galerie d‘éclairage HeliaLux LED selon l‘illustration et visser complètement la bague de verrouillage sur le connecteur à vis. Retirer la languette de protection des piles et allumer l‘appareil avec la touche [ON].
SÉLECTION DE LA LANGUE1. Appuyer sur la touche [SET] pour accéder au menu principal.2. Sélectionner l‘option de menu ‚Paramètres généraux‘ et confirmer la sélection avec [SET].3. Avec les touches fléchées, sélectionner l‘option de menu ‚Régler la langue‘ et confirmer la sélection avec [SET].4. Sélectionner la langue souhaitée avec les touches fléchées et confirmer la sélec- tion avec [SET].5. La langue a été mémorisée. Appuyer sur la touche Back [«] pour retourner au menu principal. RÉGLAGE DE L‘HEURE1. Appuyer sur la touche [SET] pour accéder au menu principal.2. Sélectionner l‘option de menu ‚Paramètres généraux‘ et confirmer la sélection avec [SET].3. Avec les touches fléchées, sélectionner l‘option de menu ‚Régler l’heure‘ et confir- mer la sélection avec [SET].4. Régler l‘heure à l‘aide des touches fléchées. Utiliser la touche [SET] pour commuter entre les heures, les minutes et les secondes. Confirmer l‘heure ainsi réglée avec la touche Back [«].5. L‘heure a été mémorisée. Appuyer sur la touche Back [«] pour retourner au menu principal.
FR
Recommandation :l‘intensité réglée pour une phase de variation (p. ex. aurore) est obtenue à la fin de la phase de variation respective. Pendant la phase d‘arrêt qui suit, l‘intensité lumineuse réglée est maintenue jusqu‘au démarrage de la prochaine phase de variation (p. ex. lever de soleil).
SHOP-MODUS En mode Shop-Modus, la galerie d‘éclairage HeliaLux LED assure la variation lumineu-se dans différentes configurations d‘éclairage.1. Activer le Shop-Modus par pression simultanée et prolongée sur la touche fléchée
‚Haut‘ et la touche Back [«].2. La touche Back [«] permet de quitter le Shop-Modus pour revenir au fonctionne-
ment normal.
Recommandation :le support fourni est prévu pour la fixation sur l‘armoire de l‘aquarium. Le support ne doit pas être fixé au-dessus ou sur le cadre de l‘aquarium.